mini quilts, quilting, Uncategorized

Modern Meets Traditional

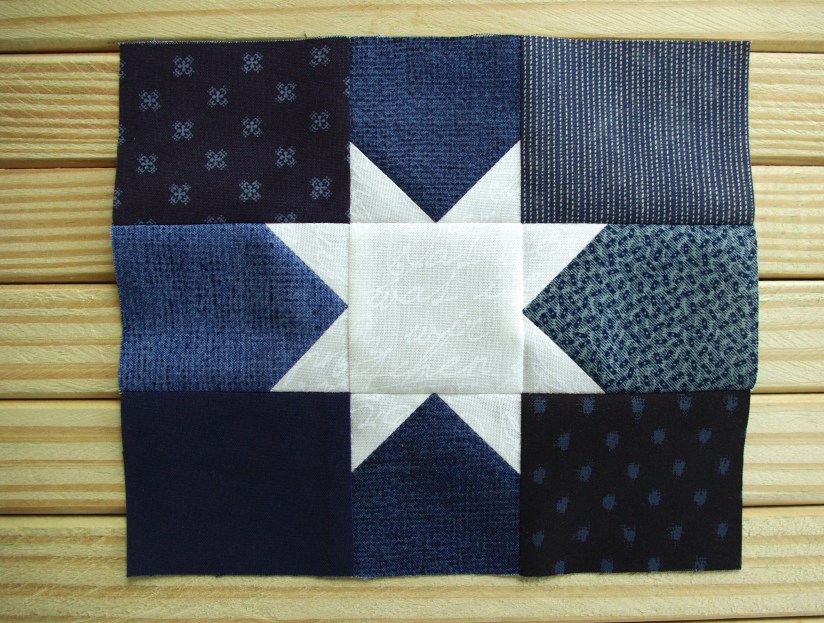
Isn’t it interesting how colors can make all the difference? Recently my son asked me to make him a mini quilt for his music room. He requested the Dutch Rose block, and for a few good reasons…he liked the center star along with how the formation around it looks ‘folded’ and of course, the block has timeless style! I couldn’t agree more.

8042_pattern_img-1

A while back I made a zippered pillow cover using the Dutch Rose block knowing that the block itself is traditional. I think the soft colors I used in my pillow accented that fact, but for this mini-quilt I wanted a modern, updated look. Masculine, too.

Overall, I find that one of the most fun parts of quilting is choosing fabrics. Sometimes I have very specific ideas, other times I forage through my (limited) stash trying to find what looks good. For this project, I knew to avoid any pastels, pinks and purples. I had just finished a quilt using Sun Print 2018 by Alison Glass for Andover Fabrics and I knew my son would like the rich, deep colors in the collection plus I had plenty leftover. After much deliberation, I narrowed it down to four hoping the combination would work.

I used Kona Cotton White for an extra pop and I quilted it with my go-to pattern, crosshatch, spacing lines 1 ½” apart, using Aurifil cotton 50wt 2024 (White).

IMGP8723

I’ve been stitching that a lot lately, and it never gets old. And I feel the color combination worked—I love it and my son was happy with it, too. I’m tempted to use these colors in a triangle quilt!

In the end, I think I achieved my goal of giving this block a mod update just by using bold, modern colors.

IMGP8713

:.,bcxz

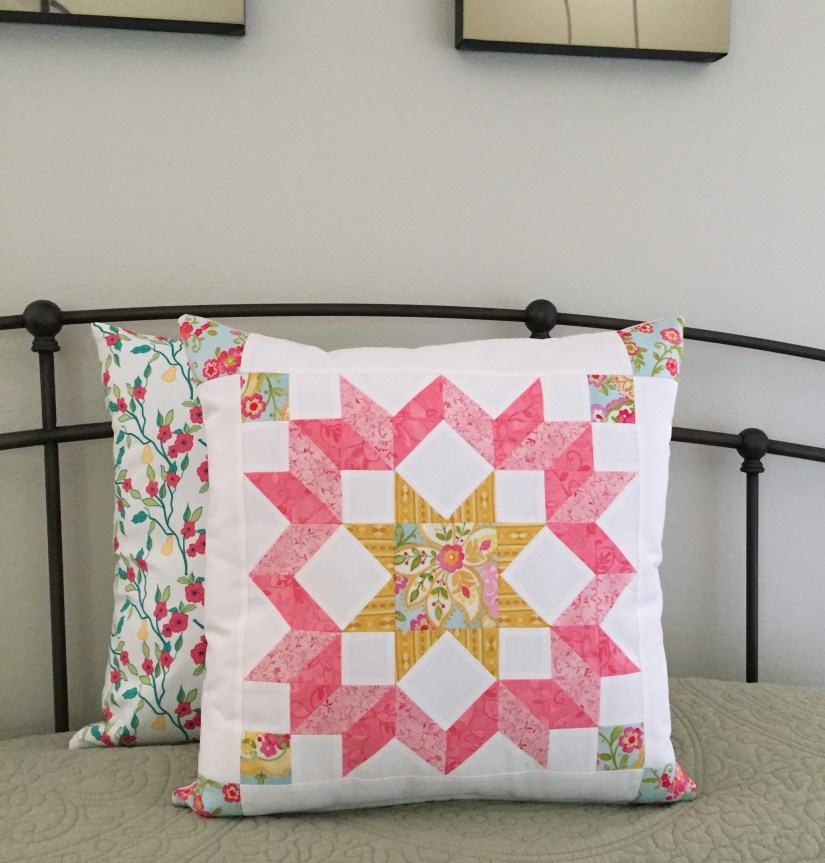
Same block, but what a different feel you get from the colors and fabrics you choose… because that’s what it’s all about, right?

mini quilts, quilts, Uncategorized

Patriotic Flag Mini Quilt

The month of May always brings out patriotism here in the US, with Memorial Day kicking off the summer season then Flag Day and the Fourth of July not too far behind. Right now I have two quilts in the making, a Christmas gift and a new pattern of mine, and I could use a break from larger projects so I set out to find something patriotic that I could finish quickly using left over fabrics.

I usually don’t sew with blue (I don’t know why, I just don’t seem to choose it) but since I made my Americana Stars & Four Patches quilt last year, I had enough blue fabric for something small. Same with red, I don’t use it a lot, but I had some on hand from previous projects plus I got a small fat quarter bundle freebie with some lovely reds included.  🙂

IMGP7940.JPG

After quite a bit of searching, I decided on a free flag tutorial from Cluck Cluck Sew. While she made a lovely pillow, I wanted something for my sewing room door so I added a light blue border and made mine a mini quilt.

IMG_7293.jpg

For the star and stripes, I used a white low volume fabric with handwriting that reminded me of old-fashioned handwritten letters and historic signatures; I thought it was fitting for a flag. It’s kind of difficult to see it unless it’s close up…

IMGP7937IMGP7939

Before I began quilting, I did some ‘thread painting’—my quilting tip that consists of laying out thread on a project to help decide on a quilting pattern. To read more about it, click here. I do tend to gravitate toward crosshatch quilting, especially on rectangular blocks because the end results are diamonds, and I love the look! So yes, I went with crosshatch quilting, yet again.

IMGP7954.jpg
thread painting

When basting a mini quilt, I always use my flower straight pins instead of actual quilting pins. Reasons being: they’re easier to put in and take out, they’re nice and sharp and long, and they seem flatter than other pins.

IMGP7979

I used my guide for quilting accuracy and it gave me very precise results!

IMGP7988.JPG

I was happy to have had enough red and white striped fabric for this project, left over from a Christmas tree skirt. And of course, striped binding is always a favorite.

IMGP8008.JPG

And speaking of binding…how lucky was I to get this tiny stripe to align when I finished off my binding? Absolutely pure luck! Doubt that ever happens again.  🙂

IMGP8022.jpg

For the back, I had this very appropriate fabric from my Stars & Four Patches quilt. As far as backing goes, it’s easy to match up prints, especially on a small project. I have more information on this topic on my Matching Fabric Patterns blog post.

IMGP8019.jpg

And…here’s the finished project!

IMGP7982.JPG

I love everything about this mini—it’s cute, a great size for my sewing room door and I can get it out to enjoy several times a year. Lastly, it was a small but significant scrap buster!

IMGP8000

Happy Memorial Day

quilting

Zippered Quilt Block Pillow Cover Tutorial

Looking for a fun and decorative way to showcase your orphan blocks? Make a zippered pillow cover! It’s quick and easy enough for beginners, and it’s a great way to use some of those set aside blocks. If you’d like something new, visit McCall’s online library of over 150 free quilt block patterns.

For a different look, I wanted my pillow front just pieced, not quilted. I also wanted to be able to change the cover for different seasons or holidays, so I added a zipper. And I made it reversible. We put lovely fabrics on the back of quilts, why not on a pillow? I used a fat quarter from the Acreage collection by Moda, it added just the right touch of color.

This tutorial is based on applying fusible fleece to the non-quilted pieced front. I knew that inserting and/or removing the pillow form would make a mess of the raw edges so I adhered fusible fleece to seal the seams and give it a smooth, crisp look. Quilting your block is certainly an option and if chosen, you can use either the batting of your choice or the fusible fleece.

Here’s what you’ll need:

Materials:

One 12 ½” x 12 ½” pieced quilt block*

Four 3 ¼” x 12 ½” rectangles for borders

Four 3 ¼” x 3 ¼” squares for border corners

-OR- One 18″ x 18″ pieced quilt block (eliminating borders/corners)

One 18″ x 18″ fabric square for backing

One 18″ x 18″ square of Pellon 987F Fusible Fleece

One 18″ x 18″ square of Pellon PLF36 Fusible Interfacing/Ultra Lightweight -OR- Pellon 906F Fusible Sheerweight

One 14″ coordinating color zipper

One 18″ x 18″ pillow form insert

* If using a block size other than 12 ½” square, adjust your border measurements accordingly. The front and back pieces measure the same size as the pillow insert so it will fit nice and snug.

Other materials needed: General sewing/quilting materials such as a ruler, cutting mat, rotary cutter, thread, scissors, pins, iron, sewing machine, zipper foot.

To make the front, I used 36 – 2 ½” half square triangles from the lovely Riley Blake collection, Floriography. I removed most of these HSTs from test blocks for reuse.

IMGP7058.JPG

I sewed the HSTs in a simple six by six layout making a 12 ½” block for the center.

IMGP7062.JPG
Tip: If you don’t use a marking system like illustrated here, it’s a good idea to take a photo once the layout is decided; it’s a helpful reference when sewing.

To reach the 18″ needed for the pillow front, I sewed one 3 ¼” x 12 ½” rectangle on each side. For the top and bottom borders, I sewed a 3 ¼” square on each end of the two remaining rectangles, then sewed them onto the top and bottom of the block.

IMGP7107.JPG

NOTE: If you are new to quilting and need instruction on making half square triangles and/or instructions on block construction, check out my Scrappy Heart Block Tutorial for general guidelines.

Before adhering the fusible fleece, trim threads off the back so nothing will show through the front.

Following the Pellon 987F Fusible Fleece instructions, iron the 18″ square onto the back of your pillow front.

IMGP7100.JPG

IMGP7110
Ironed on fusible fleece
IMGP7108

Since I used regular quilting cotton fabric for my back piece, I used lightweight interfacing to give it a bit more stiffness and weight.

IMGP7102
NOTE: You always have the option of using your choice of interfacing, or none at all. The same goes for the fusible fleece weight on the front, you can go loftier or with less loft.

Next step, sewing in the zipper. If you’re feeling intimidated by this, don’t! It’s really easy to do.

First, place your pillow front and back pieces right sides together. Make sure to note the direction of your fabrics.

Center the zipper on top of the bottom edge of the pillow. Place a pin to mark each end of the zipper. These will be guidelines on how to sew the bottom.

IMGP7230

Set the zipper aside. Using a ½” seam allowance and a standard stitch length, sew from the edge to the pin. Once you get to the pin, take a few backstitches.

At the pin, set your sewing machine to the widest stitch possible (mine was 5). Long basting stitches are used because they’ll be removed later.

Sew with a basting stitch until you get to the next pin. At the pin, reset your machine to a standard stitch length. Sew, taking a few backstitches again, to the end. Your sewn pillow bottom should look like this…

IMGP7248.JPG

Press seam open. It’s best to use a towel over the seam so you don’t get residue on your iron (like I did).

IMGP7233.JPG

Place the zipper facing down and centered onto the pressed open seam. Pin in place.

IMGP7236.JPG

Sew in the zipper using a zipper foot.

IMGP7238.JPG

If you’re new to sewing in a zipper, here are a few helpful tips:

  • Leave the zipper completely closed.
  • Start sewing at the end with the bottom stop (make sure to backstitch).
  • Sew until you are a few inches away from the zipper pull, stop with the needle down.
  • Gently unzip the zipper until it clears your foot (place the point of your seam ripper into the zipper head then use it to help slide the head out of the way). Resume sewing.
  • Sew until you reach the top zipper stops, backstitch.
  • Repeat on the opposite side.
  • Make sure the zipper pull is sticking up/out when sewing down second side.

Once the zipper is sewn in, gently remove your basting stitches with your seam ripper.

IMGP7243.JPG

Once stitches are removed and threads are cleaned up (a lint roller and tweezers help), test the zipper—it should work perfectly! To reinforce the zipper, you can sew vertical stitches at both ends.

IMGP7247

Time to sew the pillow cover closed. First, unzip the zipper at least half way. Keeping right sides together, pin the remaining three sides. With a regular foot and a standard stitch length, sew around the edges using a ½” seam allowance. To reinforce your corners, backstitch about a ½” away from each edge.

Almost there! Trim the corners so they’ll look nice and sharp when the pillow cover is right side out. You may need to use a blunt pointed object to help push out corners once turned.

IMGP7256.JPG

Also, it’s worth the few extra minutes to run a zig-zag stitch around the edges to keep them from fraying, or of course if you have a serger, it’s a great time to use it.

IMGP7262.JPG

Trim any remaining threads.  At last, turn pillow cover right side out and insert pillow form. You’re done!

IMGP7318

IMGP7321
Note: I am not endorsed by any products I have mentioned or photographed in this post; they are just items I like, use and wanted to share information on.

mini quilts, quilting, tutorials

Scrappy Heart Block Tutorial

In the spirit of upcoming Valentine’s Day, I wanted to make a scrappy heart out of fabric I had on hand; then I took it one step further and decided it would be fun to make a tutorial.

Overall, this block is perfect for the beginner quilter because it’s super easy and quick, but that doesn’t mean an experienced can’t quilter can have fun making it! It makes a great gift or a nice mini for yourself…I hope you give it a try.

To get started, choose your fabric. The pattern requires 2 ½” and 3″ squares for the heart section, also for the heart background, so strips, squares or scraps will work. I chose ten different prints as to have plenty of variety.

Materials needed: Equivalent of one fat quarter of color/print fabric in at least 3” strips or scraps for heart; one fat quarter of background fabric. General sewing/quilting materials such as a ruler, cutting mat, rotary cutter, thread, scissors, pins, iron, sewing machine.

I used fabric left over from a quilt I made myself a few years ago, Riley Blake Designs Just Dreamy 2 by My Mind’s Eye. To this day I absolutely love that quilt because the fabrics are so cute and happy, also making them perfect for this project. And the colors are great for Valentine’s Day! For the background fabric, I chose Kona Cotton White .

IMGP6885.jpg
Riley Blake Designs Just Dreamy 2 by My Mind’s Eye

Here are some general guidelines:

  • Use 1/4″ seam allowance throughout
  • Press seams open (not borders)
  • RST = Right Sides Together

Once you’ve chosen your fabric, it’s time to cut.

From printed fabric, cut:

20 – 2 ½” squares

5 – 3″ squares

From background fabric, cut:

5 – 3″ squares

2 – 2 ½” squares

2 – 2 ½” x 4 ½” rectangles

2 – 2 ½” x 12 ½” rectangles (borders)

2 – 2 ½” x 16 ½” rectangles (borders)

Next step, draw a diagonal line on the back of all five 3″ background squares in preparation for making half square triangles (HSTs).

To make HSTs: Place a 3″ background square on a printed 3″ square, RST. Sew ¼” on both sides of the drawn line. Make five.

IMGP6916

Cut on the drawn line. Press. One sewn unit will give you two HSTs, you’ll have ten total. Trim to 2 ½” square. For superior accuracy, I used my Bloc-Loc ruler; however, a regular quilter’s ruler will work fine.

IMGP6934

Time to choose your layout. I spread out my colors fairly evenly, but anything goes!

IMGP6945.JPG

Tip: It’s a good idea to take a photo of your block once the layout is decided; it’s a helpful reference tool when sewing the block together.

To make rows, sew squares together keeping in layout order. I usually press seams in opposite directions per row for nesting purposes, but because the squares are rather small, open pressed seams will help reduce bulk. The block will lay flatter having done so.

Keeping your rows in correct order, sew together in pairs, and then sew pairs together. I used a pin at every seam so they’ll line up nicely.

IMGP6959.JPG

Results from all that pinning!

IMGP6962
IMGP6969

With your block sewn and pressed (measuring 12 ½” square), the next and final step is attaching the borders. Pin one  2 ½” x 12 ½” rectangle to each side of the heart. Sew*, press toward border.

*Tip: When sewing on borders, place them on the underneath side of the block (feed dogs side) to avoid sewing pressed seams in the wrong direction. Also, if your border is a bit longer (as mine was), the feed dogs will help ease in the extra length.

Attach one 2 ½” x 16 ½” rectangle to both the top and bottom of the heart block. Press toward border.

And done!

IMGP7004.jpg

Block measures 16 ½” square.

I haven’t decided what I am going to do with mine, there are so many options! I could make it into a pillow, a quilted mini or add others to it and make it into a quilt. Also, be sure to trim all the threads off the back before doing anything; it’s a terrible task but makes all the difference.

Tip: Since I used 5″ squares, I had leftover pieces from cutting the 3″ squares. To reduce waste, I cut them into 1 ½” squares so I could use them in future projects.

Happy Valentine’s Day

Note: I am not endorsed by any products I have mentioned or photographed in this post; they are just items I like, use and wanted to share information on.