With the summer season upon us and picnics in the forecast, I thought it would be a great time to offer my Fabric Utensil Wrap Tutorial as a downloadable PDF. I’d had some inquiries about making this a PDF and since I, too, enjoy having tutorials on my computer, I went ahead and created one to share.
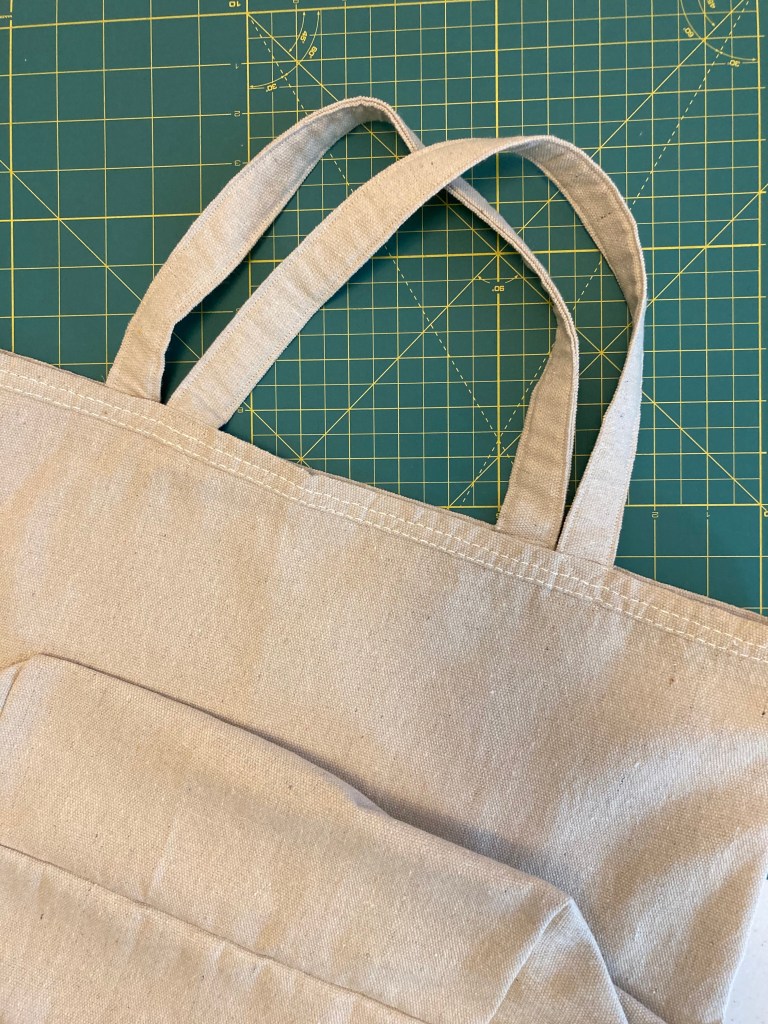
The winter months are a great time to catch up on projects you’ve been planning but have been putting off for a while. In my case it was making reusable grocery bags out of canvas.
To get started, I didn’t want to spend a lot of money, and high quality canvas wasn’t really necessary so I purchased a durable canvas drop cloth (for around $9) which saved me at least half. The weave was comparable to fabric off the bolt, so it was a win-win.
Because I was using cotton, I was able to press seams with an iron and I used my hot ruler for accuracy.
I also had the issue of fraying, so once the seams were sewn and the body portion of the bag was assembled, I ran a zigzag stitch along all the raw edges. A serger would work nicely if you’ve got one.
Notice the nice hem along the top? When cutting, I planned to have the factory sewn edge up top for a professional look. It was also a more substantial edge for attaching the handle and it added extra durability.
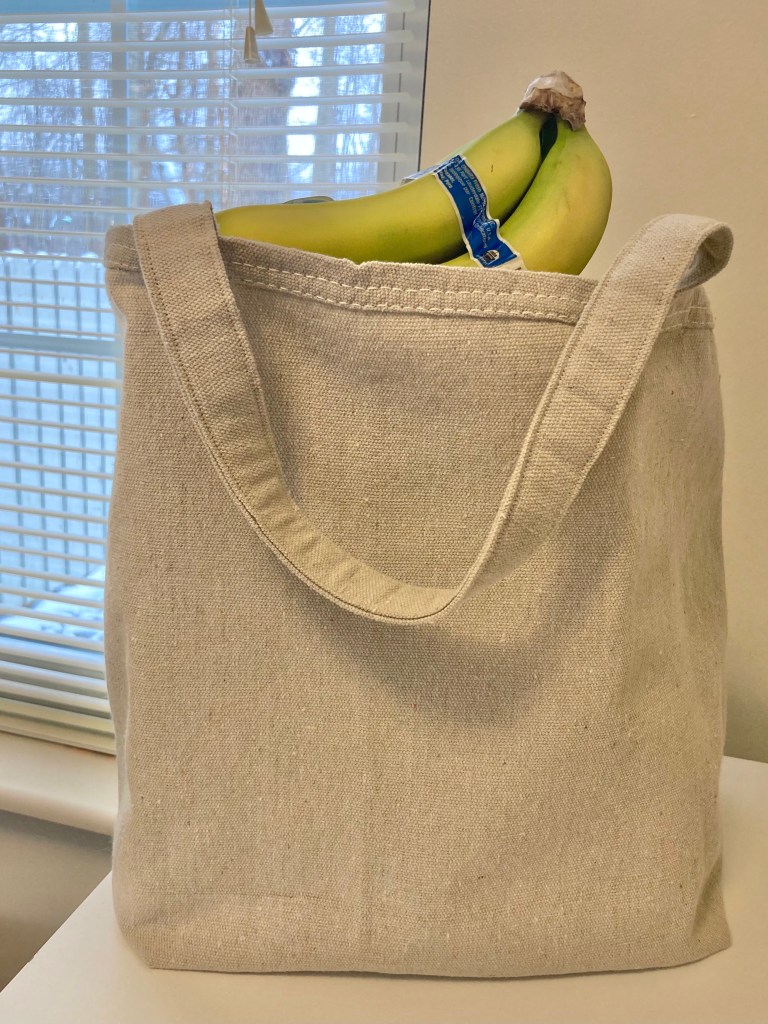
Overall, the tutorial allowed me to achieve the same results just with different materials. If you decide to make your own reusable bags, I should point out a few things regarding plastic vs. canvas.
First of all, the canvas bags won’t stand up like plastic! But they’ll definitely last longer and they can be laundered which is a definite plus.
With both types, you’ll want to be sure to add something to the bottom for support. I used fitted cardboard to give the bags a more defining shape and added strength.
My husband does the grocery shopping (he actually likes to) 🙂 and he loves these bags. And of course, if it’s green and eliminates plastic waste I’m all about it!
From start to finish, these bags (I made 3) took just a few hours and they’re a really easy make.
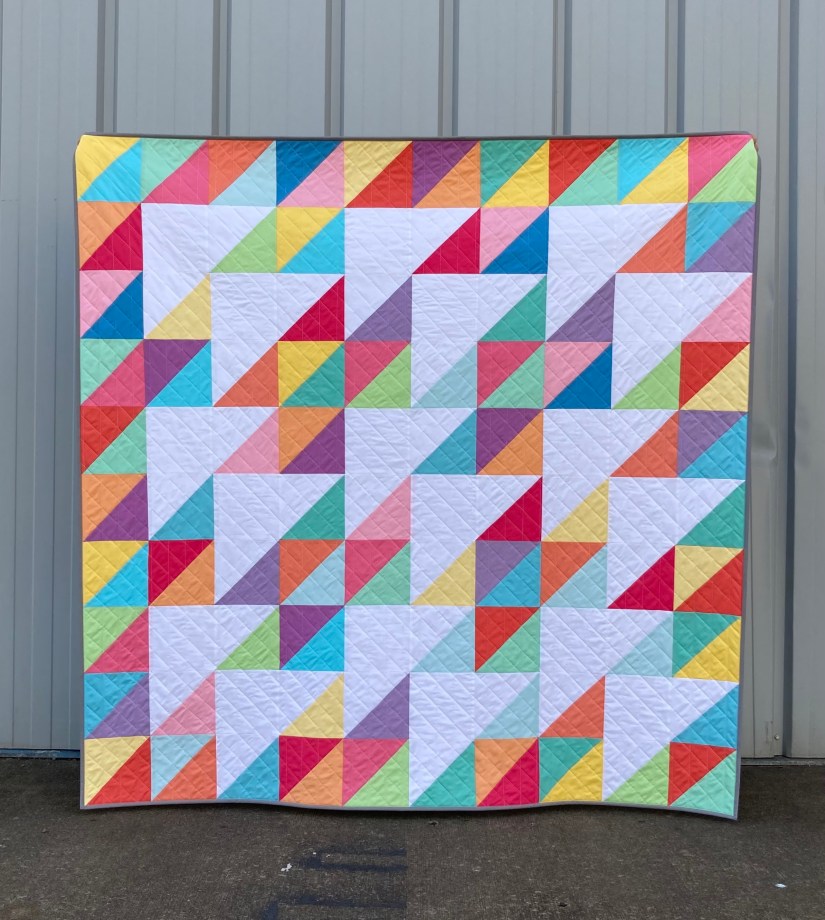
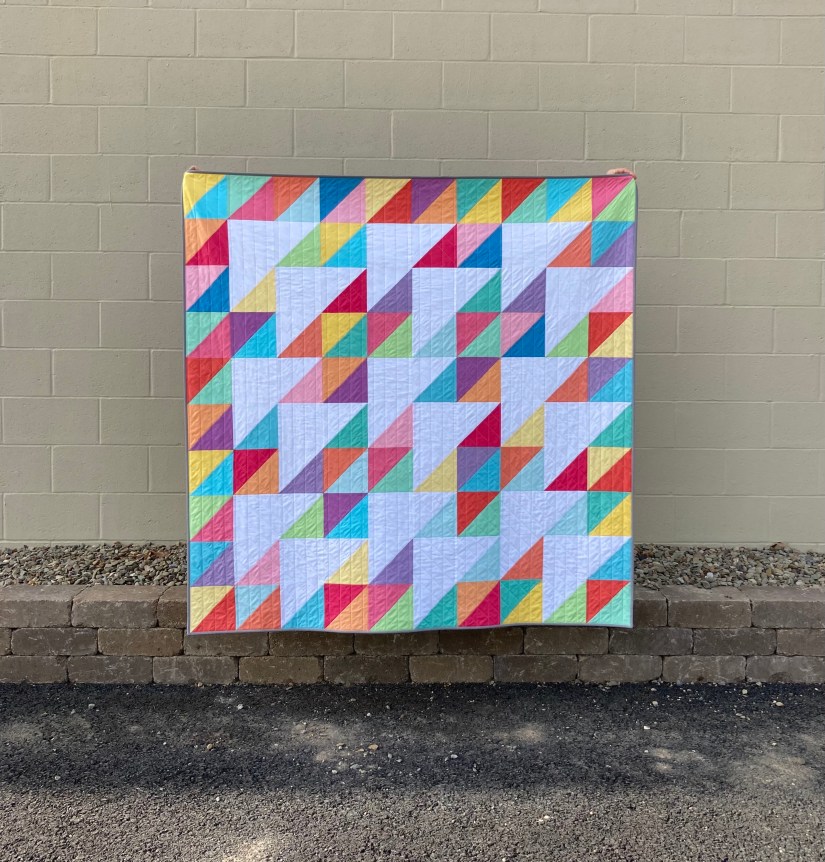
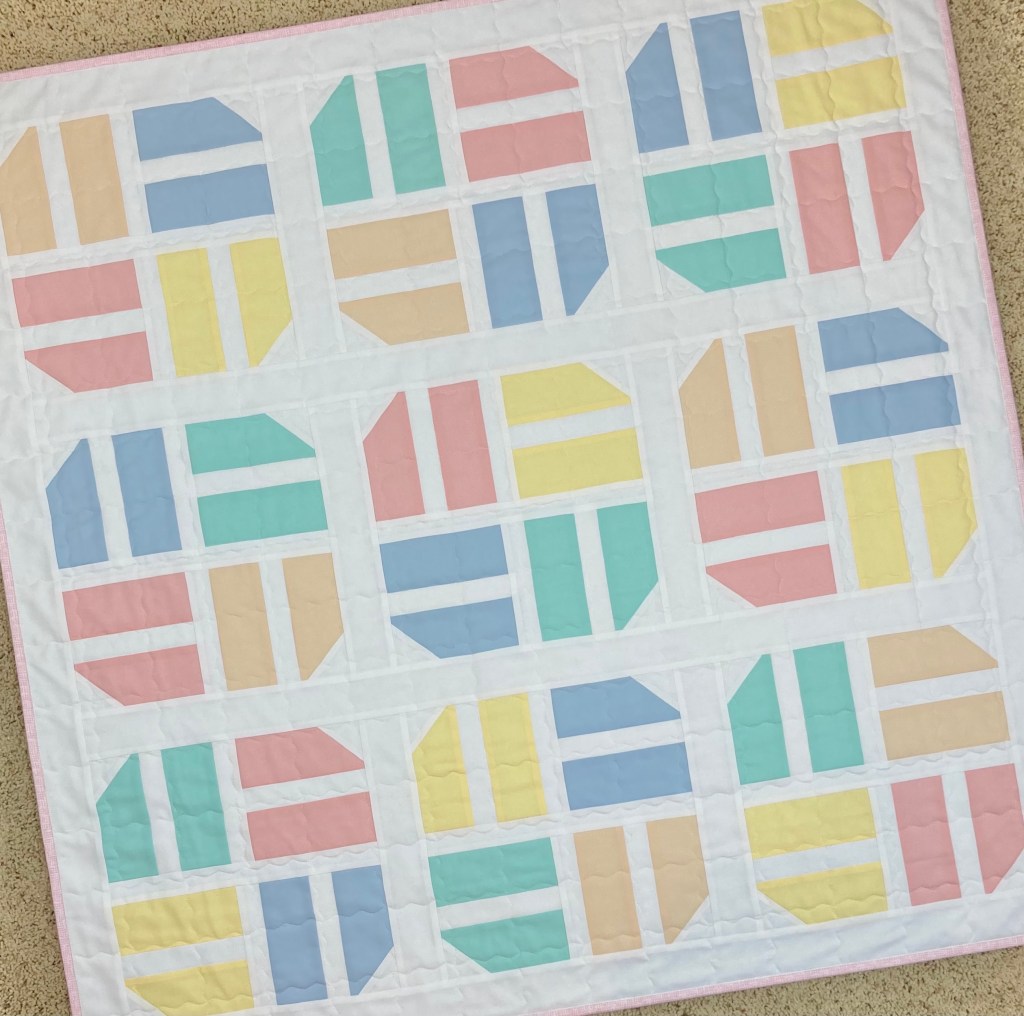
My first quilt pattern of the year is here! Triangle Twizzle is available as a PDF download for purchase in my Etsy shop. This quilt is easy, fun and a quick sew for quilters of all skill levels.
In fact, it’s so easy a beginner quilter could make it in no time! The pattern is written for a 10″ square stacker / layer cake with a bit of yardage needed for the large white triangles.
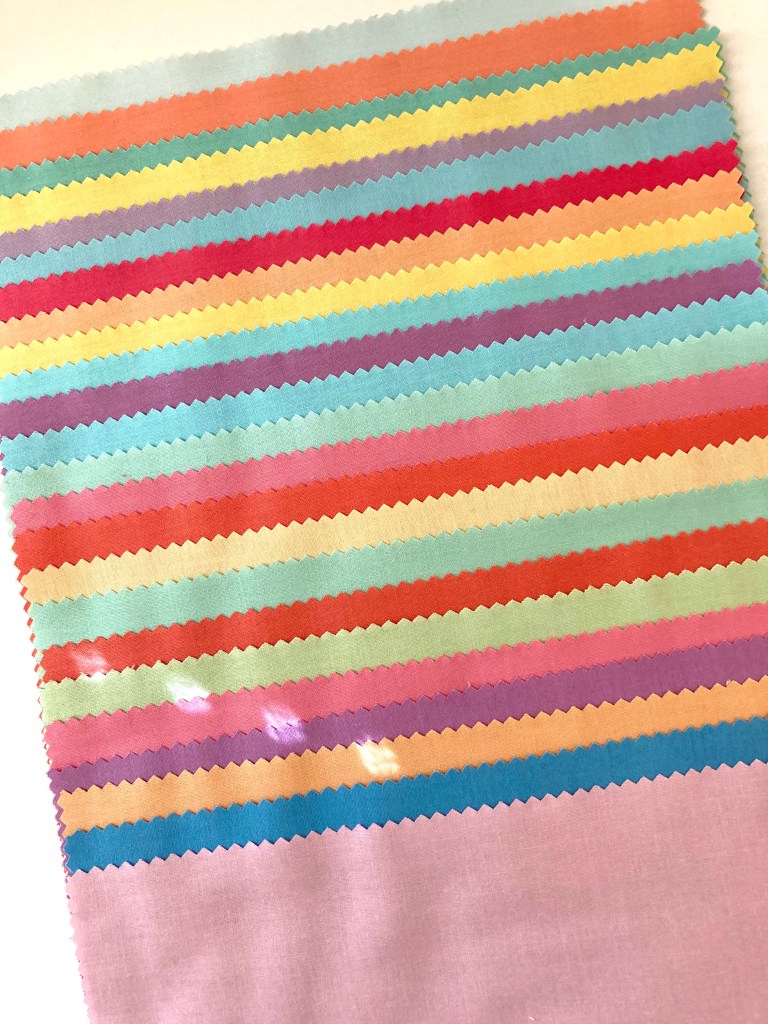
I made mine using Riley Blake’s Pastels for a bright, cheerful look.
But the color choices are endless, making it such a versatile quilt. Can you imagine one in various shades of a single color, Christmas colors, Halloween colors or rich fall hues? Anything goes!
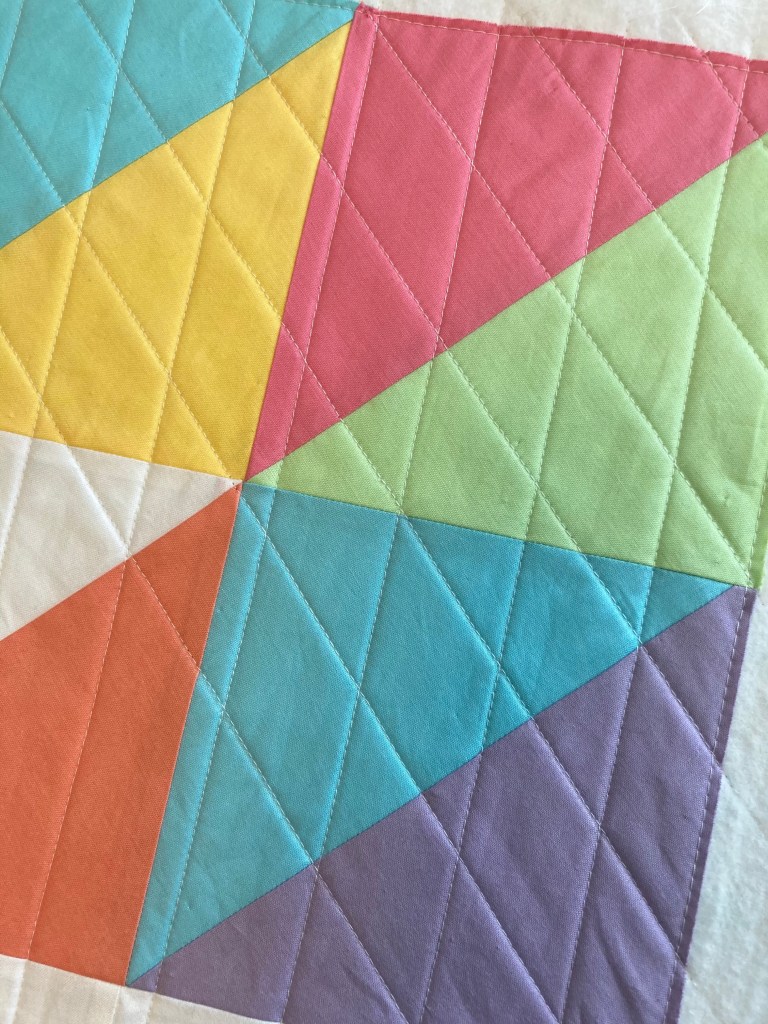
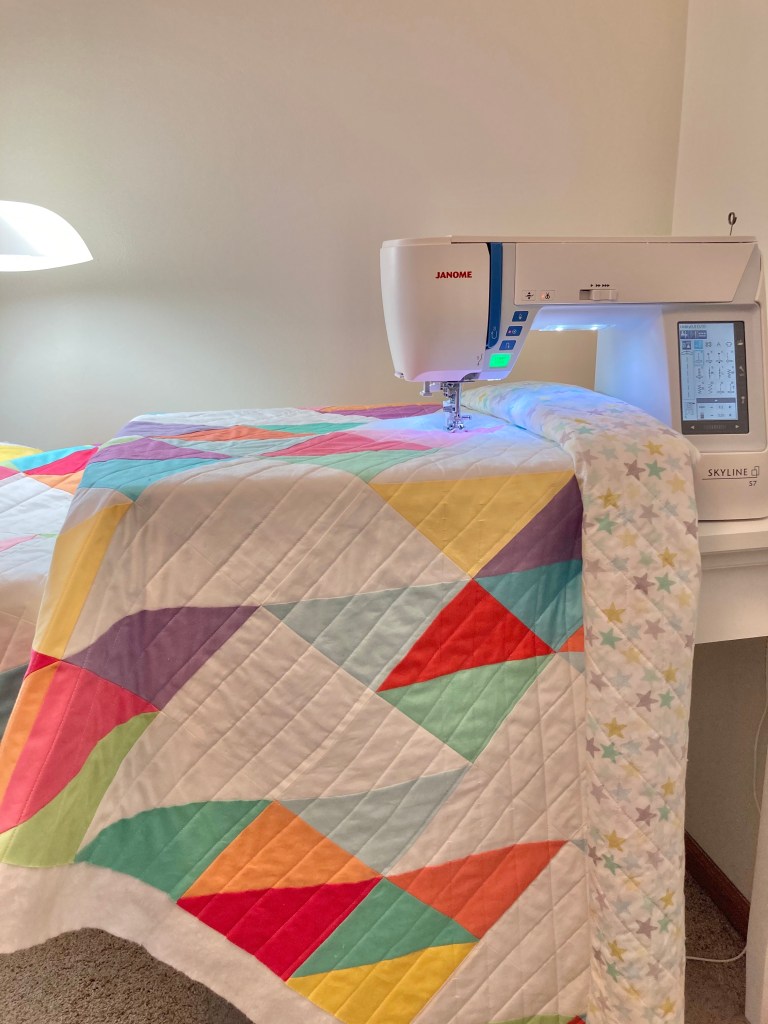
In keeping with the modern vibe, I quilted mine with a vertical straight line every 1 1/2″ then I quilted straight lines on a 45° angle going the opposite direction of the HST seams. I love the parallelograms.
While I had to run the quilt through my machine over and over (and over) which took a huge amount of time, I’m really happy with the results.
With three sizes to choose from and color options galore, I hope there’s a Triangle Twizzle quilt in your future!
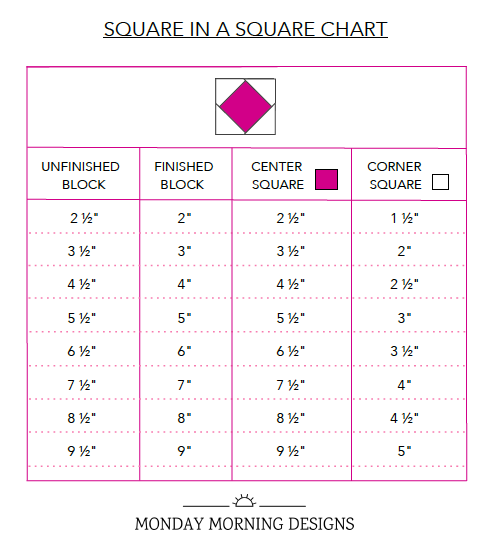
One of my latest patterns calls for a Square in a Square unit that I incorporate into a block. Since I’ve used these units in the past as well, I thought it would be a good time to create a Square in a Square cutting and sizing chart as a reference guide.
With this chart you won’t have to waste time figuring out the math, it’s all right here. 🙂
Like all charts I have available, this Square in a Square Chart can be downloaded as a PDF. Whether you save a copy onto your computer or keep a printed copy, it’s a great tool to have on hand!
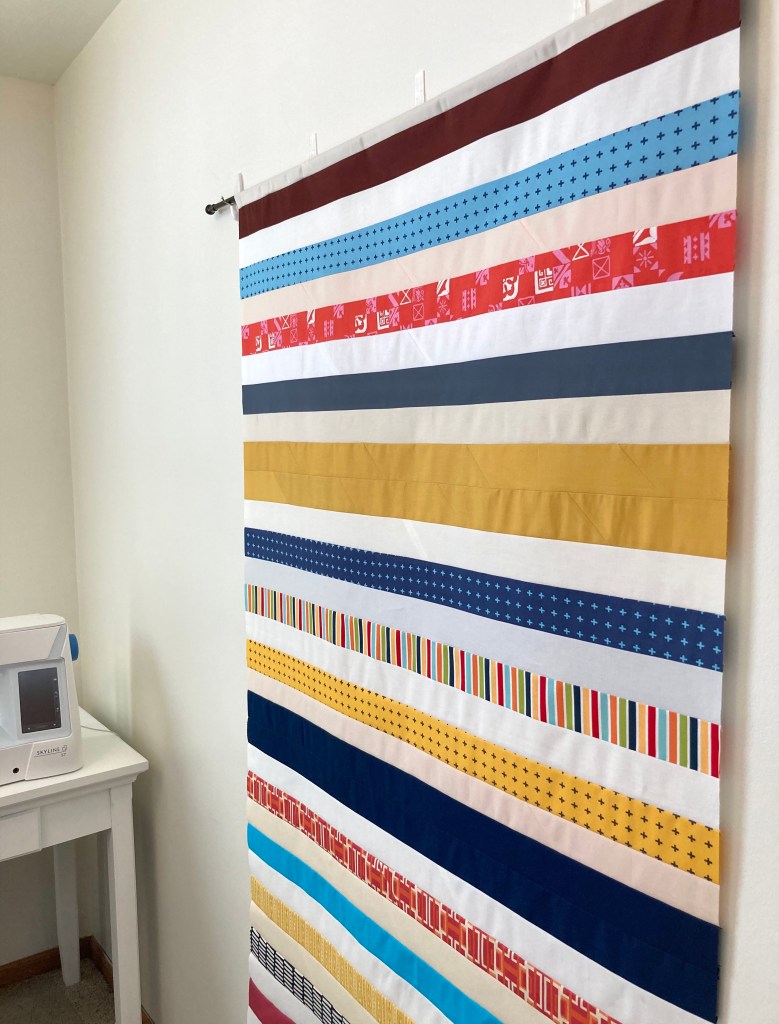
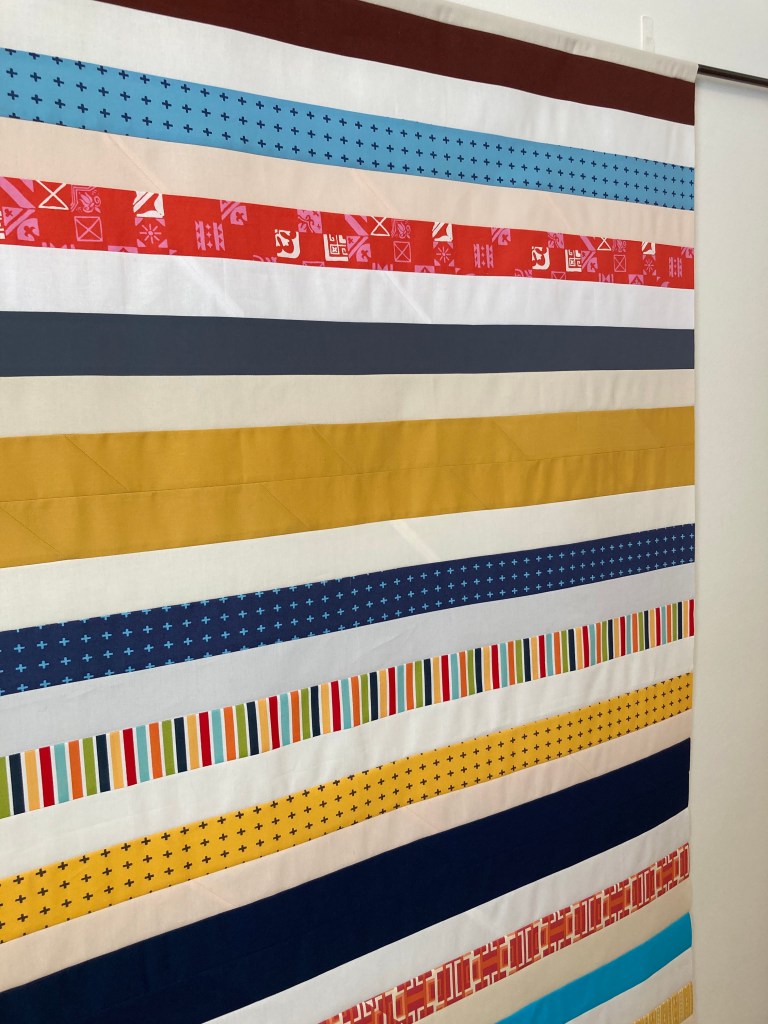
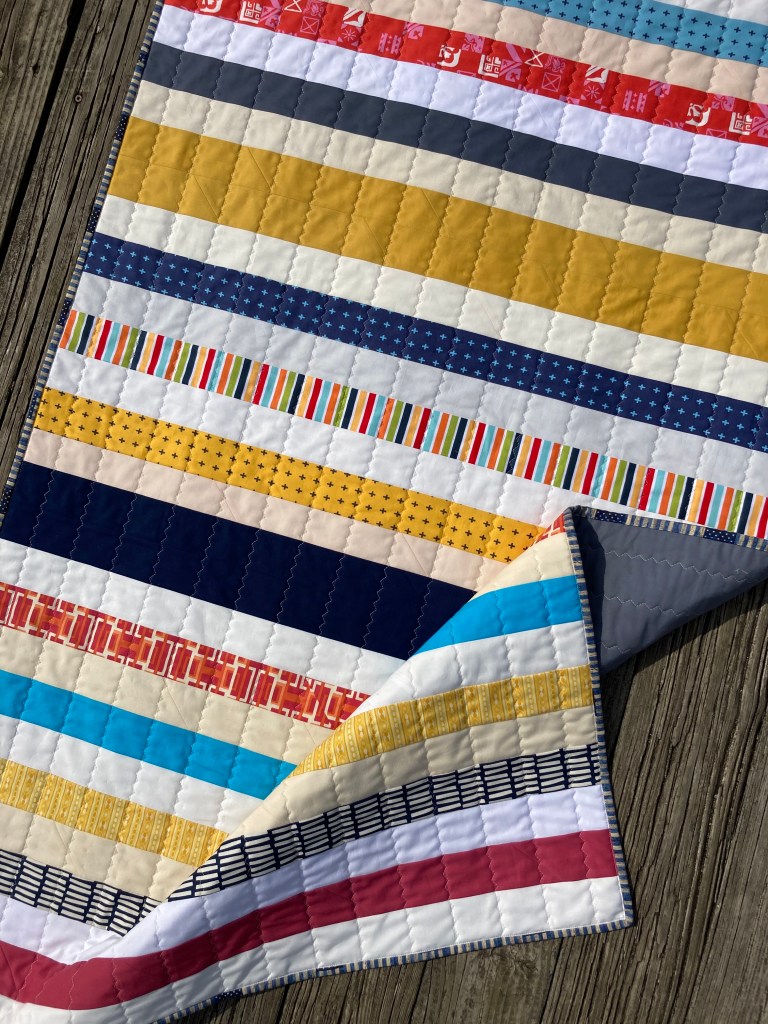
A few weeks ago my daughter requested a quilt specifically for outdoor use. Even though she has a few others I’ve made her, she doesn’t want to use them outside so of course I agreed to make another one. 🙂 We both decided that a scrappy, use-whatever-I-have quilt about the size of an extra large beach towel would work just fine; an approximate size of 36″ x 60″.
Since ‘beach towel’ was mentioned in our conversation, I got to thinking along those lines and decided to go with a strippy theme by using WOF 2 1/2″ strips leftover from other projects. Having recently reorganized all my fabric, I had a good idea of what was what in my stash, so I pulled a variety of print strips that would coordinate, along with all the solid 2 1/2″ strips I had.
To start, I trimmed the print strips to 37 – 38″ so I wouldn’t have to be overly concerned about lining up edges perfectly when sewing, and it would also allow for some wiggle room when trimming the top to its final size. Some of the solids were 2 1/4″ strips and needed pieced to get to the required length. But since this was an improvised project, I figured anything goes!
My layout consisted of alternating light and dark colored stripes, varying the placement of prints and solids. I had enough strips of solid navy blue and gold to make one 4 1/2″ wide strip of each. To add a bit of interest to the design, I placed one wide strip about 1/3 of the way down and the second wide strip about 1/4 of a way down from that.
I pressed all my seams to the dark fabrics, and trimmed the top to 36 1/2″ wide once all the strips were sewn. The length ended up at 60 1/2″.
Here’s the finished quilt top…
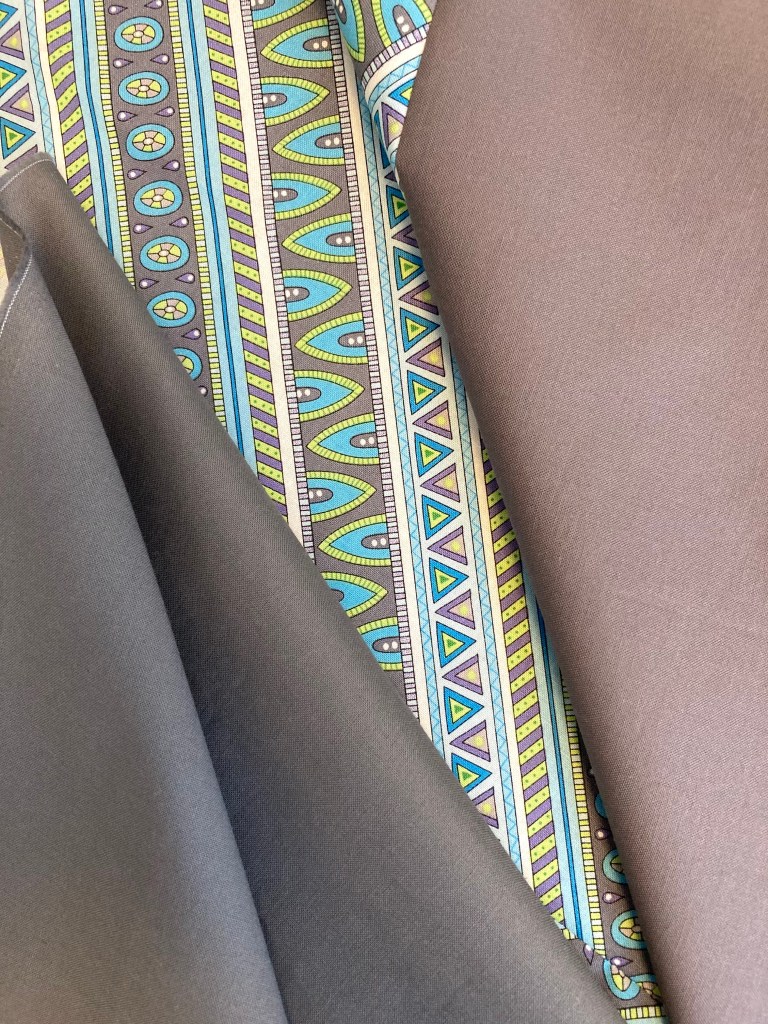
For the backing, we decided dark colors would be best since the quilt will be used on the ground. I pieced together various gray fabrics along with a colorful blue/gray diagonal print.
Did you ever have a quilt that you considered an ‘I always wanted to do that’ quilt? This was one for me. I’ve always wanted to make a strippy quilt, improvise a quilt, and quilt using a zigzag stitch. I figured this was the perfect time to do them all.
For the quilting, I set my machine on the zigzag setting with three stitches per zig. Or zag? 🙂 I tested out a few different sizes before I began, deciding on a rather petite stitch that was fun to sew. As always, I pin basted and used a hera marker for marking lines (every 2″). I really like how it turned out.
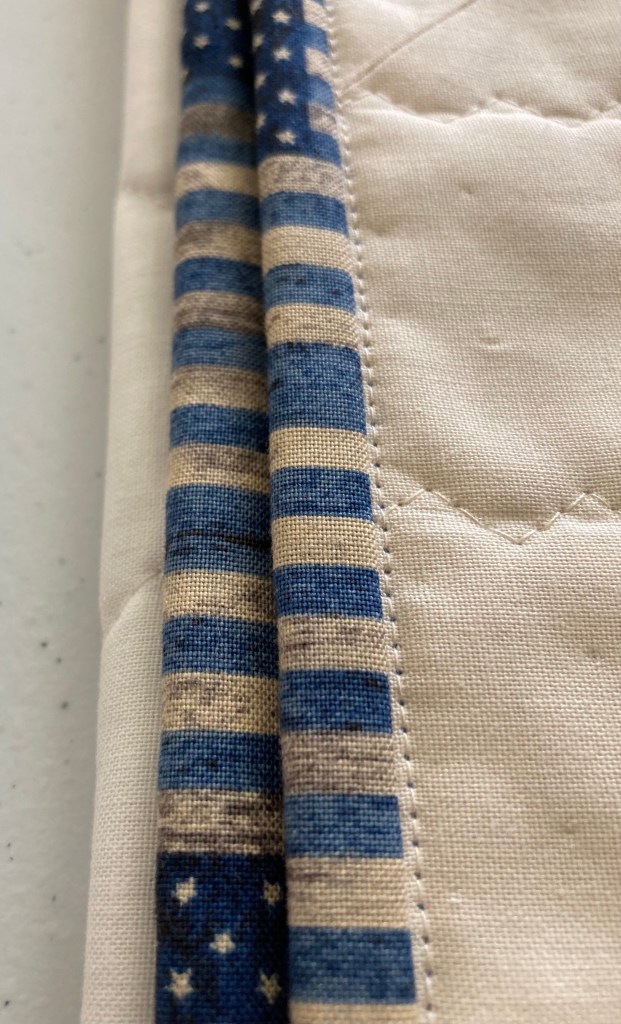
To finish, I used a blue and tan flag print for the binding, mainly because I wanted to use the last of this fabric and I thought the stripes would show up nicely. Plus, everyone loves striped binding, right?
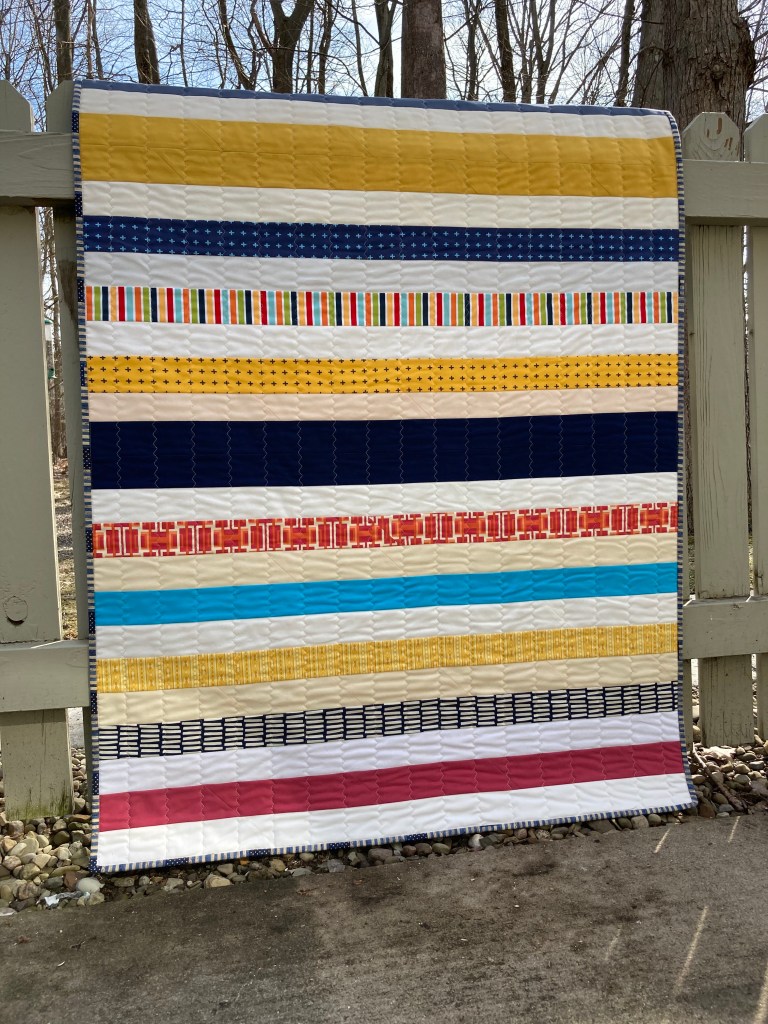
Here’s the finished quilt! And I’m happy to say I bought nothing to make this one. I even pieced the batting and used thread that I’d had for a few years now.
If you want to make a small, striped quilt for indoor use or out, here’s a layout of the one I made. Overall, there are twenty-seven (approximately) 2 1/2″ strips and two 4 1/2″ strips. This is just a guideline, you certainly can add or take away as needed.
finished size 36″ x 60″
Now it’s time to send it off for the new owner to enjoy!
If you happen to follow me on Instagram, you may have seen a post or two with me griping about cutting threads off the back of quilt tops. I’ve probably even mentioned it on blog posts too, as it’s the absolute worst step in the quilting process, I think anyway!
Not only is this step tedious, it’s really time consuming. On some quilt tops, I’ve literally spent 8-10 hours trimming threads. That’s a lot of hours! But I look at it this way, if I’ve spent a ton of money, time and energy making a quilt, I might as well do it right. Plus I want my quilts to be as best as they can be.
My longarmer told me about quilters who skip this step, and why they shouldn’t. One main reason is that if a light background fabric is used, all those threads on the back will show against it, especially the darker colored ones. Also, uncut threads will most definitely ruin the smoothness of the front. Whatever is left uncut on the back is sure to make a lumpy and bulky front, and that’s not a good look.
Secondly, longarm quilters don’t like getting tops full of uncut threads because it’s going to make their job look messy, even if they’re a great longarmer. I guess it’s kind of quilting etiquette. 😉
Here’s a look at a quilt top back I’ve recently finished trimming, before and after. What a difference!
All that trimming made for a nice, fresh front. It was definitely worth the effort.
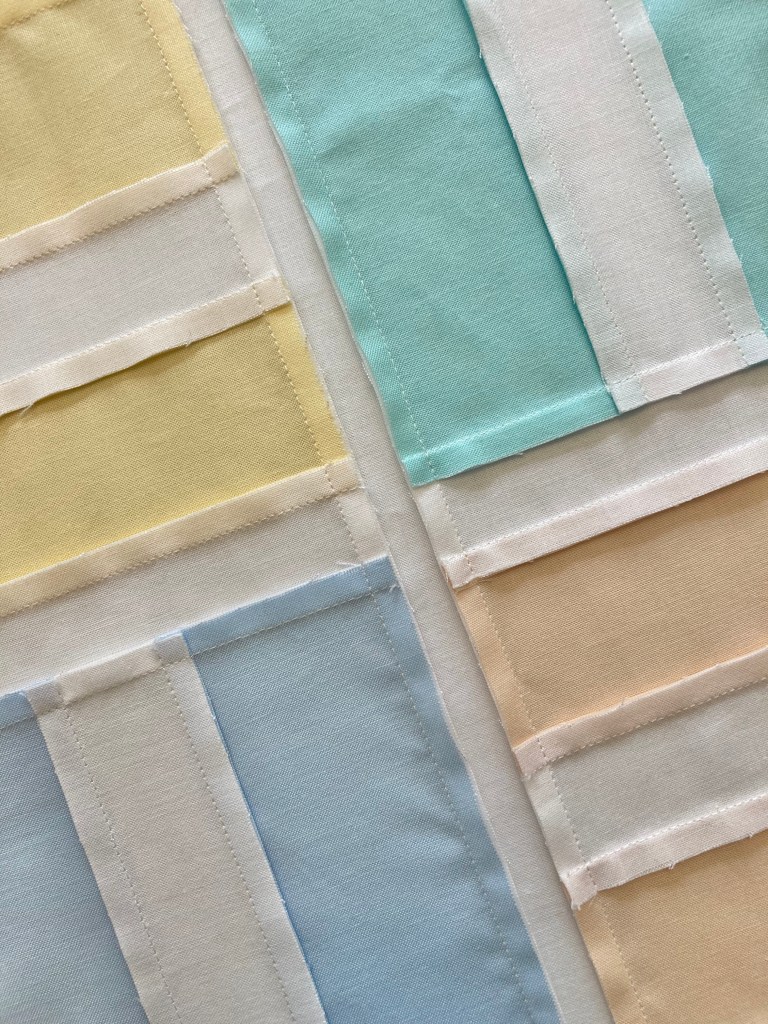
And here’s the finished quilt. Even though I used pastel solids, threads left uncut would have certainly shown through on the white fabric. (Pattern is Sweet Stripes. This baby quilt is currently for sale in my Etsy shop)
So the next time there are threads to be cut, I’ll do the lousy task and try to tone down my complaining…I guess it’s not all that bad once I get started…plus my quilt top AND longarmer will thank me. 🙂
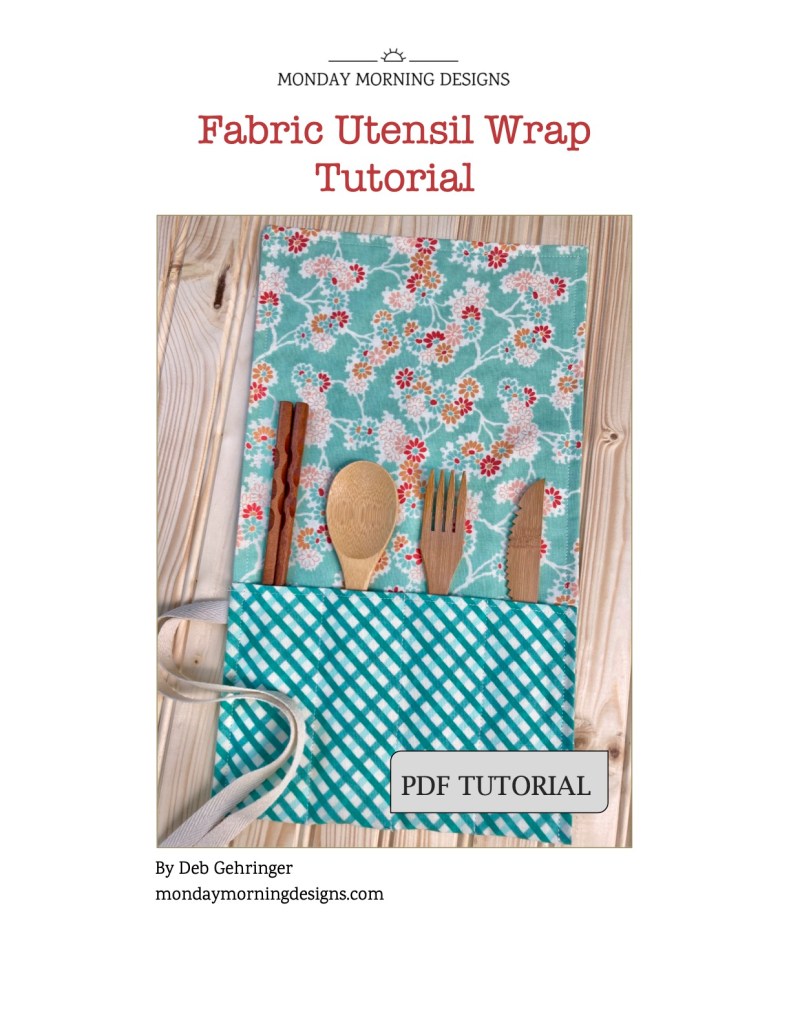
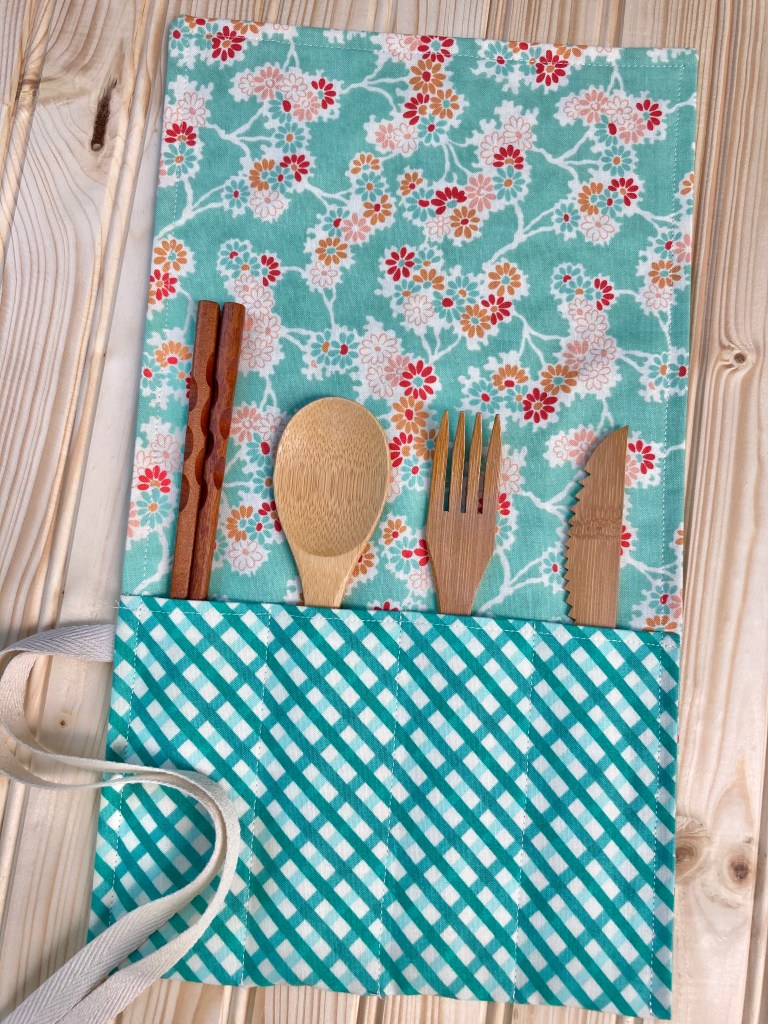
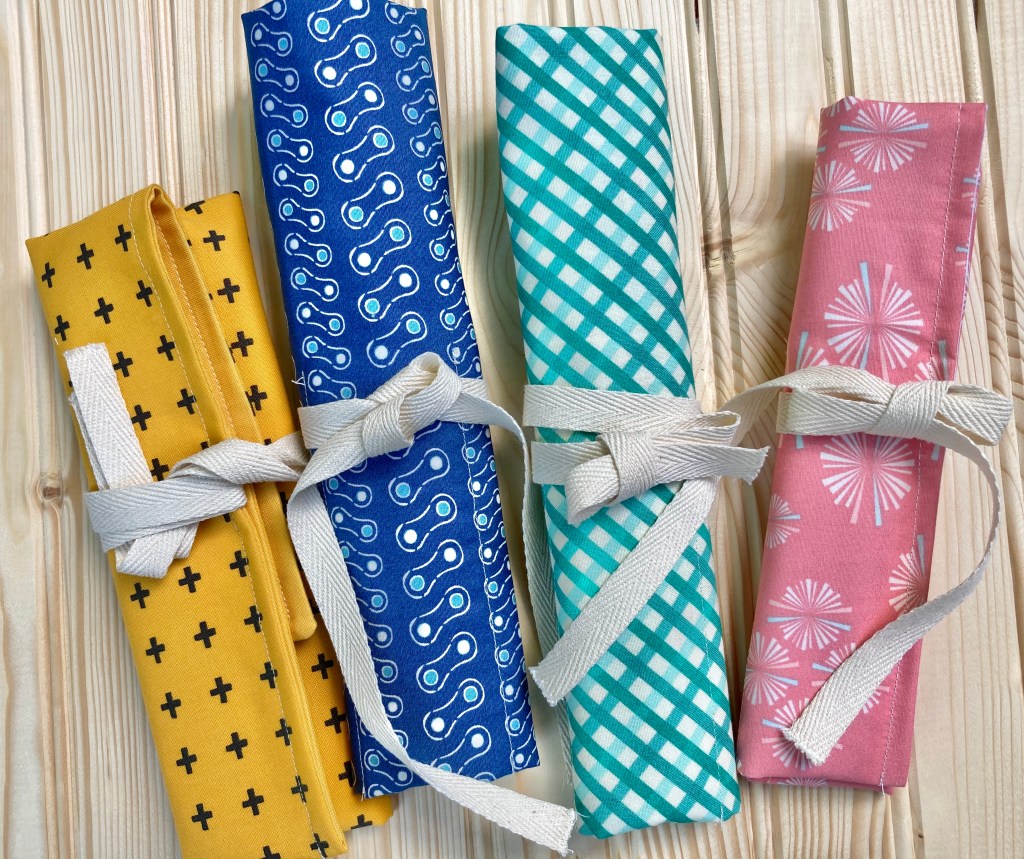
Every year I look for handmade gifts to make my family for Christmas, usually it’s a quick sewing project and sometimes it’s not even quilting related. 😉 Last year I stumbled across a neat item that doesn’t require a lot of time or materials—a fabric utensil wrap. They’re great for picnics, work lunch or any meal on the go!
If you’re like me and are always finding ways to reduce plastic waste, these eco-friendly, reusable wraps are the perfect solution. If it’s good for the earth I’m sold, so I decided to make one for each of us, myself included. I also went extra green by opting for bamboo utensils.
Since these wraps were so well received, I thought I’d write a tutorial to help pass along the idea. Here’s what you need and what you have to do:
MATERIALS
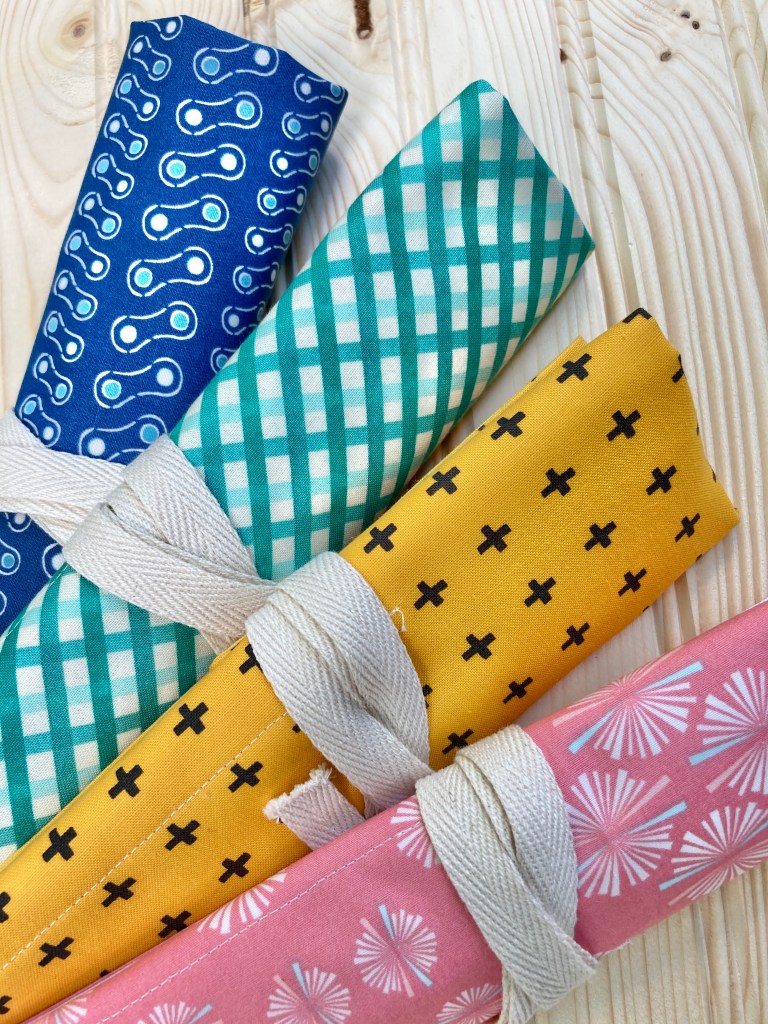
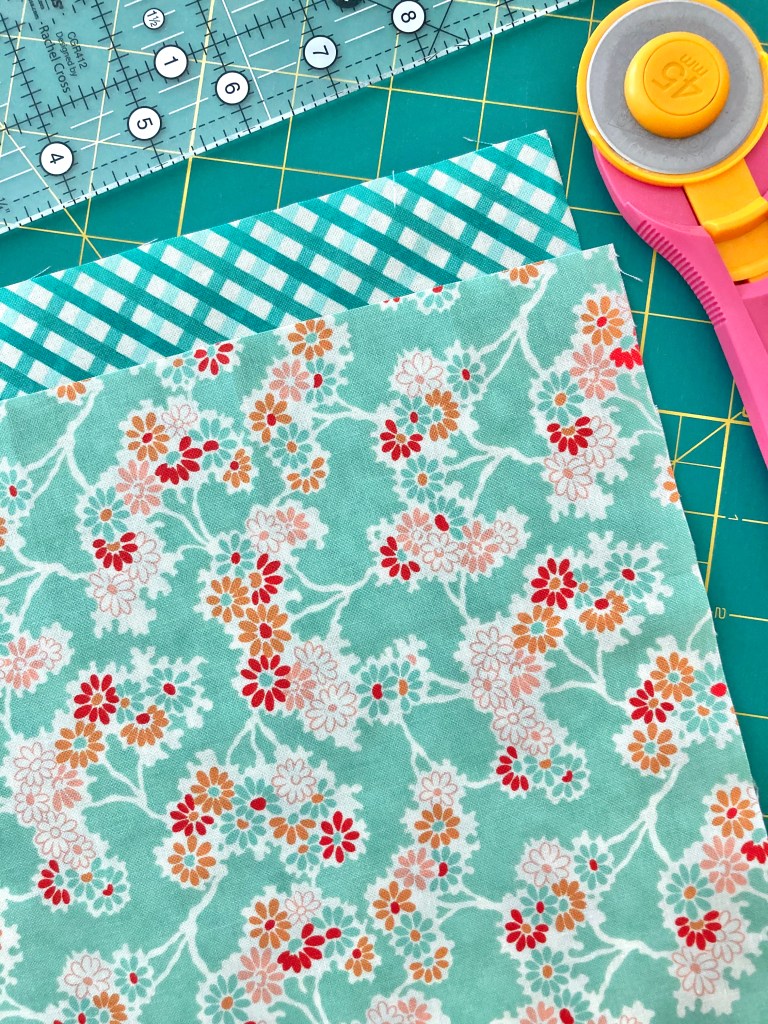
2 fat eighths (or fat quarters) – each a different print
1 – 24″ piece of 1/2″ twill tape (or 1/4″)
general sewing supplies
GETTING STARTED
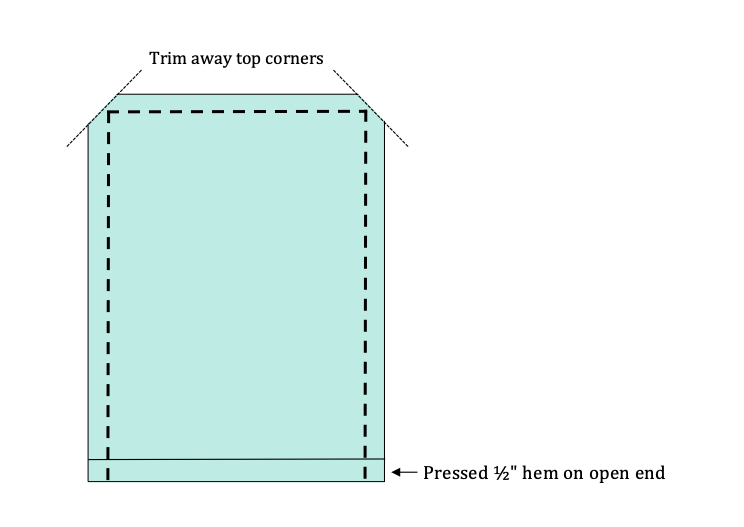
Since you’ll probably end up tossing this in the laundry at some point, it’s a good idea to prewash the fabric. Whether you do or don’t prewash, be sure to press your fabric before beginning. Once pressed, cut each piece of fabric to 9″ x 20″.
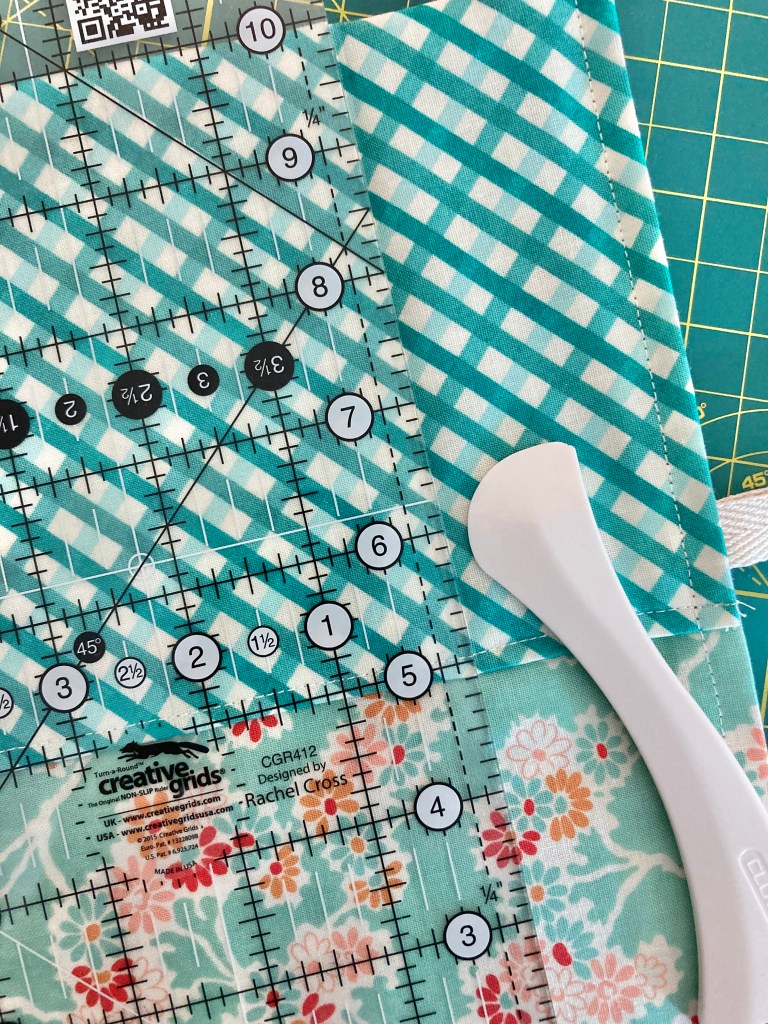
Next, press a 1/2″ inch hem on one short end of each piece. I used a hot ruler to keep my hem accurate.
SEWING FABRIC PIECES
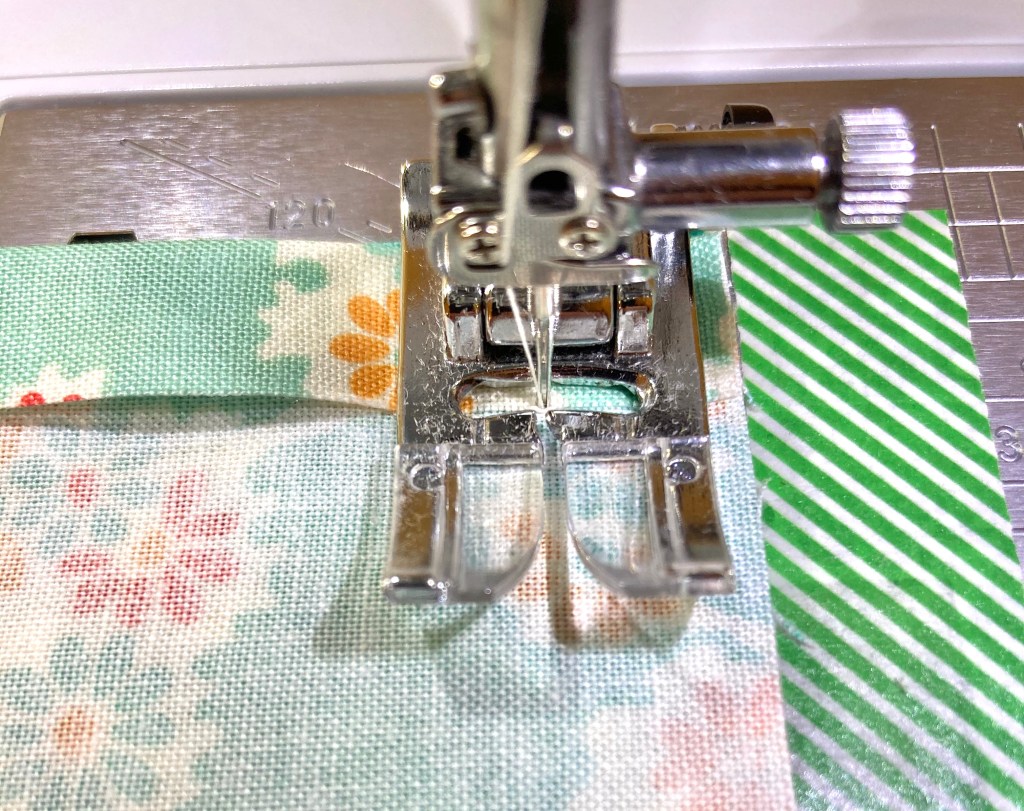
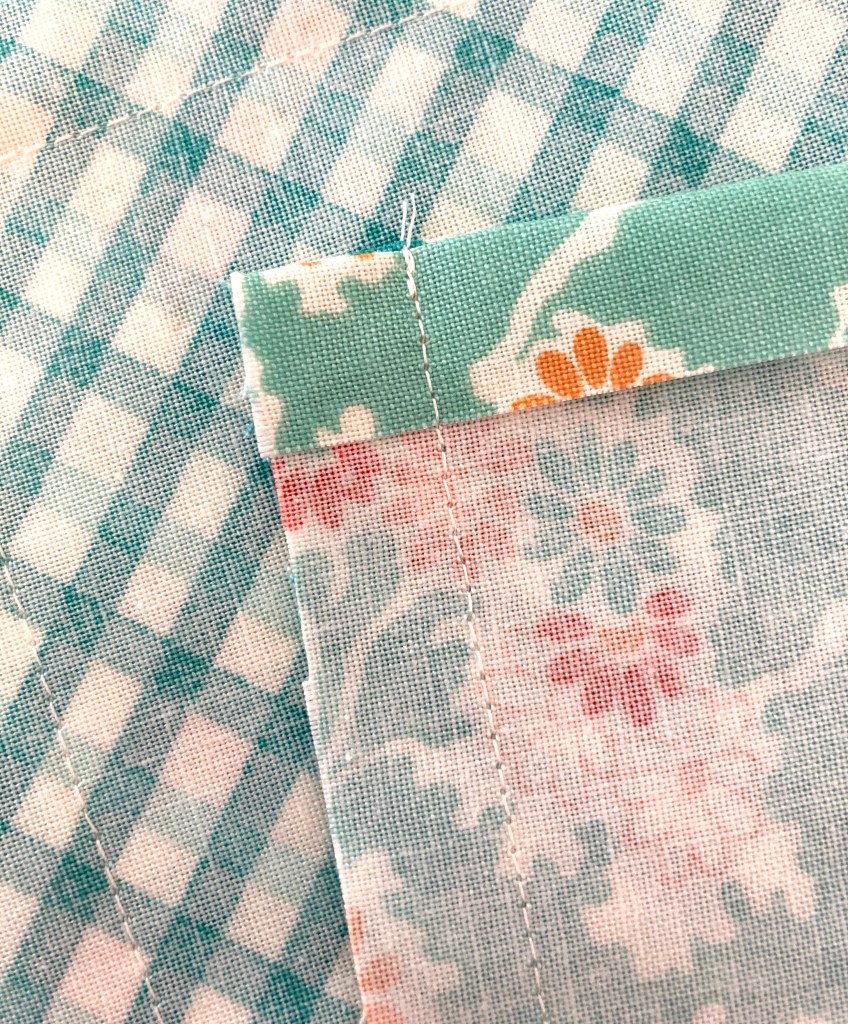
First, align both pressed edges then pin together. Starting on a long side of the pinned fabric, sew a 1/2″ seam along three sides, leaving the short pressed end of the rectangle open. I used washi tape as a guide to keep my seams straight.
Once sewn, trim away the top corners the making sure not to cut too close to the thread. This will help reduce bulk and it’ll help give the corners a nice finish.
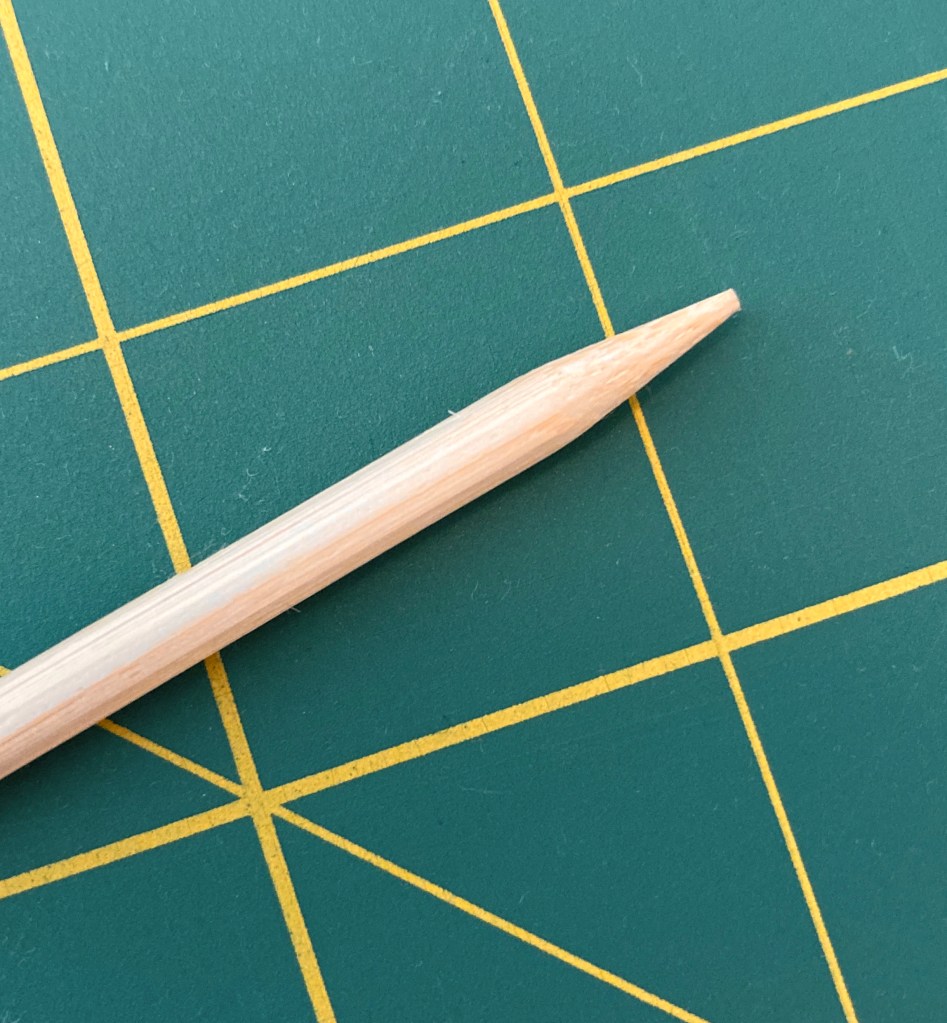
Next, from the open end, turn the fabric right side out. I used a blunt tip bamboo stick to push out the corners for a sharper point, it really makes a difference.
After your corners are nice and sharp, press. Then sew the open end closed with a topstitch about 1/8″ from the edge, backstitching at each end.
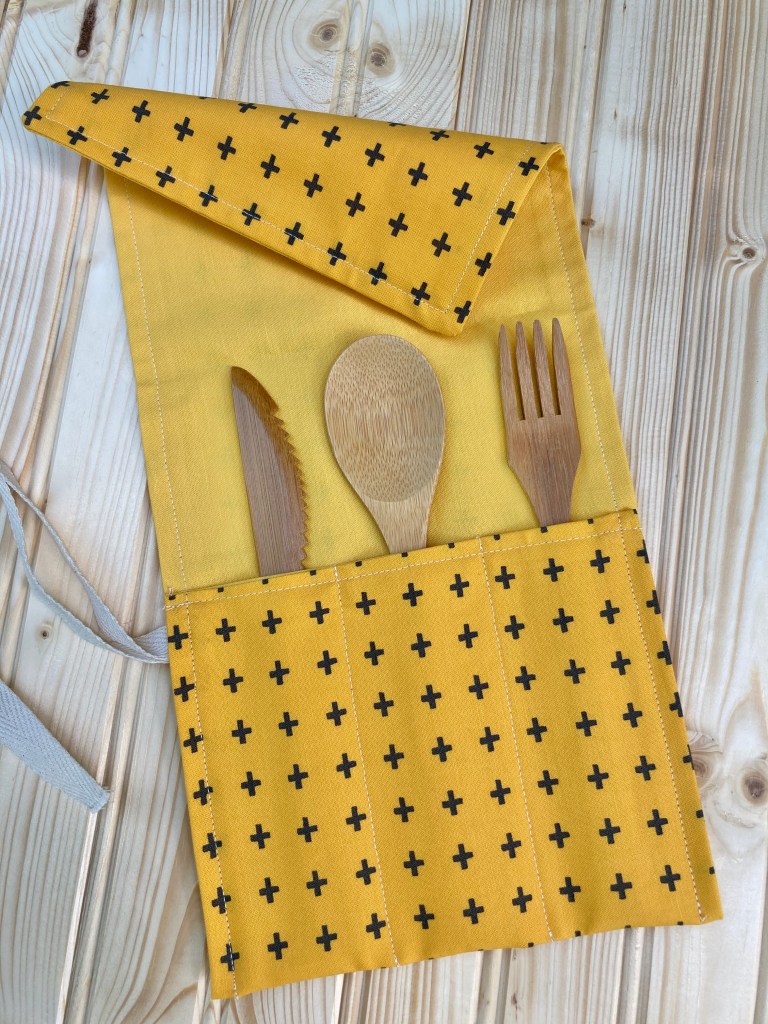
MAKING THE UTENSIL POCKET
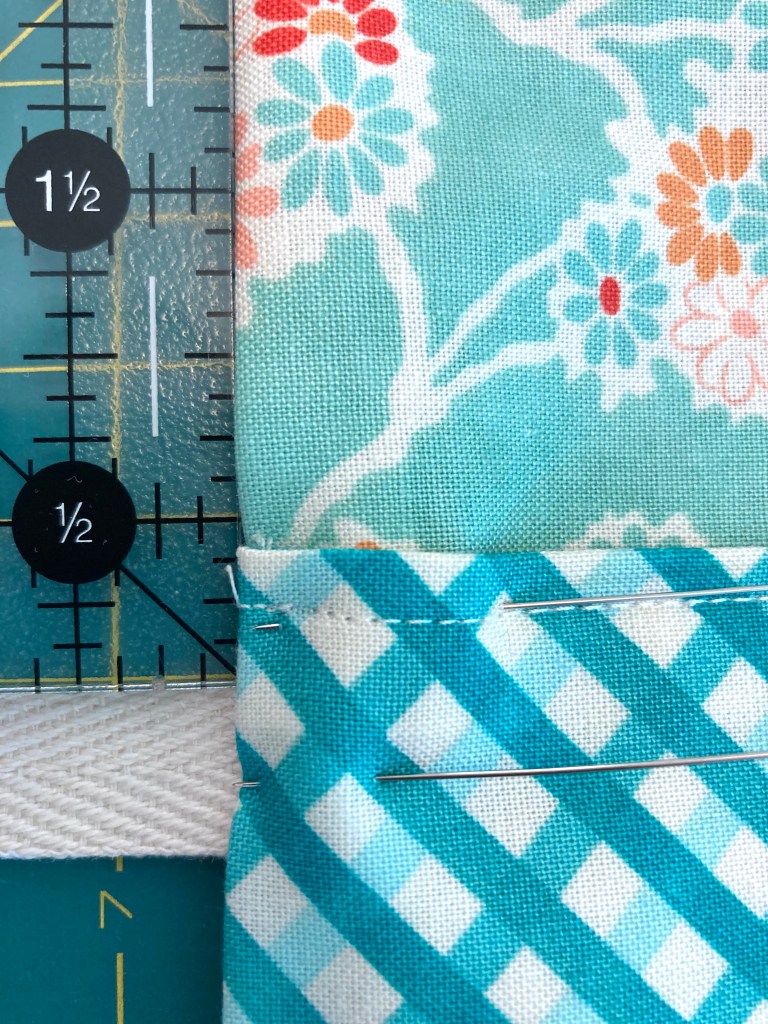
After sewing all the sides closed, fold the previously open end (now topstitched) up 5 inches from the bottom to create a pocket. Pin the side edges of the pocket.
SEWING IN TWILL TAPE
Fold the 24″ twill tape piece in half and insert the folded edge into the top left side of the pinned pocket. The fold should be inserted into the fabric approximately 1/2″. Pin the inserted tape about 3/8″ down from the topstitched edge.
TIP: Sew a zigzag stitch along each end of the twill tape to keep it from fraying.
Stitch a 1/4″ seam allowance all the way around the edges, backstitching at each end.
CREATING UTENSIL POCKETS
Now that the main pocket is created, it’s time to create individual pockets for the utensils. You’ll need a ruler and a fabric-safe marker. As an alternative, I used a hera marker to indicate my separations so I didn’t have to worry about any markings.
I needed 4 pockets—one for chopsticks, a fork, a spoon and a knife. I divided the width of my pocket in equal measurements from left to right: 1 3/4″, 1 7/8″, 1 7/8″, 1 3/4″. Depending on your needs, determine your measurements. After doing so, mark a vertical line from the topstitched edge to the fold at the bottom for each section. Next, sew on the line, leaving the top open and backstitching at the ends. And done!
NOTE: The step above can vary quite a bit, depending on your purpose. For example, if you want a section for a reusable straw you’d opt for thinner pocket or if you want a section for a napkin or condiments, you may want to make a wider pocket. I should note that packets of mayo, mustard and/or a rolled up napkin fit inside the sections of the wraps I made.
At last, your wrap is ready to use! Simply place the utensils inside, fold down the top, roll it up and tie.
AN ALTERNATIVE SIZE UTENSIL WRAP
For my husband and myself, I made a smaller size wrap, omitting the pocket for chopsticks. I planned for only three sections: a fork, knife and spoon. I cut the fabric pieces 7 1/2″ x 20″ and made the pocket sections 1 7/8″, 2″, 1 7/8″. Otherwise, I followed all the instructions as written.
Whether you use bamboo or regular kitchen cutlery, hurray for ditching one-time plasticware! Every step towards going plastic-free counts and these fun wraps are an excellent way to start!
From time to time I like to write about sewing tools I use to make quilting easier, especially ones that help me make better quilts. I have 5 valuable items to showcase, and if you don’t already use them I recommend giving them a try.
STARCH
When my Sweet Stripes quilt pattern was out to testers last November, a tester asked me if the pattern should mention using starch. When I replied, ‘I don’t use starch, only when making minis,’ she was pretty surprised; its use must be more popular than I thought. Fast forward to my upcoming pattern where small squares will be stitched and flipped with seams pressed open—that actually need starched for best results—I’ll definitely recommend using it this time!
My starch preference is Flatter by Soak. I’m not one for scented products, but I’d just finished a bottle of unscented that smelled anyway so I chose pineapple this time. A 8.4 ounce bottle costs around $12 on Amazon putting it on the expensive side, but for a top-notch product it’s worth paying a bit more (my last bottle lasted one year). It’s great stuff; it doesn’t leave your fabric crunchy nor does it leave residue on your iron.
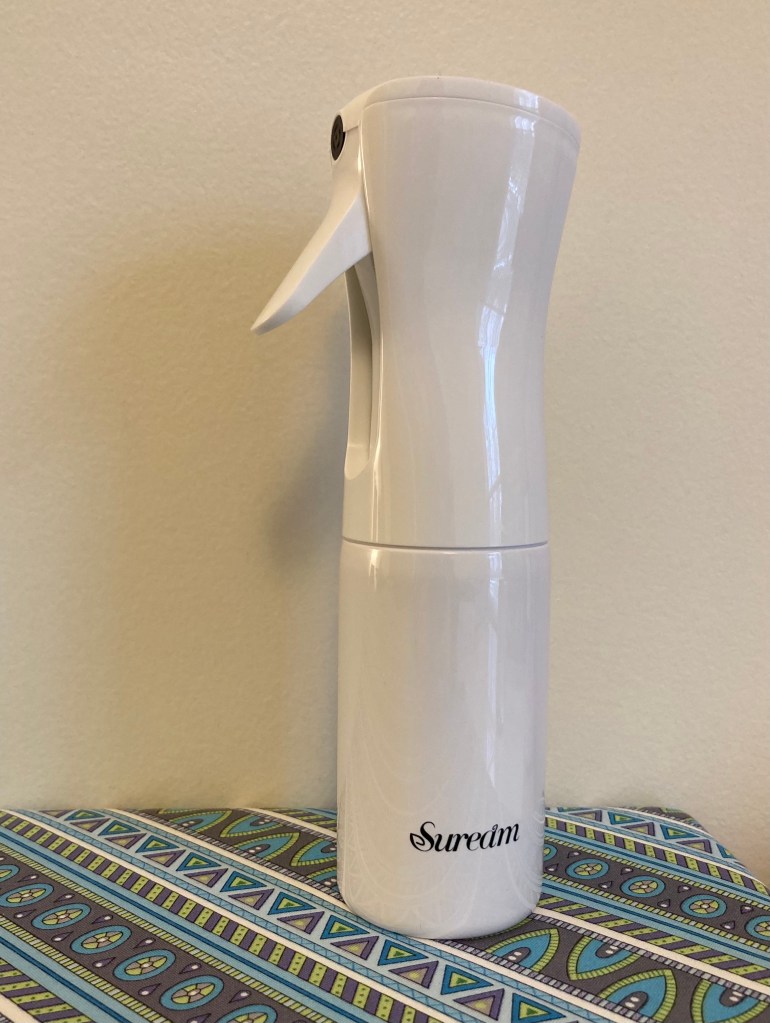
SPRAY MIST BOTTLE
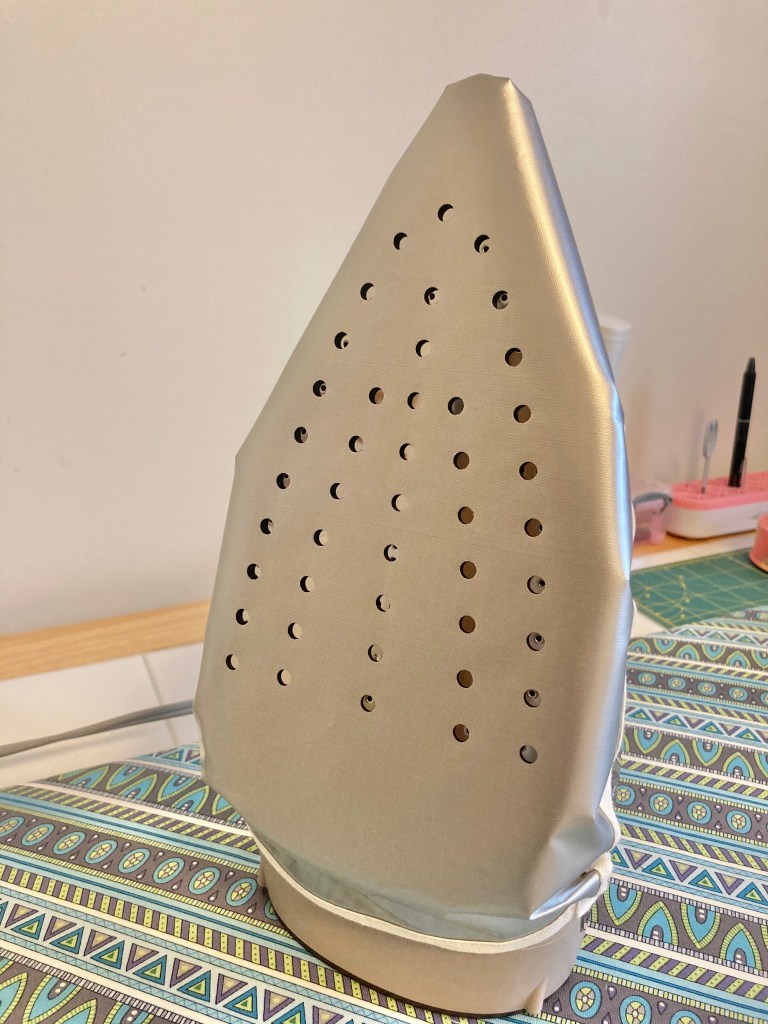
Since every iron leaks eventually (even my costly Rowenta Focus started leaking after a year or so) I’ve quit putting water in them. While I really love using steam and I miss it, I’ve gotten used to going without. As an alternative, I use a water spray bottle when pressing. I’d seen this funky sprayer in a quilt shop over the summer but ended up purchasing one online a few months later. It’s a fine mist spray bottle and it is excellent. It holds 5.4 ounces of water and costs around $7 on Amazon. The pump sprays a really fine mist and if you hold the nozzle down it’s works like an aerosol. I love the clean look of white so it’s not unsightly on my pressing table.
IRON SHOE
This is kind of an odd item, but it comes in really handy. I first saw one at the Fat Quarter Shop as a flash sale item and thought I’d give it a whirl, thinking it might help avoid the constant mess of getting interfacing adhesive stuck to my iron. It costs around $15 and is ‘made of fiberglass and is a non-stick surface that will save your fabric from scorching, shine and burns.’ It’s great when using interfacing and when pressing seams of pieced batting—nothing sticks! It’s easy to use; just tie it on your iron (fits any size).
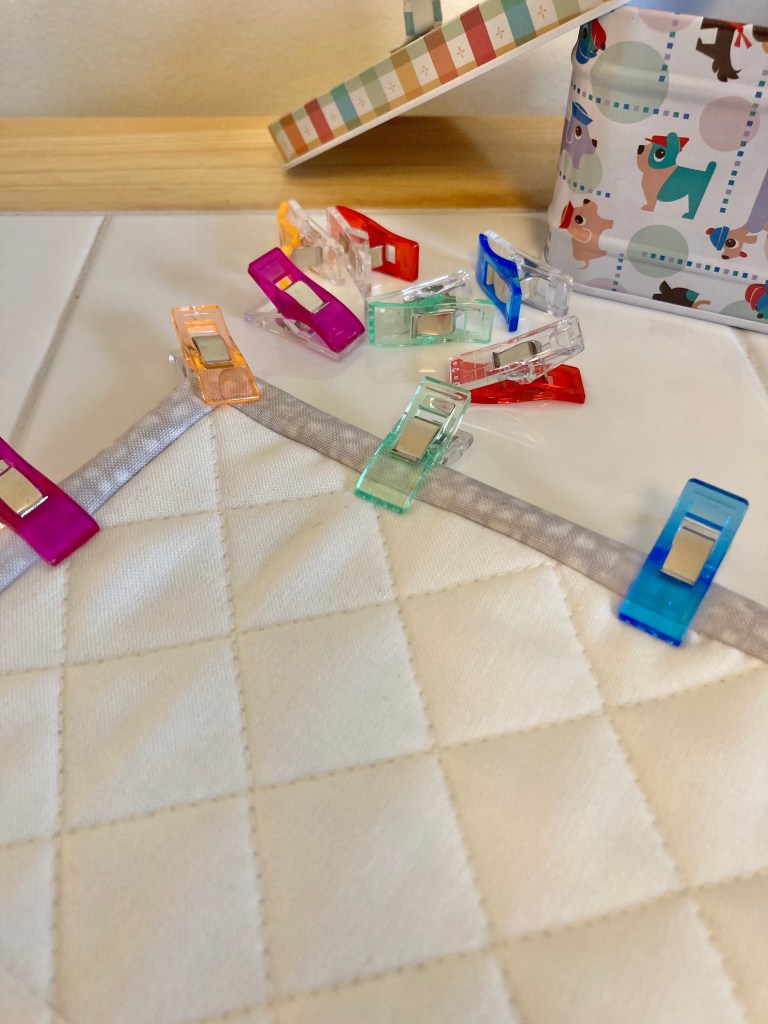
QUILTING CLIPS
My sister bought me this cute little tin of 100 assorted colored clips (including 10 large sized). I’m not calling them ‘Wonder Clips’ because they’re not actually Clover brand as ‘Clover’ isn’t stamped on. I have a couple hundred Clover clips and by comparison, they’re pretty much the same. They’re the same size, they look alike and they perform the same. These might even grip a bit tighter. I’m guessing they’re less expensive than name brand, and I was told they were purchased on Amazon. I use them constantly and love the fun colors.
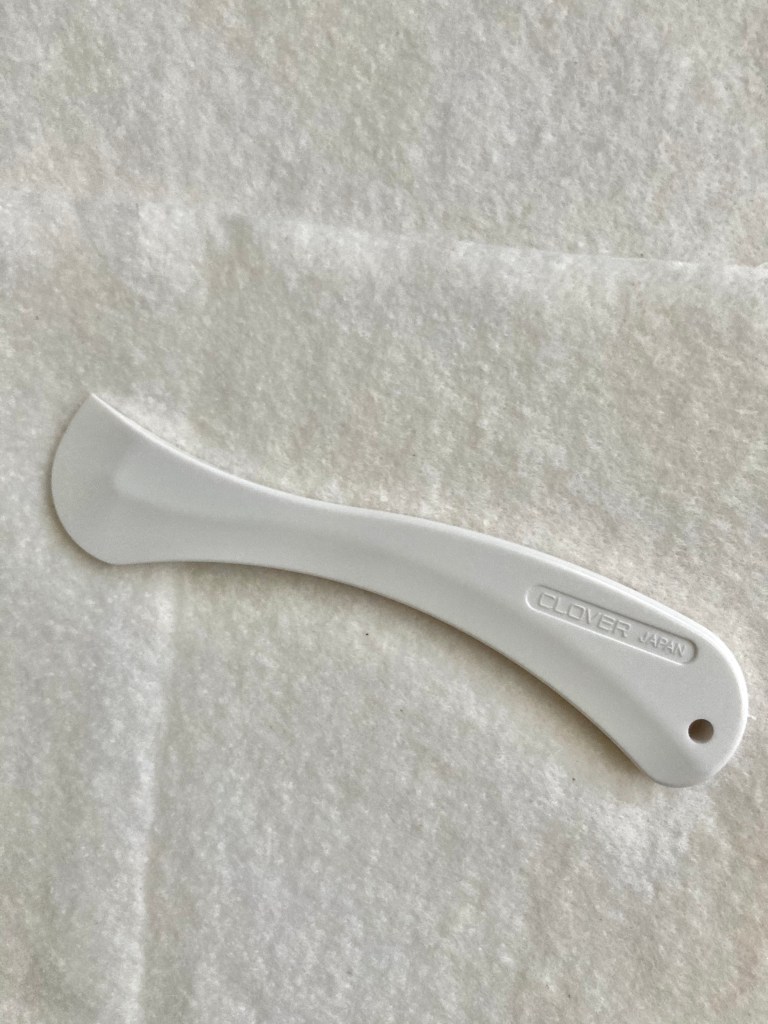
HERA MARKER
If you quilt your own quilts, using a hera marker is a safe and effective way to mark your quilt tops. If you’ve never used one before, they’re really easy to use. Just line up your ruler where you’re going to sew and mark a pressed line, just like you would using a pen or pencil. Since you have to see the line to sew, you’ll have to run the marker along the side of the ruler a couple of times to get a good indentation. In the end, the indentation is just a crease that’ll go away. This Clover hera marker can be purchased at JoAnn, online, or at your LQS, costing around $6. It’s a great tool and for such a low price, it’s well worth it. The sharper edge can eventually wear down, but it’ll take quite a while. I just replaced mine after about 4 years of use, and that was mainly because I had broken off the tip.
I hope this post is a useful guide if you’re looking for items to make quilting easier and more efficient…and to making more beautiful quilts!
Note: I am not endorsed by any product I have mentioned in this post; they are items I like, use, and wanted to share information on.
It seems that staying in more than usual made for a productive year. In 2019 I’d completed 11 quilts and thought that was a lot, but in 2020 I surpassed that and made 14! Of the 14, I gave 4 as gifts and I have a few on hand should a gift-giving occasion arise.
Other than having a queen sized quilt ready for longarming, I’d quilted the other 13 myself. That’s quite a bit as I typically have one or two done professionally every year. My goal for 2020 was to use what I had on hand, so I didn’t purchase fabric to make several of these quilts.
Here’s a look at the past year: These two quilts were gifted along with two others that I can’t show—one is to be published in the Quilts & More fall edition, and the other is a pattern currently in the works. The photo below I now offer as an easy tutorial for a beginner, Checkered Baby Quilt.
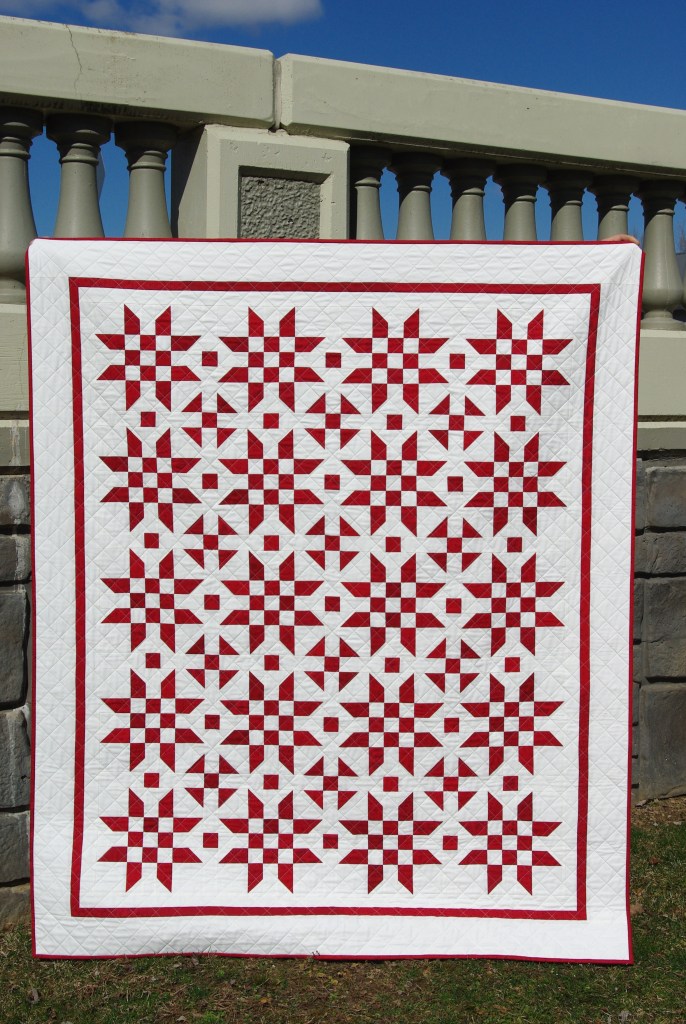
This is the only two-colored quilt I’ve ever made, for me red and white were the obvious choice. 😉 It’s a free Moda pattern called Illusions.
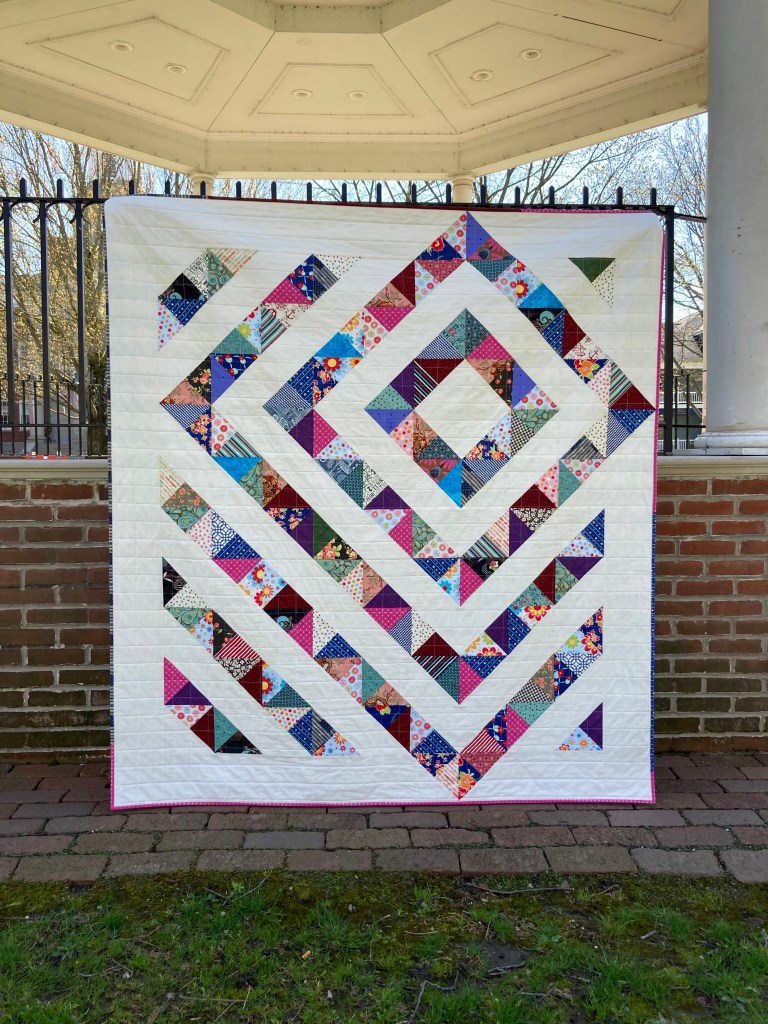
This Scrappy Four Patch Charm is the second quilt I’d made from this free pattern from Robert Kaufman. I just love this design and I wouldn’t be surprised if I make yet another one. For this, I literally took every 5″ square I had, cut a few more and threw it together. It was so fun and it used a lot of what I had on hand.
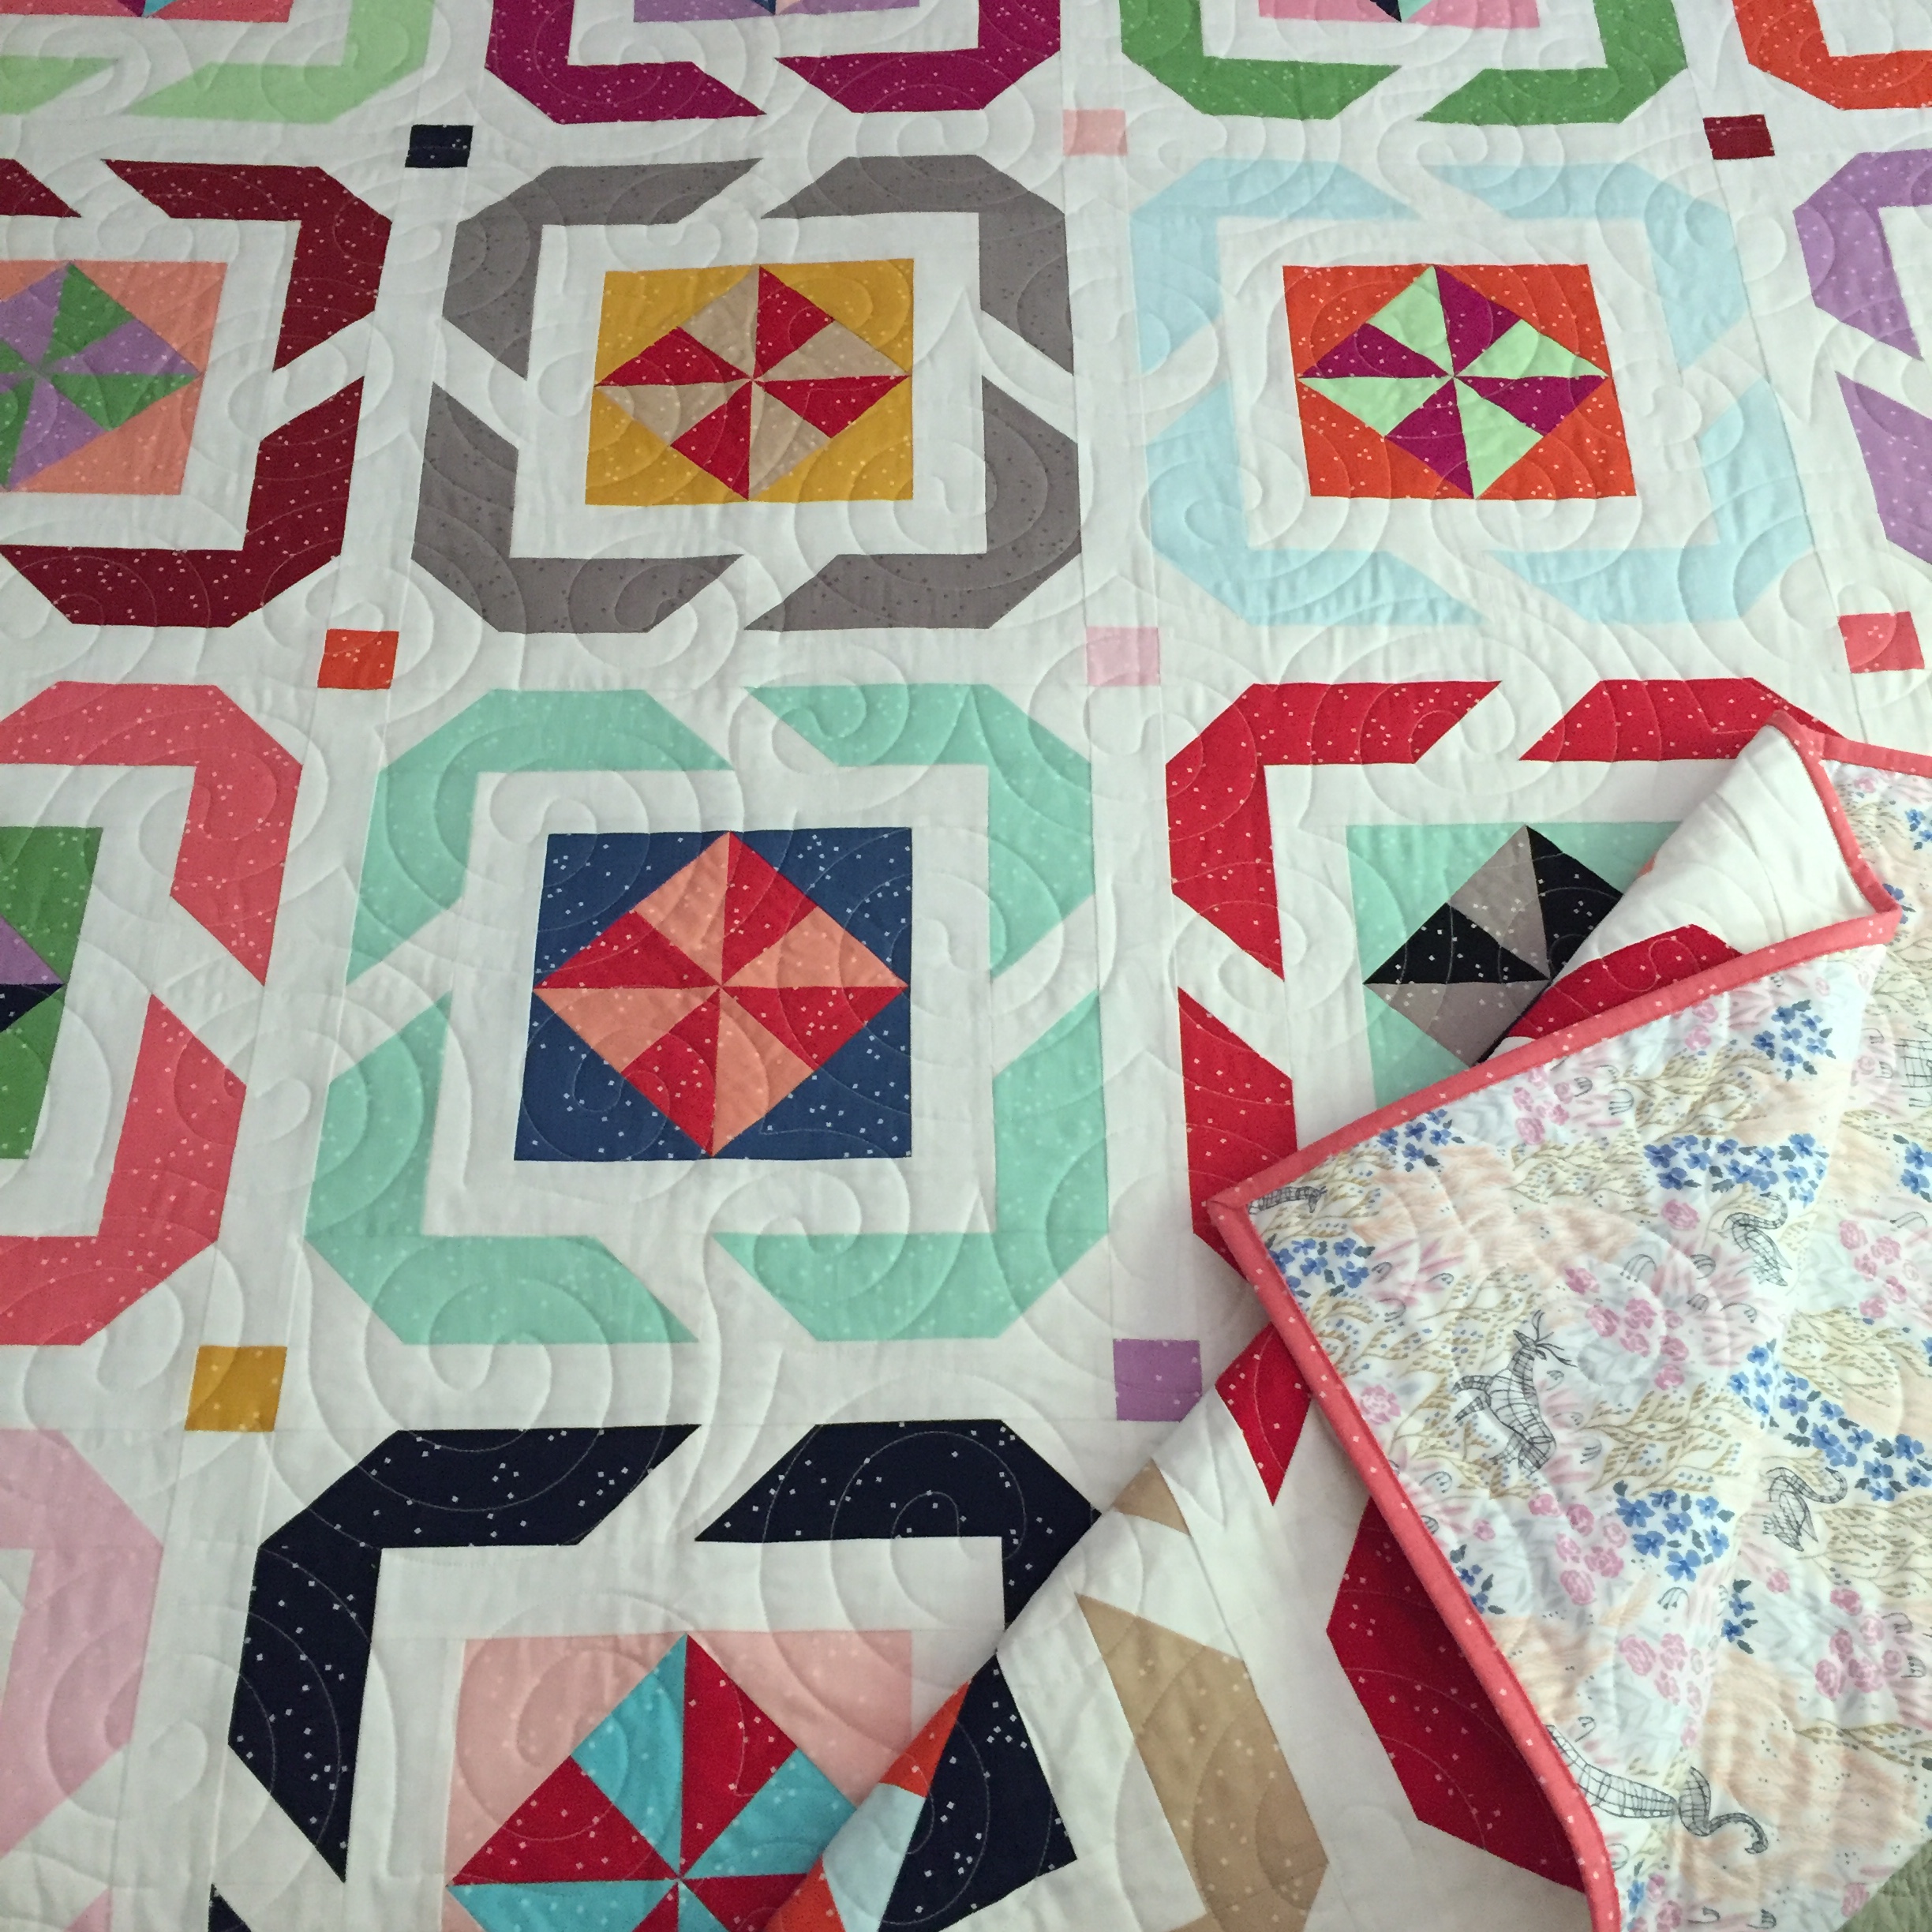
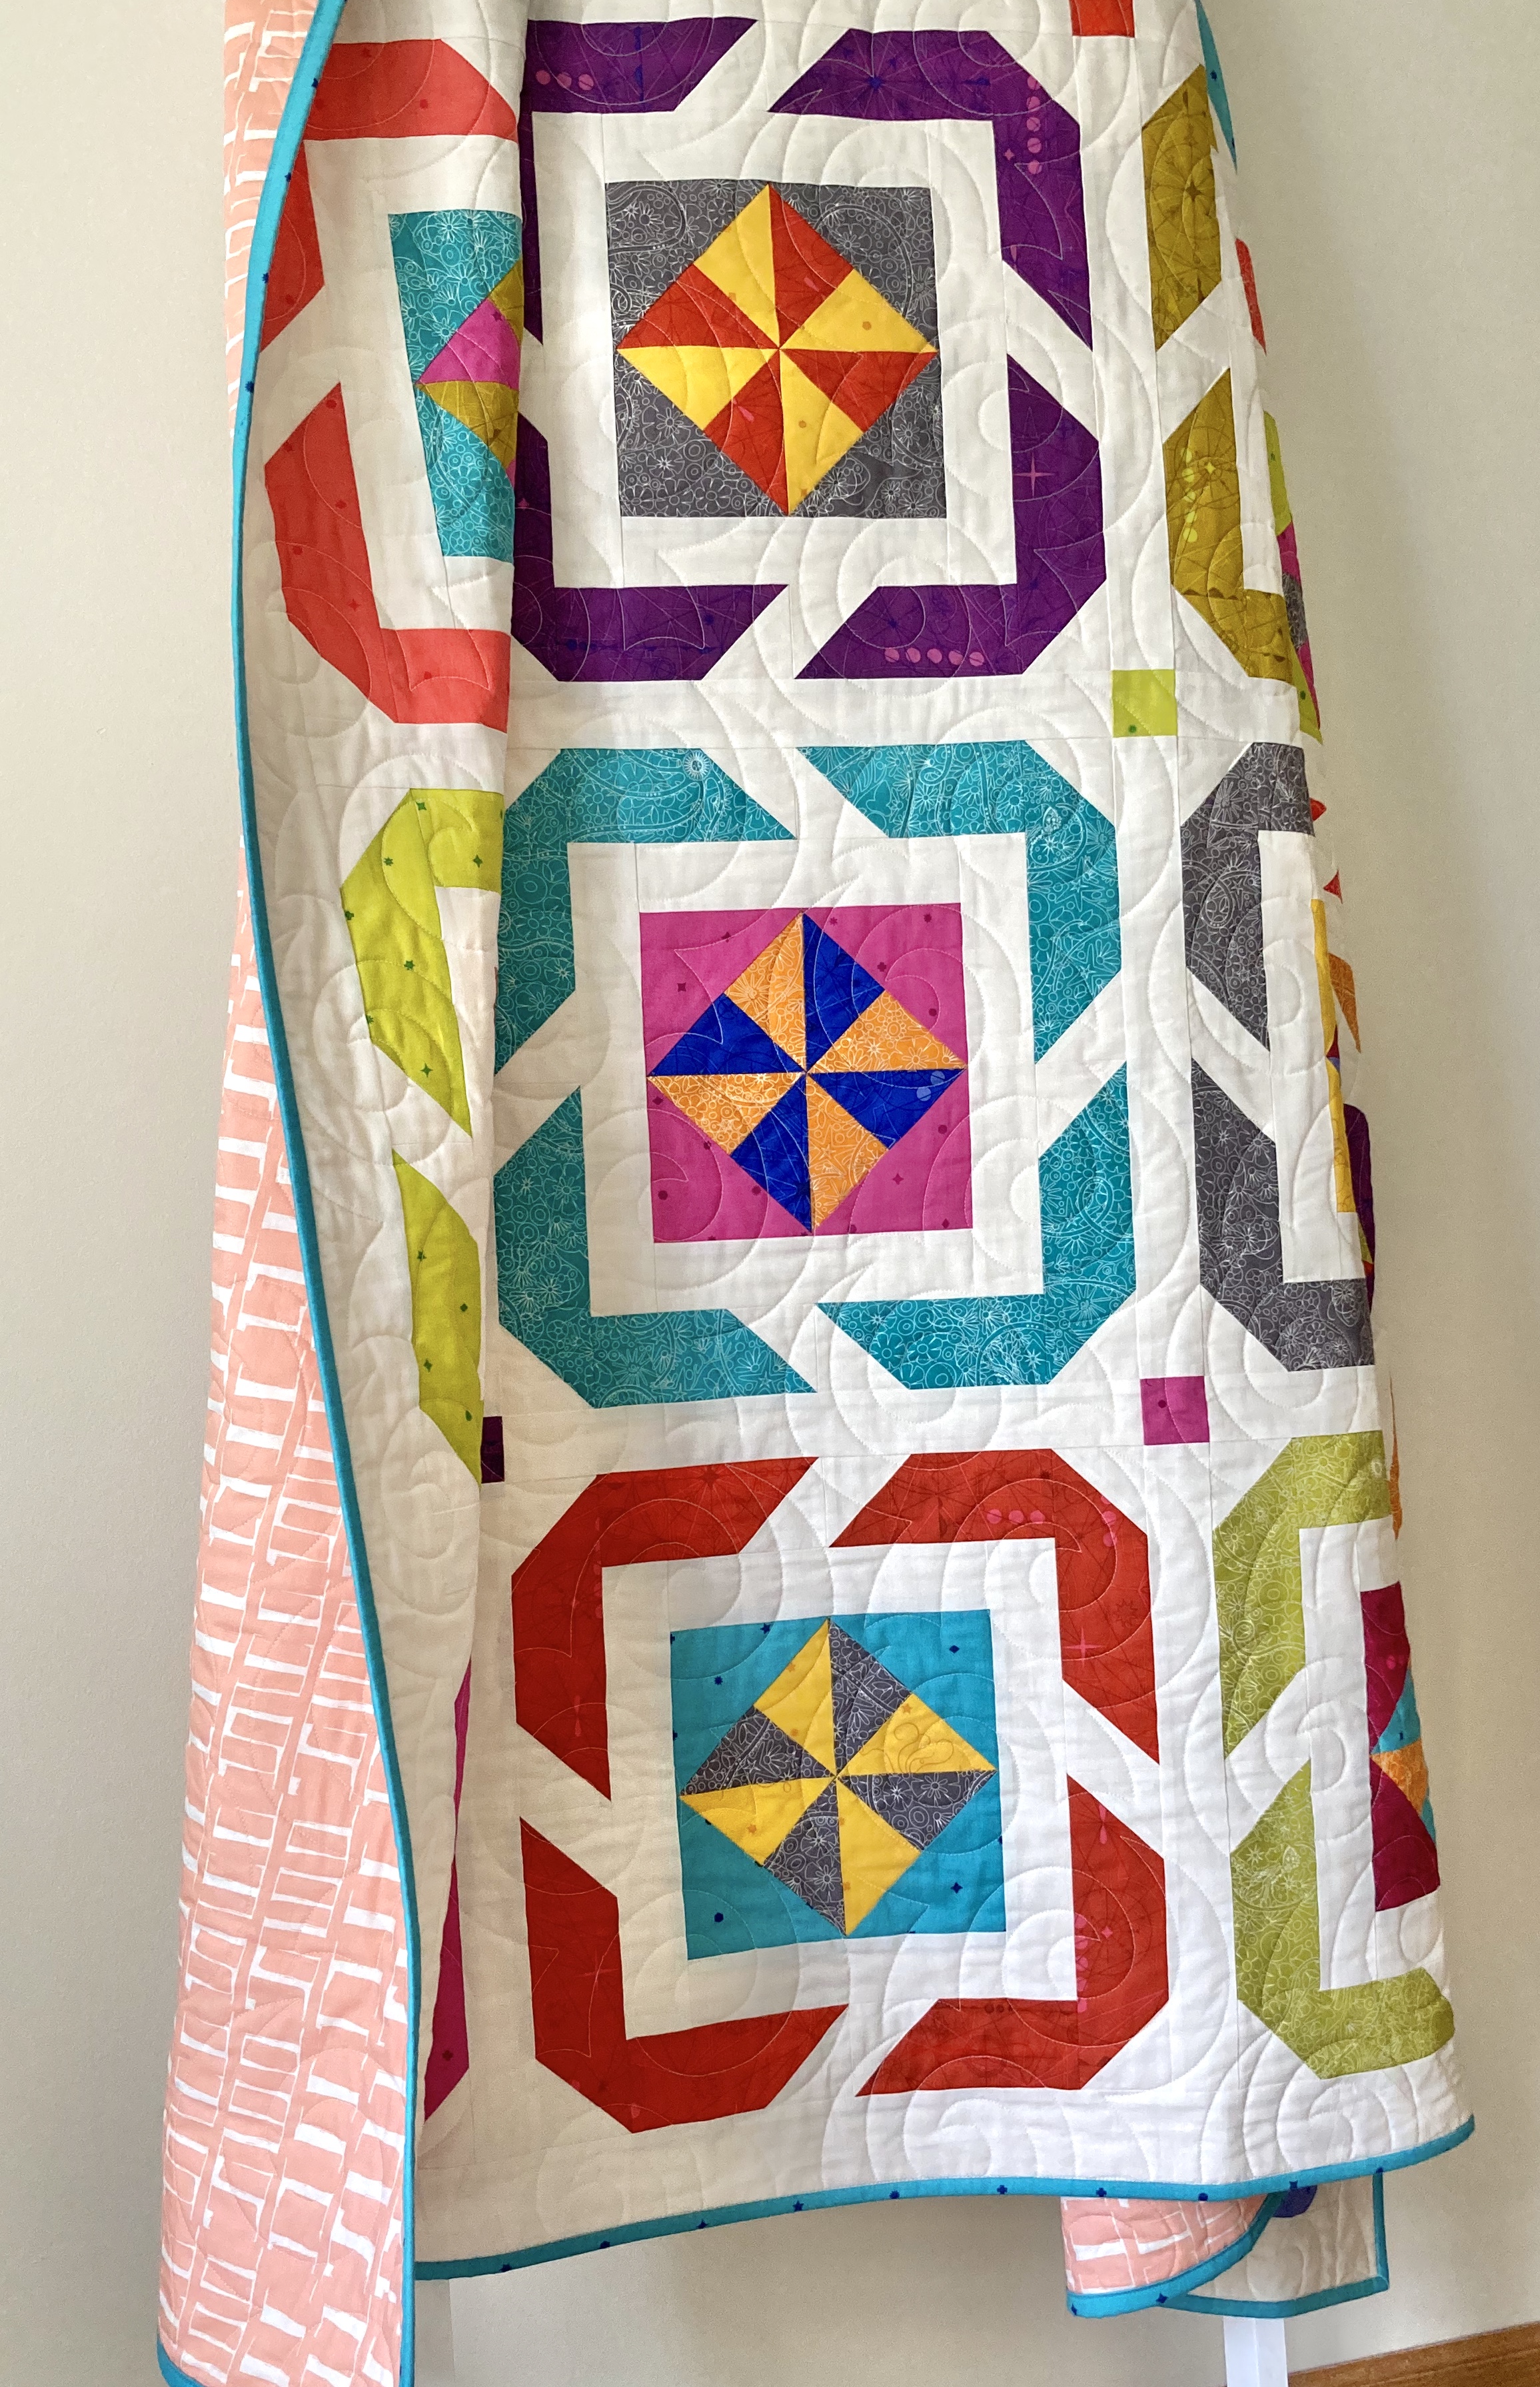
My Holiday Hemlock quilt was a challenge and a joy to design, not to mention how fun it is to watch it come together. While working on this, I decided on a second, scrappy version for all the scrap lovers out there!
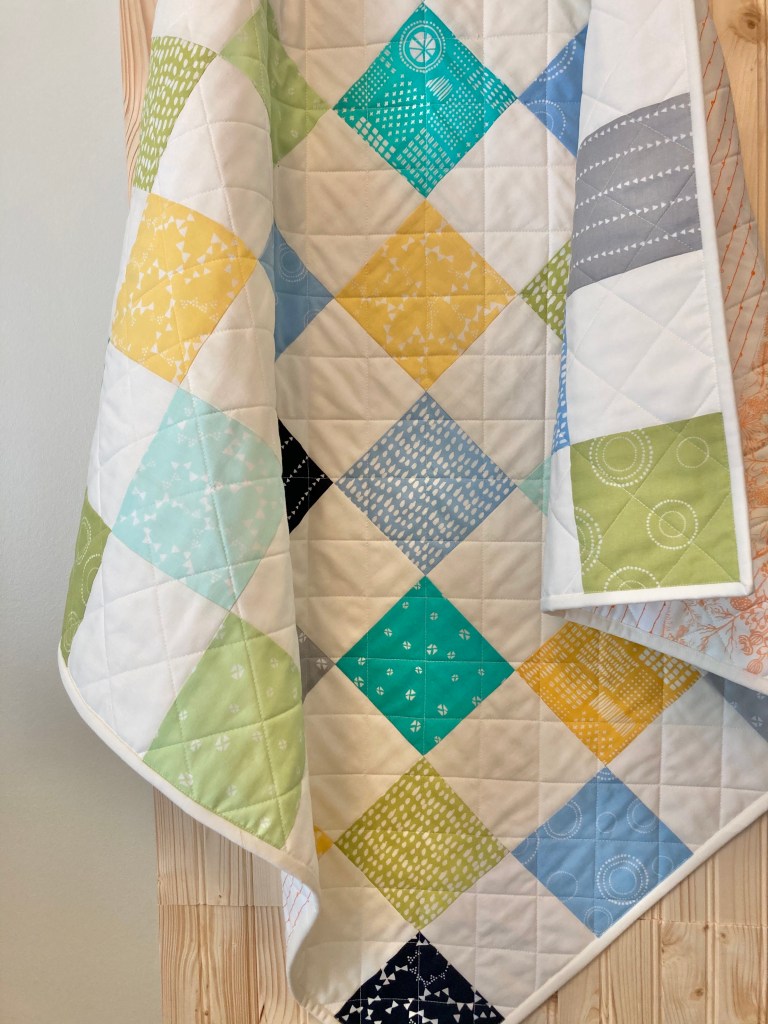
Sweet Stripes is the last of my pattern releases for the year. This cheerful pattern is designed with the beginner quilter in mind. It’s fat quarter friendly and there are 7 different sizes with two layouts versions to choose from. It’s quick AND easy!
I made this baby size Sweet Stripes quilt but I have no baby to give it to, so it’s currently for sale in my Etsy shop. 🙂
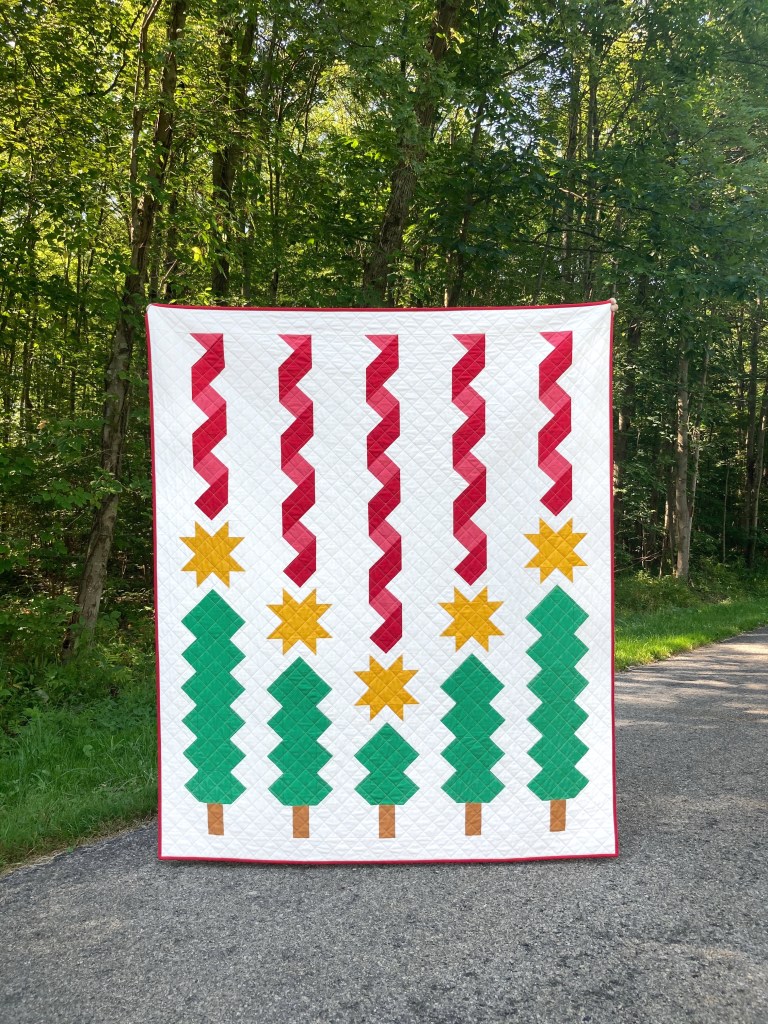
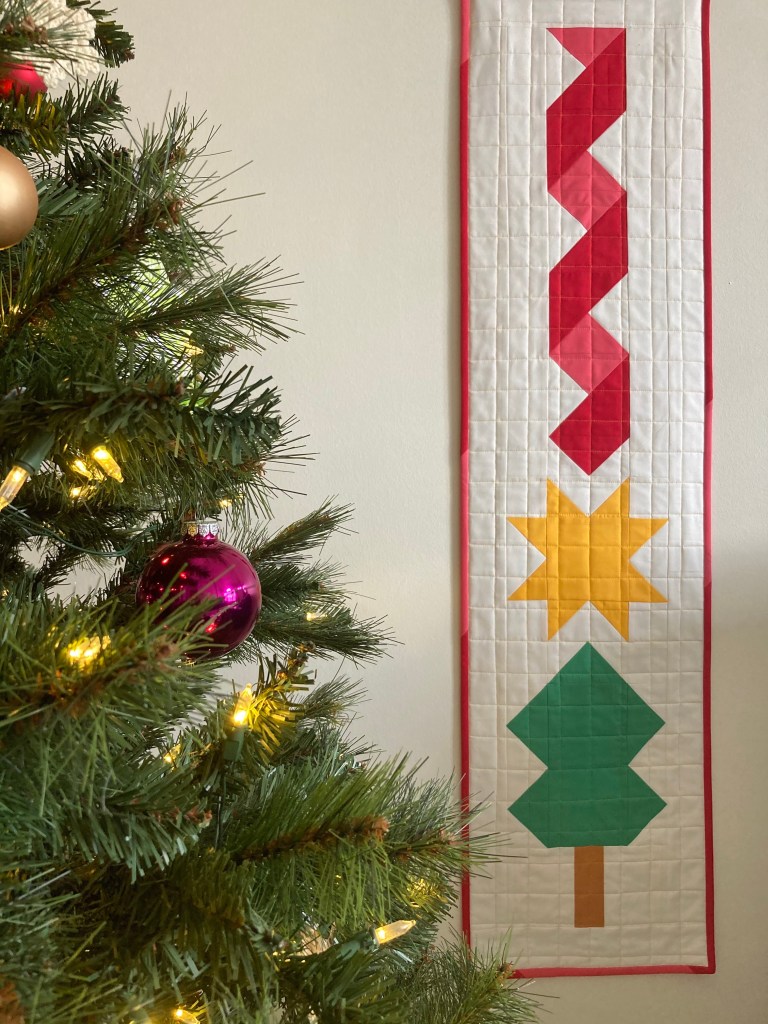
The last quilt finish of the year is my Christmassy Triangle Peaks. I had to make this red and green version for my annual holiday quilt. Even though I finished it mid-December, I’m already planning for this year!
I was surprised that I made only one mini; a section of my Holiday Hemlocks. I put together a center tree and star along with a shorter ribbon and it made a lovely wall hanging. It’s a great way to display part of the quilt if you don’t have time to make a whole one.
I also added another page to my website, color gallery. It showcases several photos with color tiles to help with your color inspiration. Thankfully my family members allowed me use their beautiful images for this project. I think it’s an excellent resource.
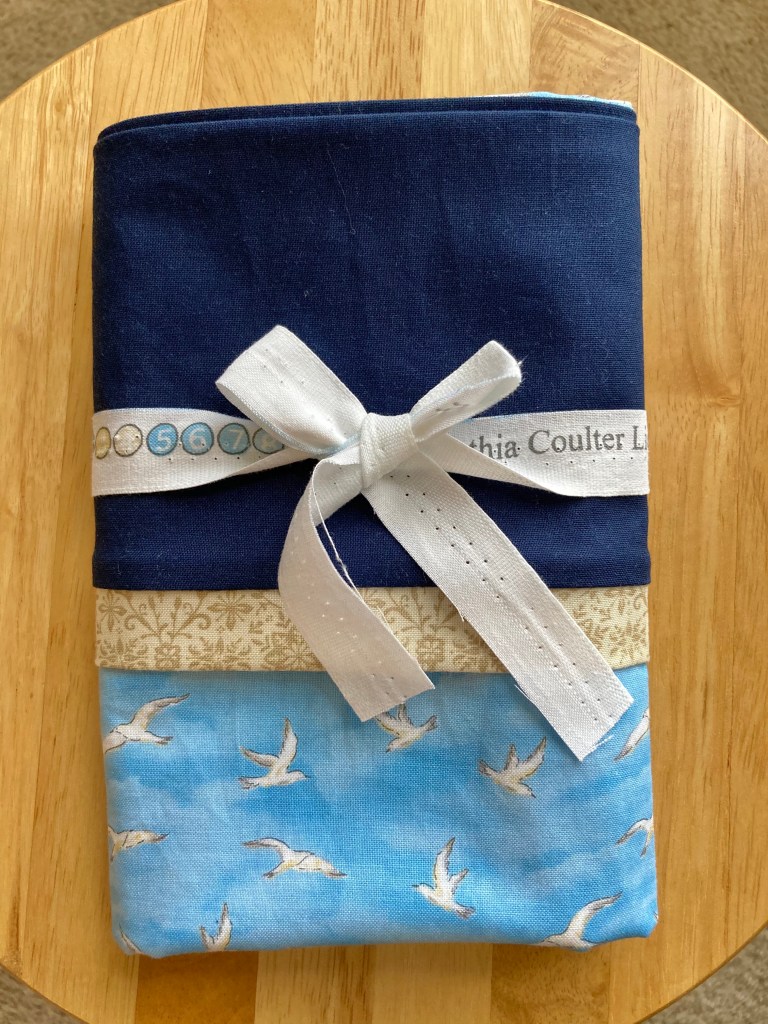
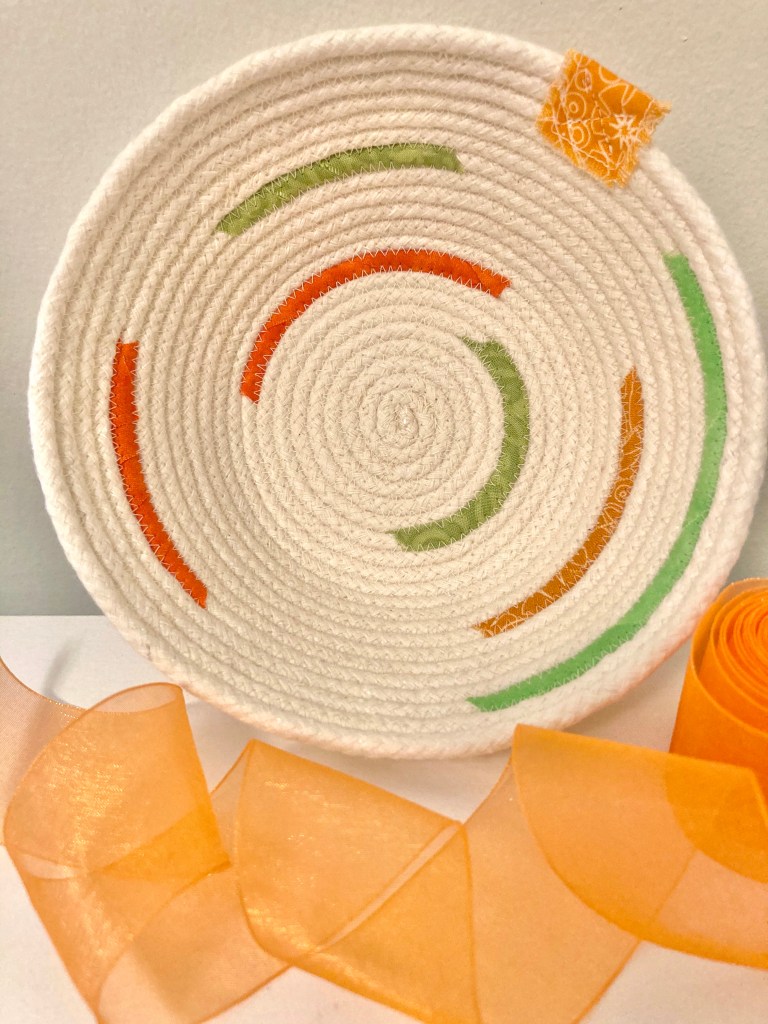
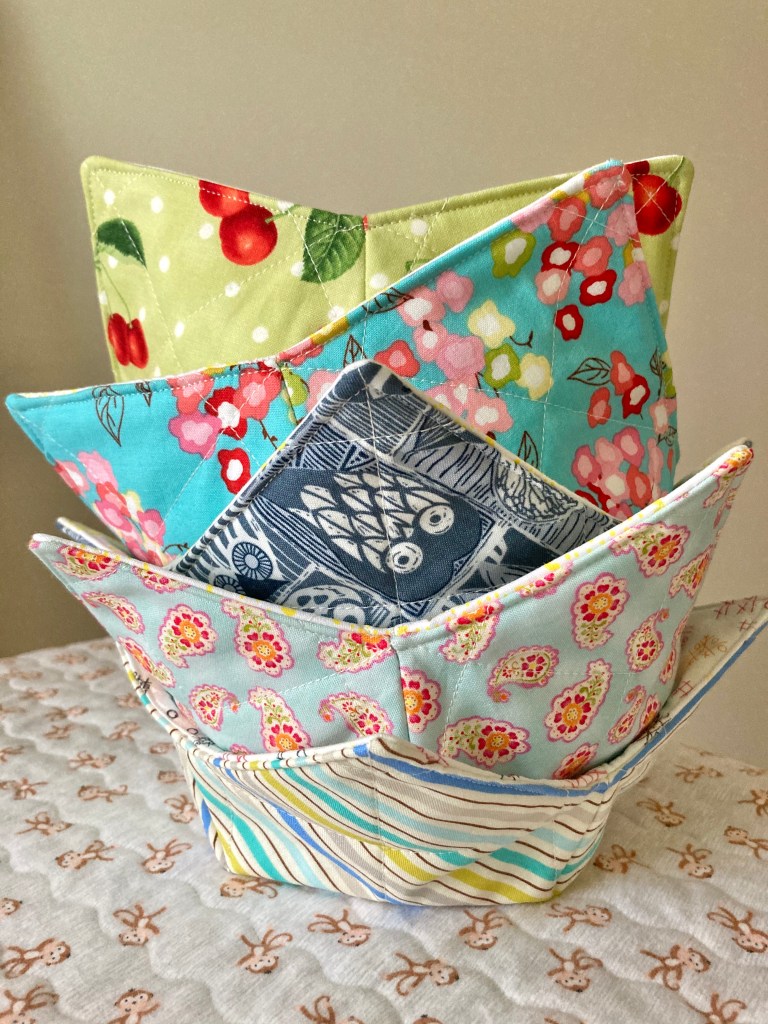
Other projects include pillows for my mom, a pillow case for my bird-loving husband, utensil wraps, colorful rope bowls and microwave bowl cozies.
I also added several tips, tutorials, charts and plenty of other quilty posts to my website. And lastly, I updated my logo and I love it.
Coming soon in 2021…a tutorial for the utensil wrap, a new quilt pattern and more tips and sewing inspiration. I’m looking forward to a great year of creating!
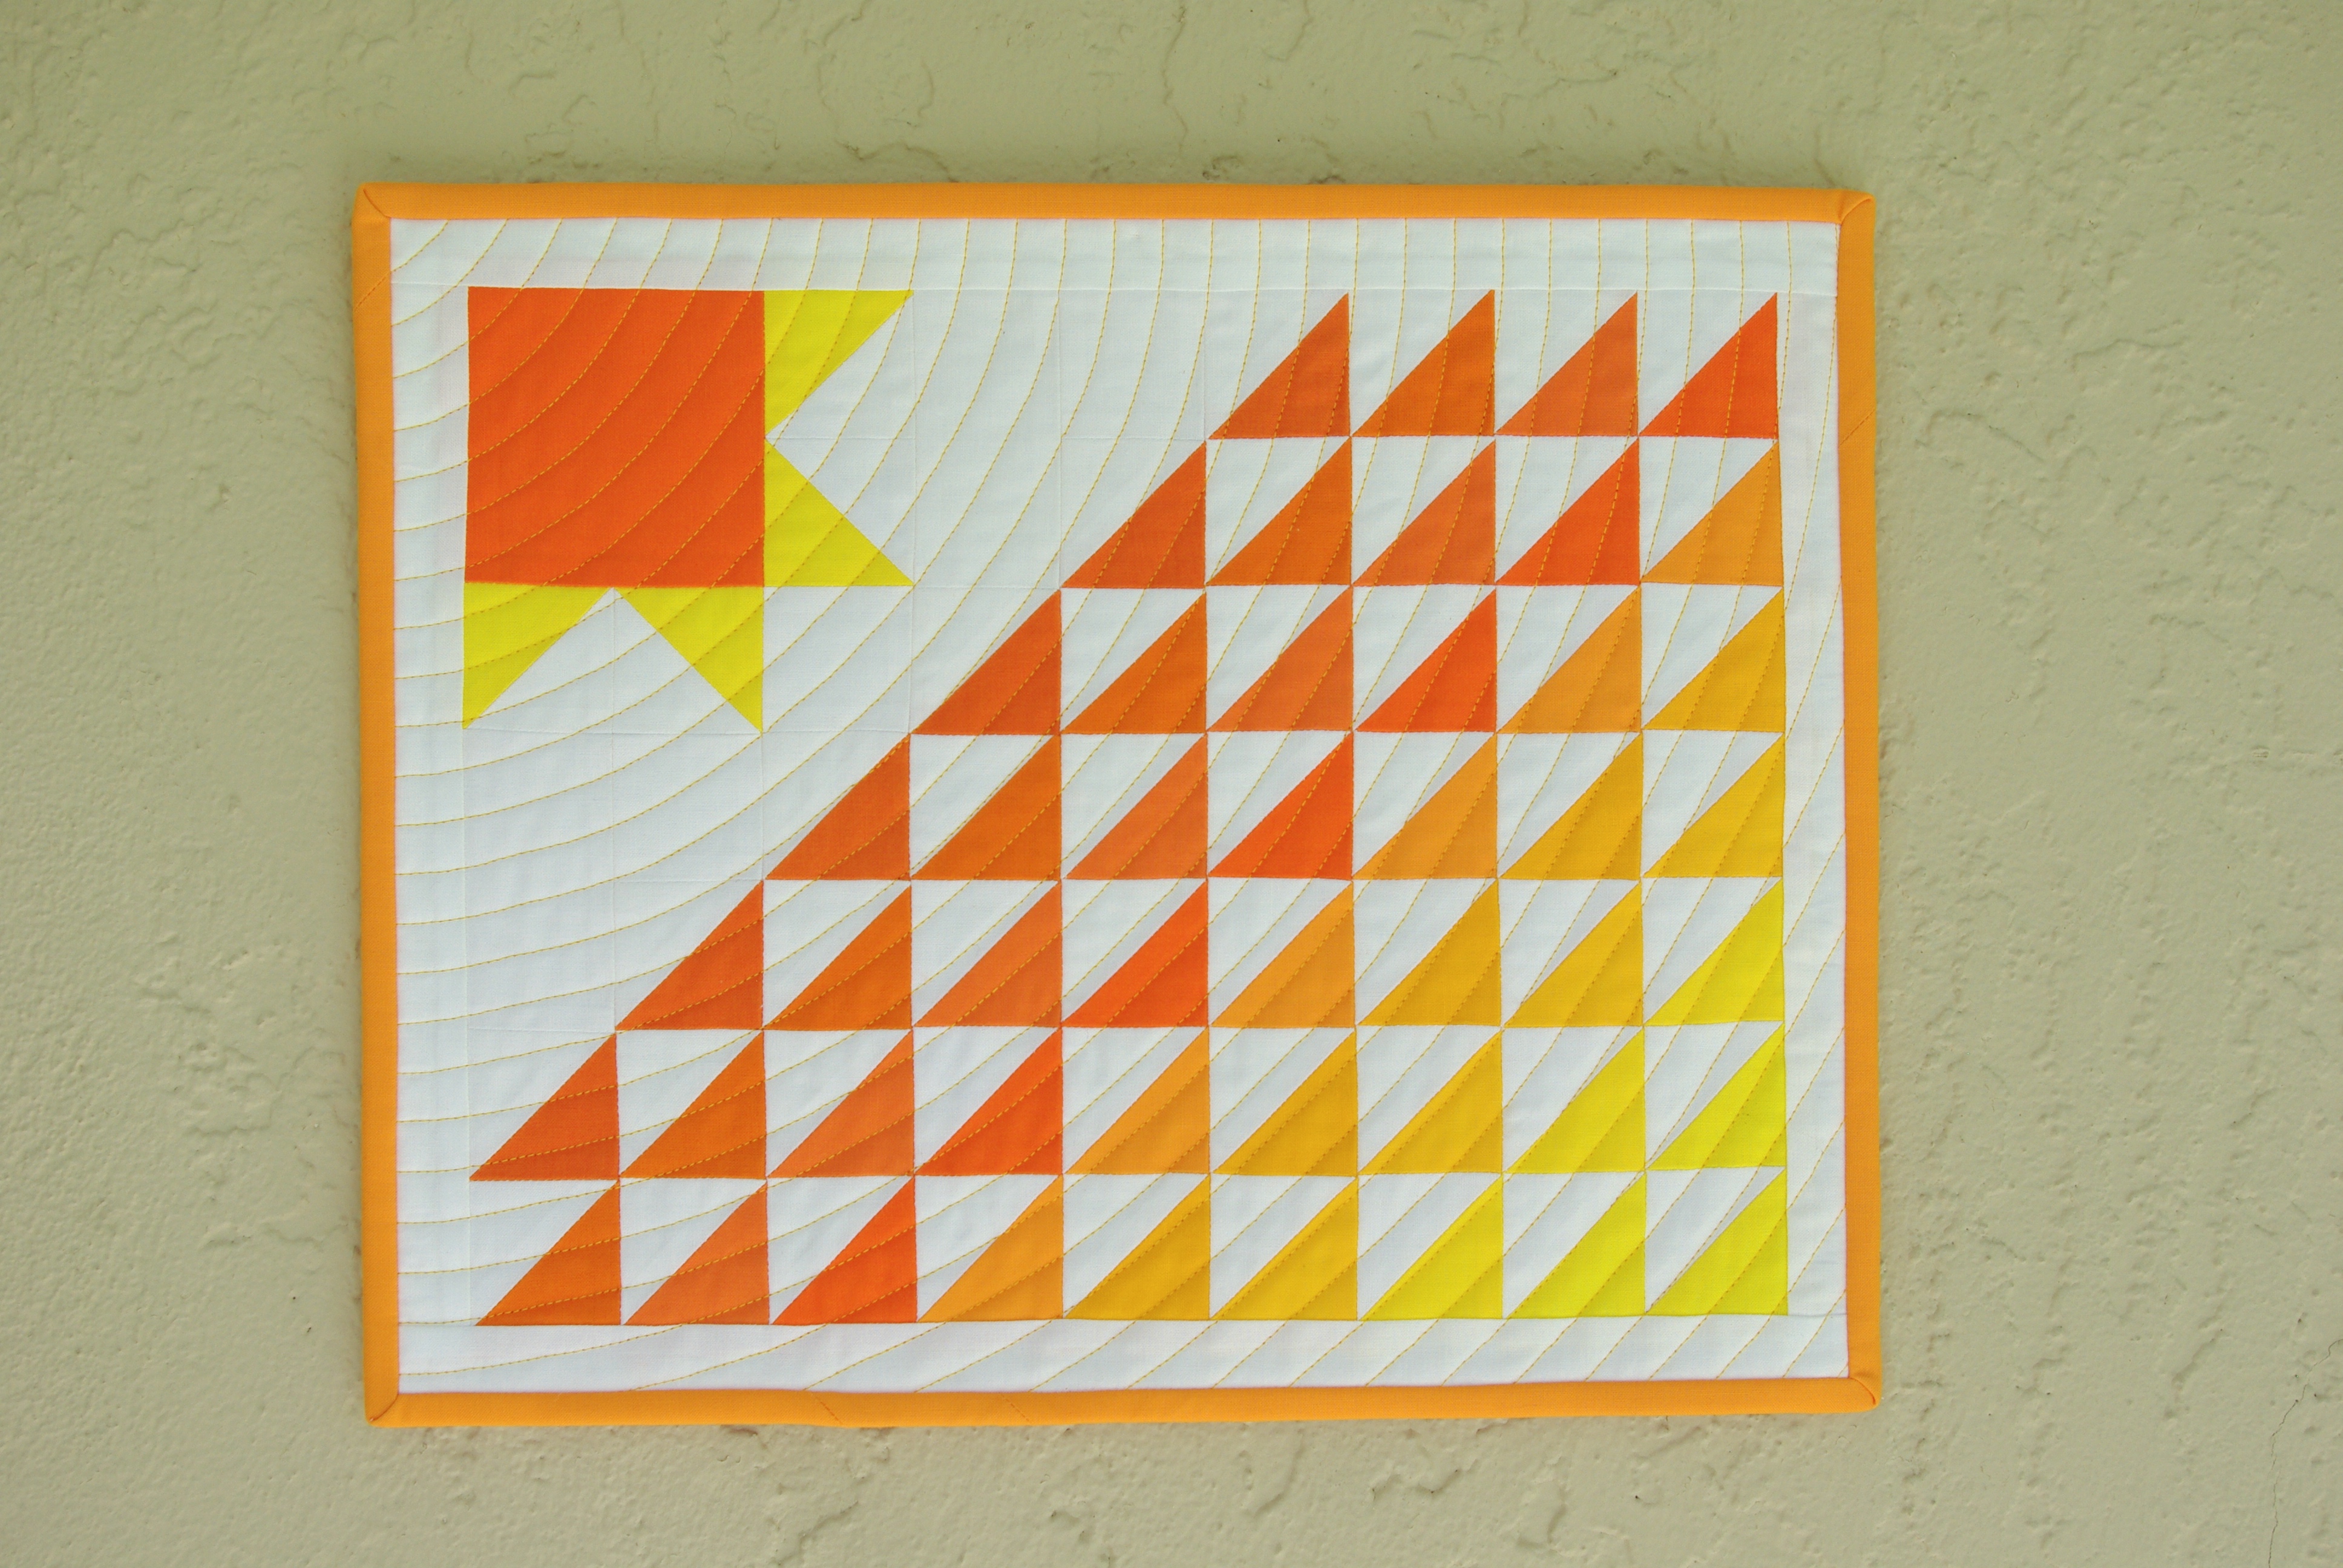
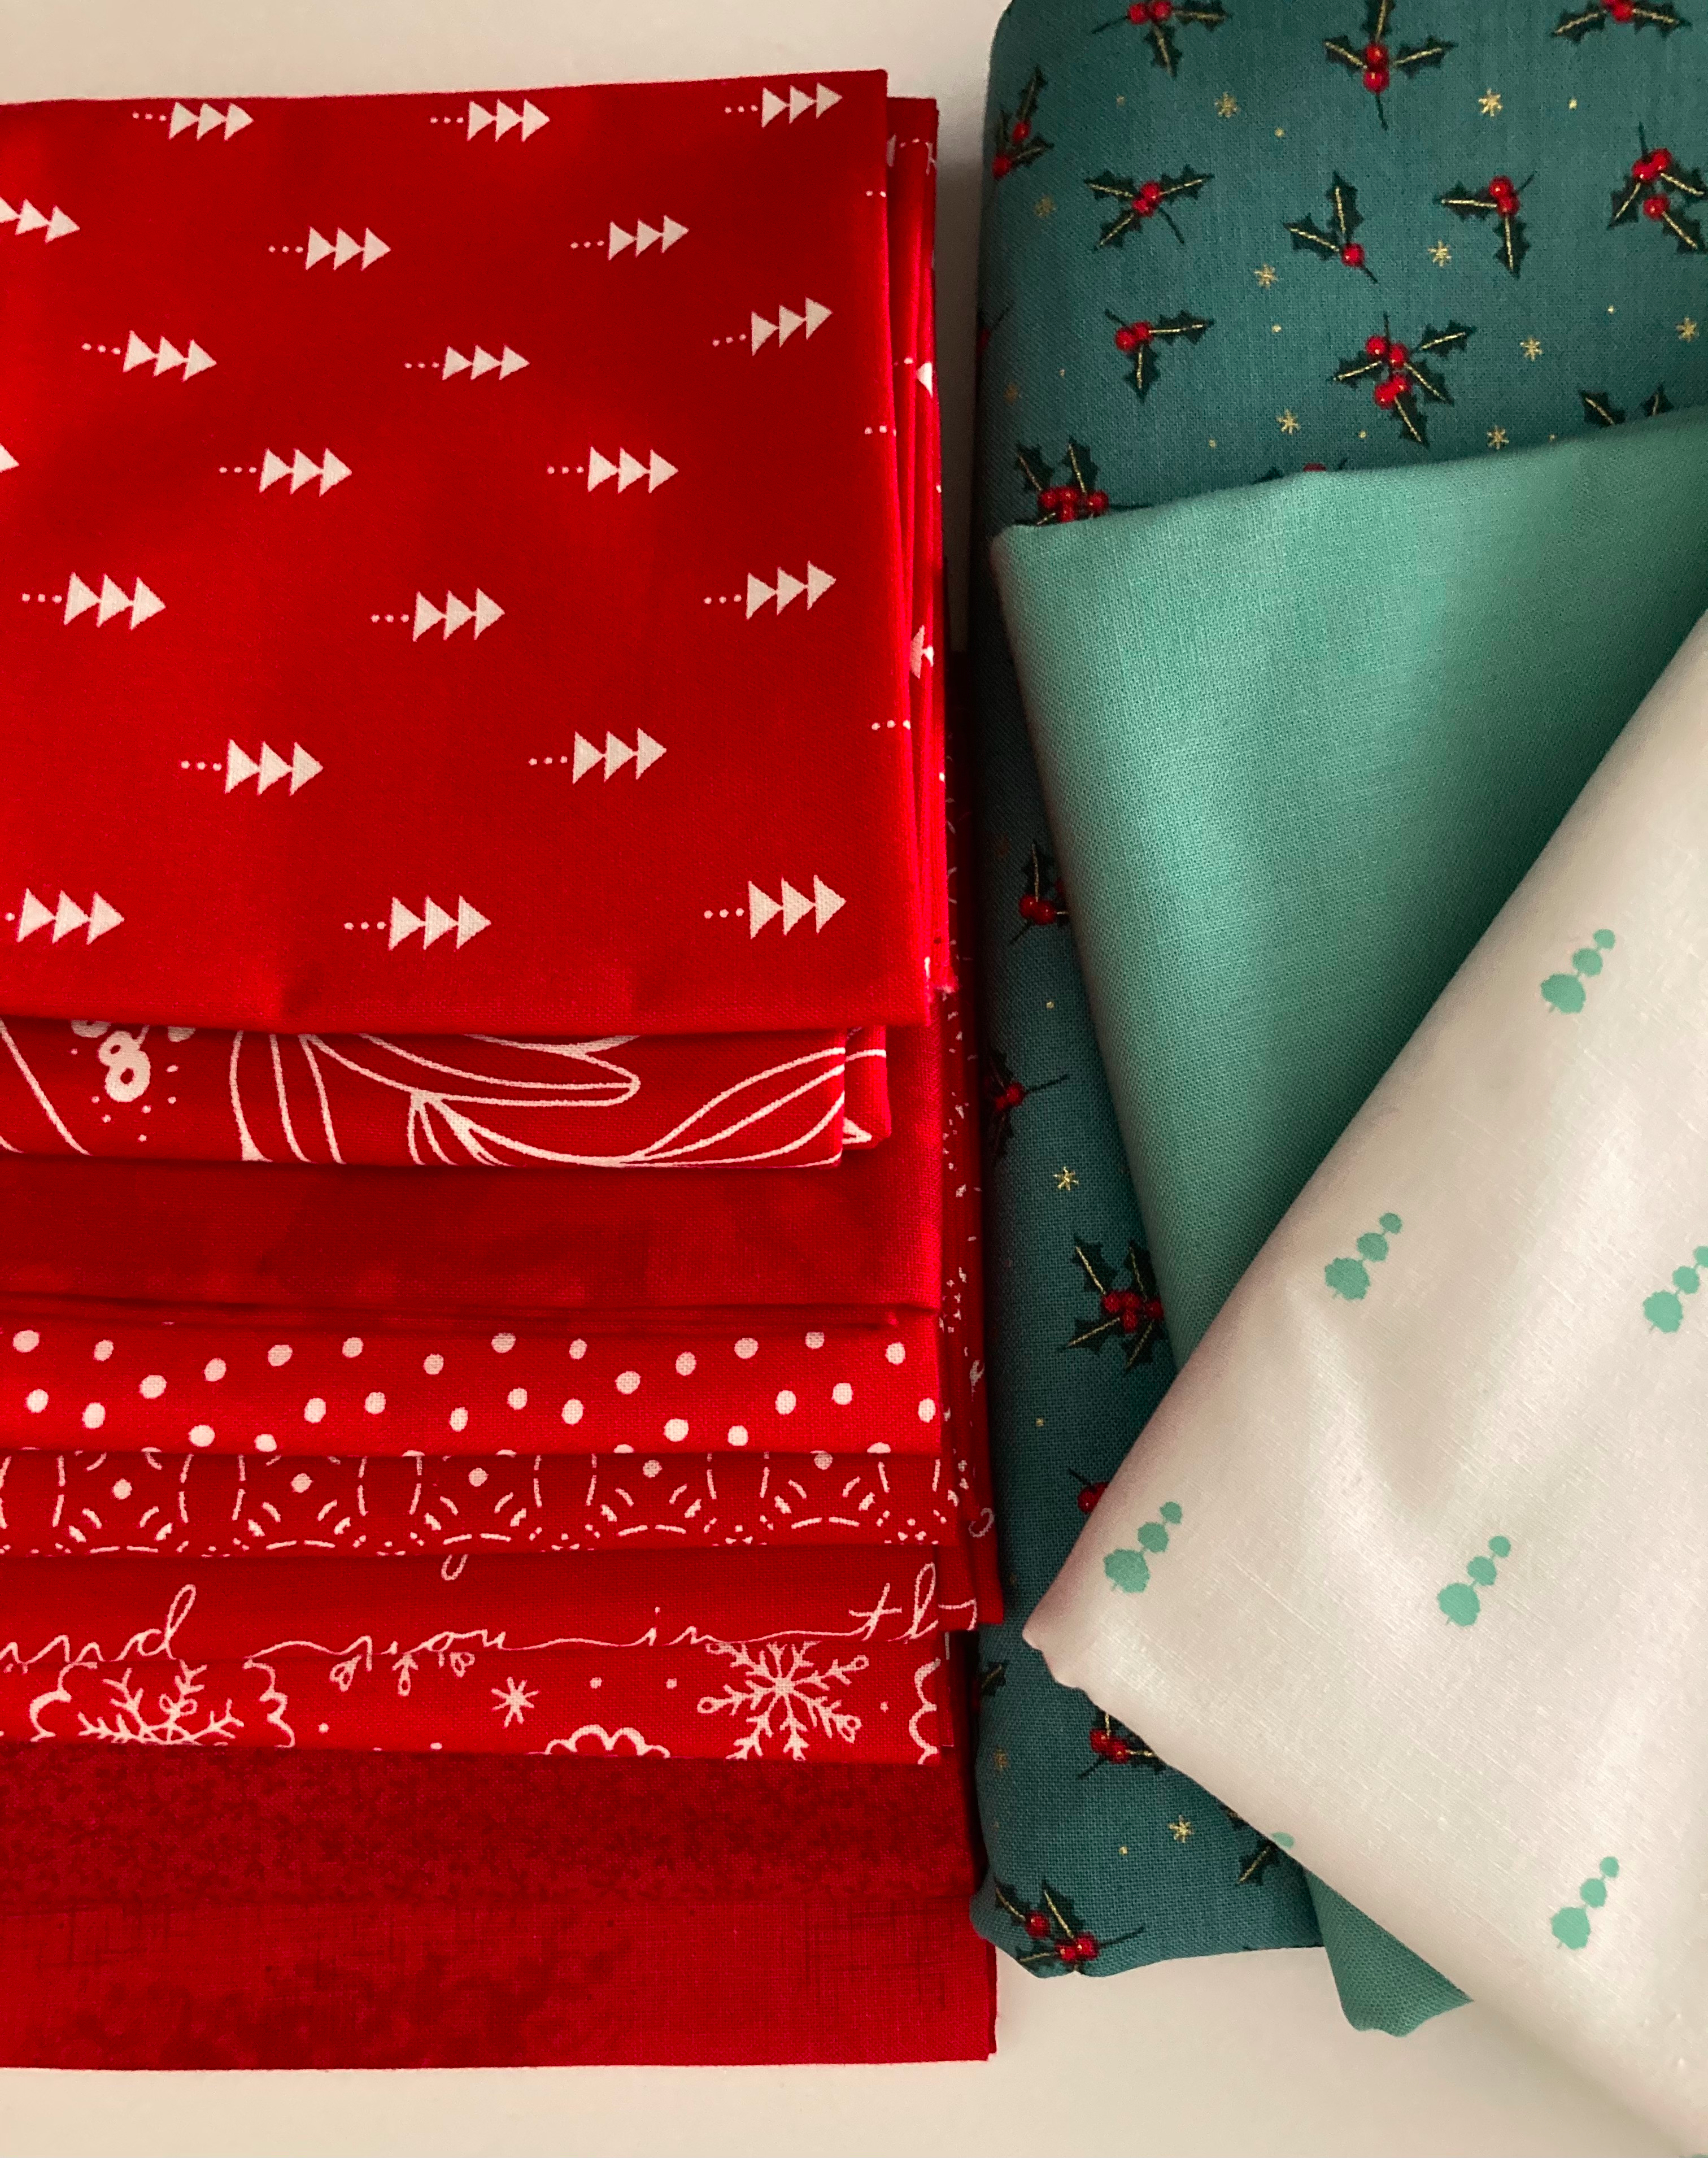
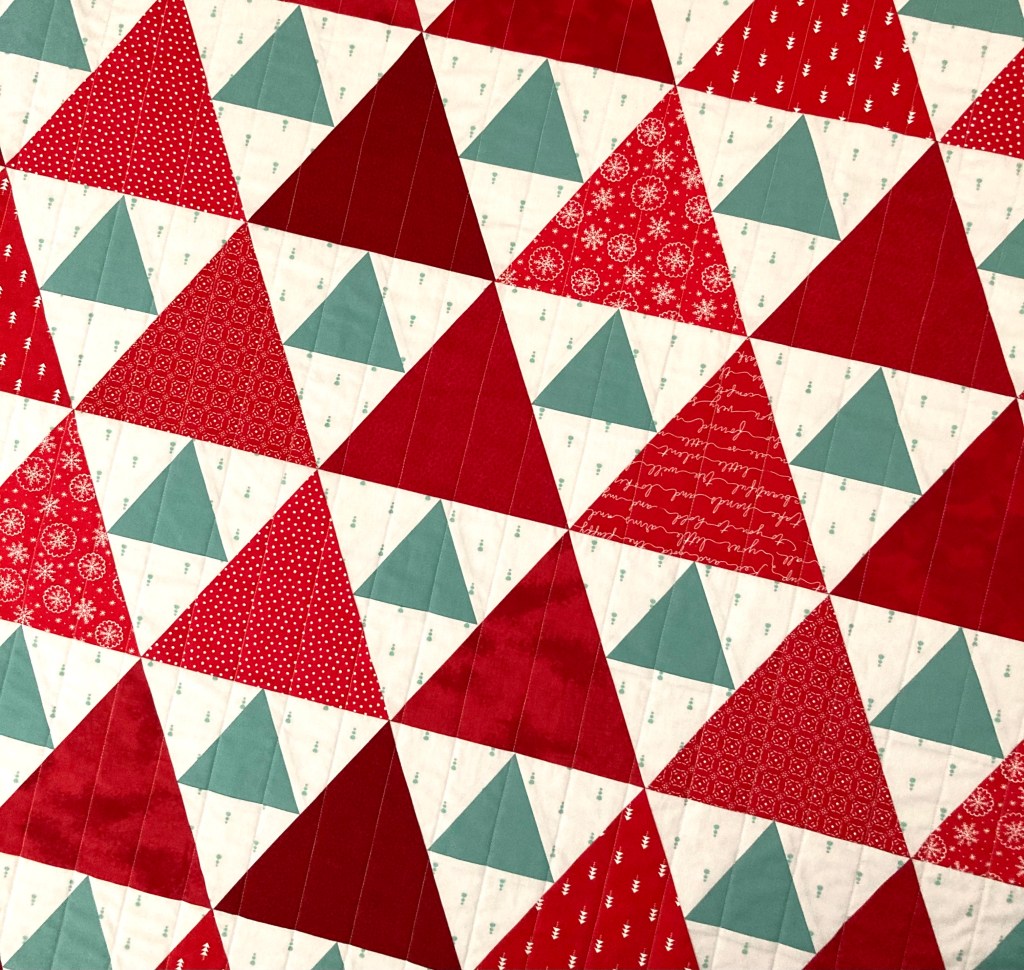
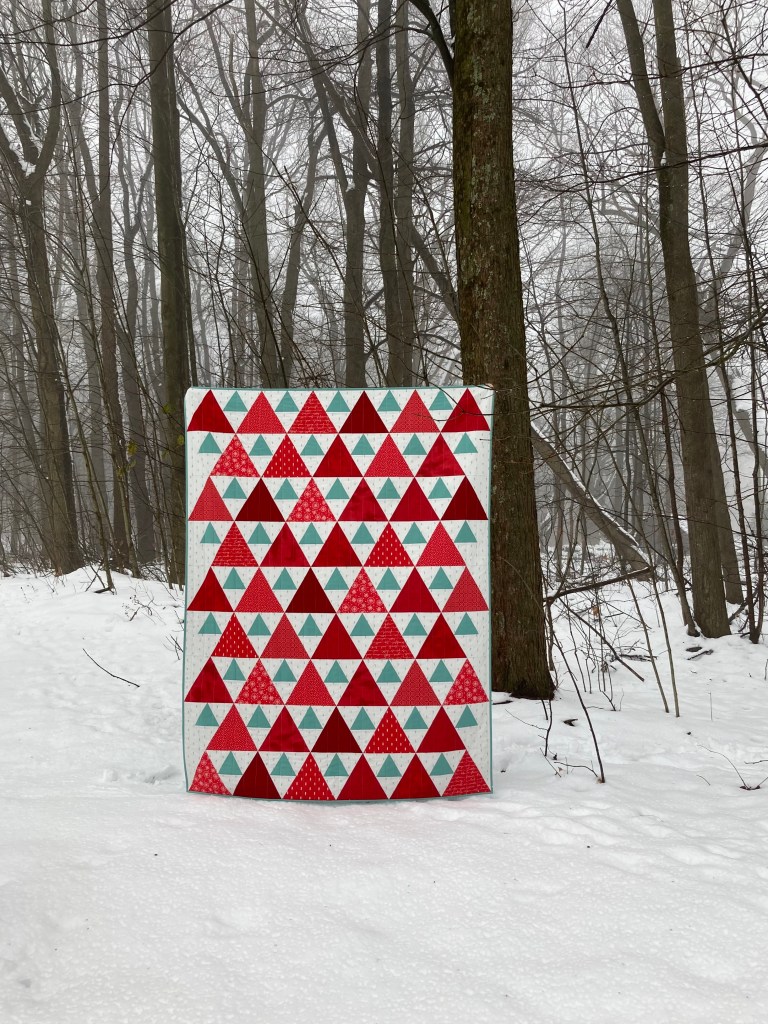
Two years ago I made a blue and orange Triangle Peaks quilt for my daughter and had since planned to make myself one with red and green fabric—I guess all those triangles got me thinking about Christmas trees. So here it is, my last quilt for 2020 (of 14 total).
Last year I ordered this lovely bundle of red happiness specifically for this quilt. I used only half of the fat quarters by excluding the richest reds and replacing them with reds that were more in line with the lighter ones in the bundle.
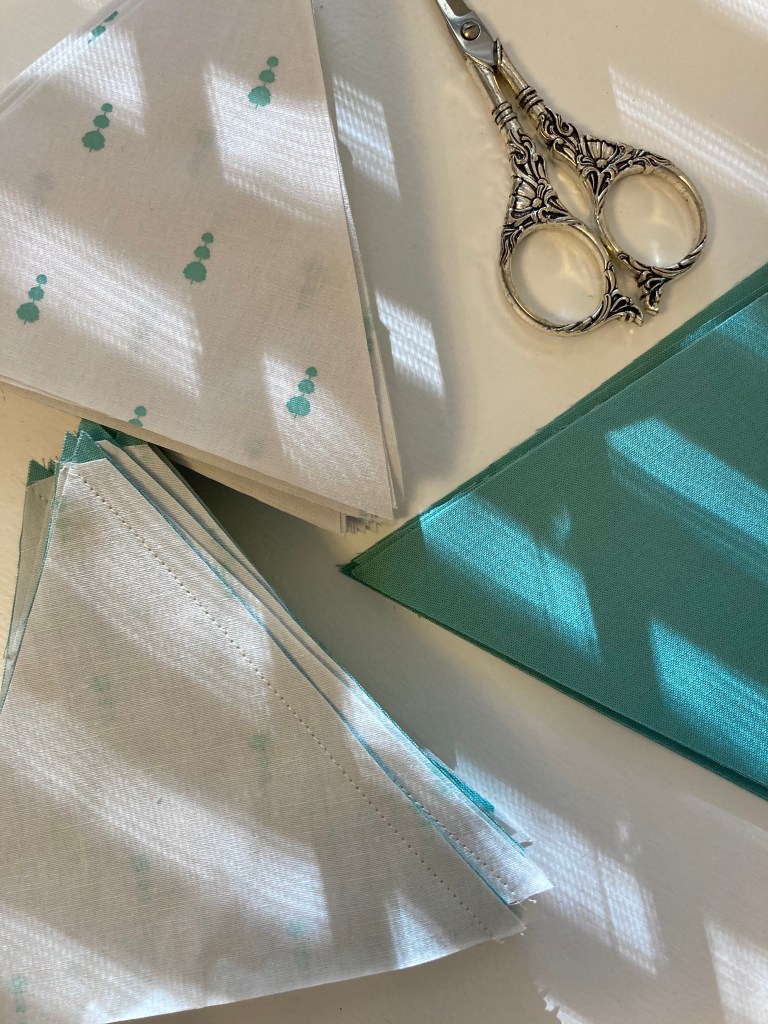
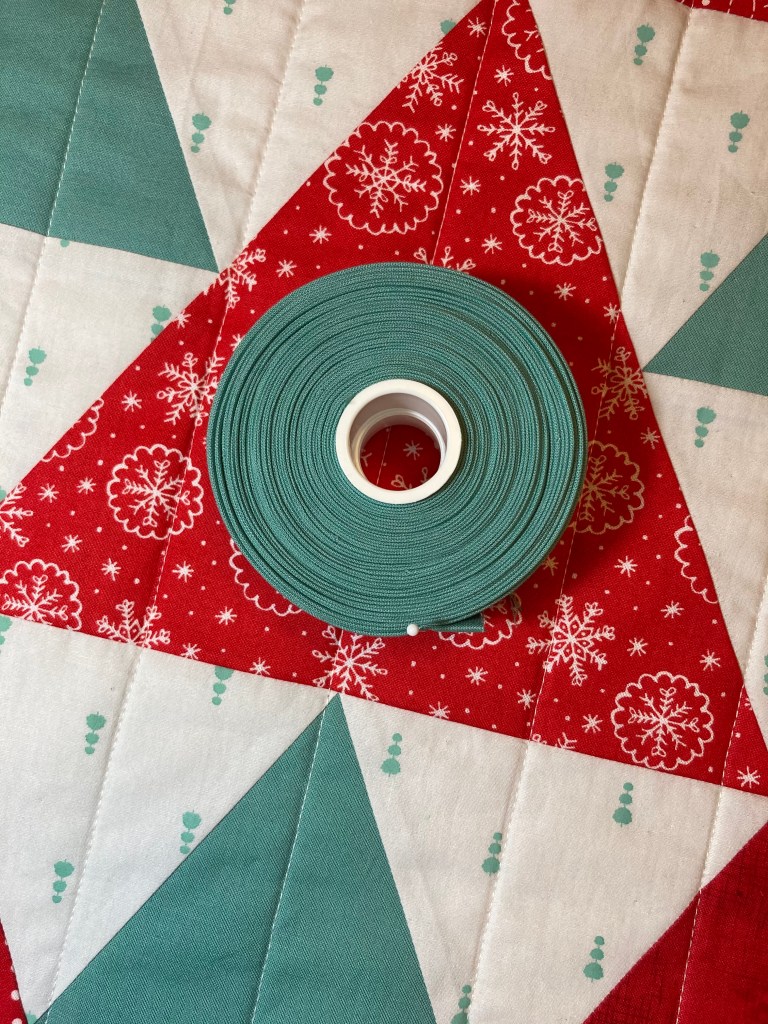
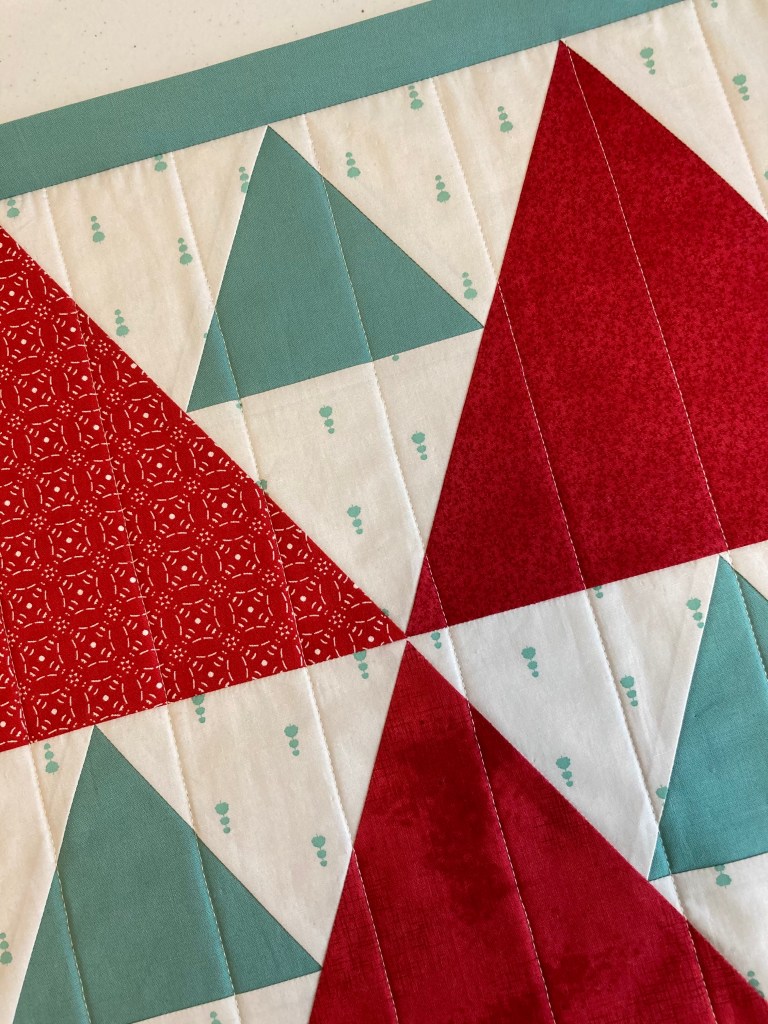
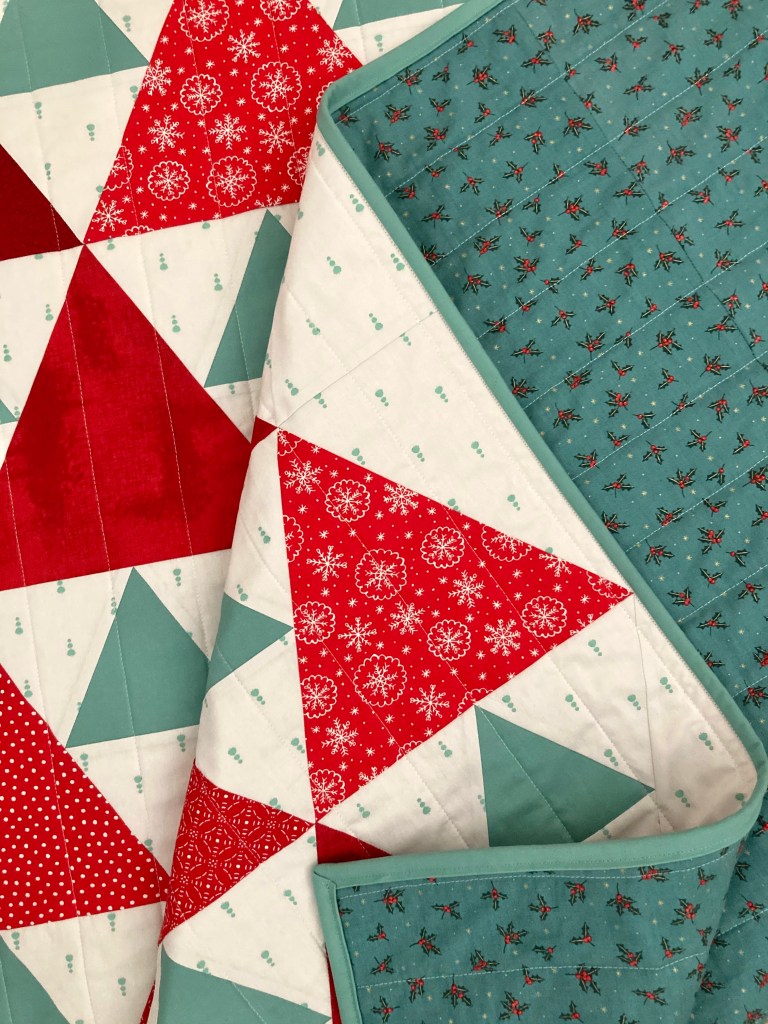
For the background, I used Art Gallery’s Loved to Pieces Frost Topiary. This fabric isn’t completely white, it actually has a frosty hue and the tiny topiary trees are so cute! I thought a different type of tree would give this year’s Christmas quilt a different twist. The accent triangles are Kona Cotton Sage green, which BTW took around nine MONTHS to get! Pandemic online fabric ordering has been quite the experience. Lastly, the backing is Andover Fabric’s Teal Yuletide Holly accented with pretty gold metallic.
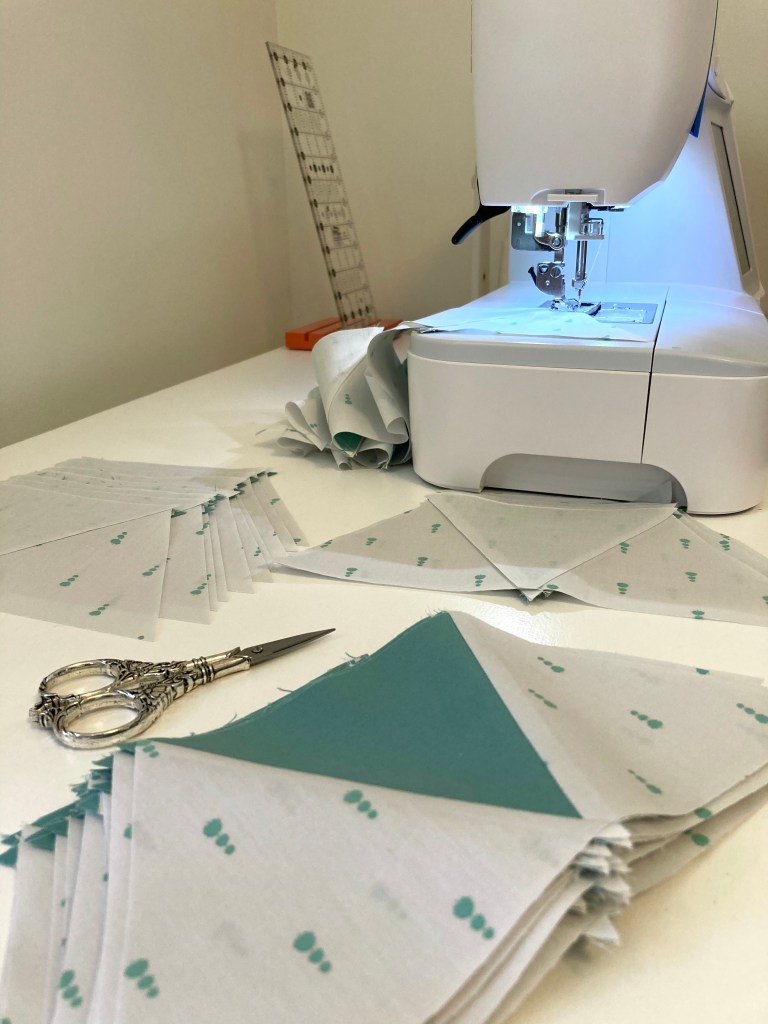
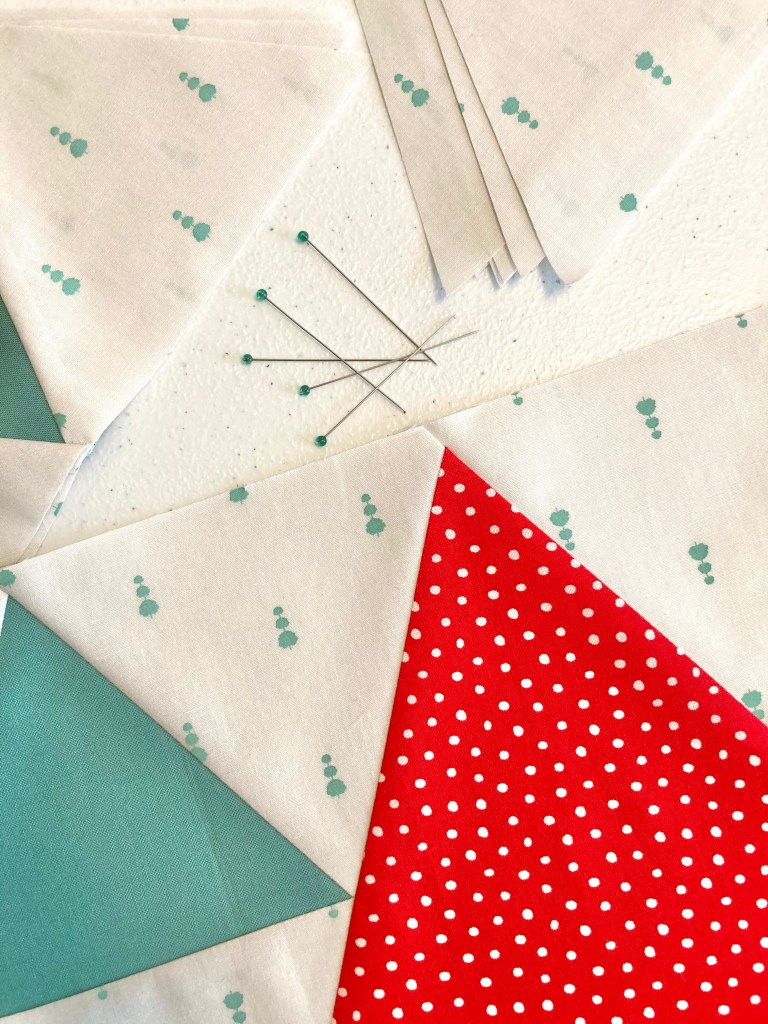
Triangle Peaks, by Emily Dennis, is one of the fastest makes out there. While it takes a while to cut the fabric (doesn’t it always?) there’s very little to do to make blocks. The large cut triangles are the main ‘block’ and the smaller triangles are simply sewn to the background. There are biased edges, but with so little to sew handling them sparsely is a given.
And chain piecing is always fast…
As always, choosing a layout is time consuming for me, I think I might tend to overthink it. Once the layout was determined, sewing the rows went quickly. Sewing the rows together to finish the top took quite some time, mainly due to pinning.
My absolute most dreaded part of quilting is cutting threads off the back. I will find every other non-related chore to do to avoid doing it. But, since this quilt has mostly biased edges that don’t fray, trimming was a cinch.
I decided to straight line quilt so pin basting was pretty intense. After my Quilting Disaster! I’m diligent about using plenty of pins. Lines were quilted 2″ apart giving it a clean, simple finish.
I used the remaining yard of the sage green for the binding to match the accent triangles.
After attaching my binding to the quilt and before sewing it down completely, I always give it a press. I find this helps it lie flat and makes it a bit easier to stitch down. 🙂
The holiday themed backing makes it complete.
And here it is!
Yet another festive quilt for the holidays. Merry Christmas!