One of my latest patterns calls for a Square in a Square unit that I incorporate into a block. Since I’ve used these units in the past as well, I thought it would be a good time to create a Square in a Square cutting and sizing chart as a reference guide.
With this chart you won’t have to waste time figuring out the math, it’s all right here. 🙂
Like all charts I have available, this Square in a Square Chart can be downloaded as a PDF. Whether you save a copy onto your computer or keep a printed copy, it’s a great tool to have on hand!
If you’ve been quilting for a while I bet you’ve accumulated quite a bit of cutaway batting—I have a fair amount myself. For me, I needed to stash down and use what I had plus I’ve found it difficult to purchase any batting because it’s either sold out or on backorder.
Since I had a couple patterns in the works, it was a good time to do some quilt batting piecing so I could finish my projects. First up was a throw quilt that will finish 56″ x 72″.
To get started, I gathered cutaway strips from other quilts I’d made. I had three strips that were long enough and once sewn together, the whole piece would be wide enough. Because the strips were uneven in length, I cut them all to an even and approximate length of what I’d need. I then was ready to get sewing.
Here’s what I did, and if you decide to piece batting too, this is what you’ll need to know. I’ve compiled a list of tips to help you as you go along.
Before you start sewing:
Set up good lighting.
Match the thread to the batting as close as possible.
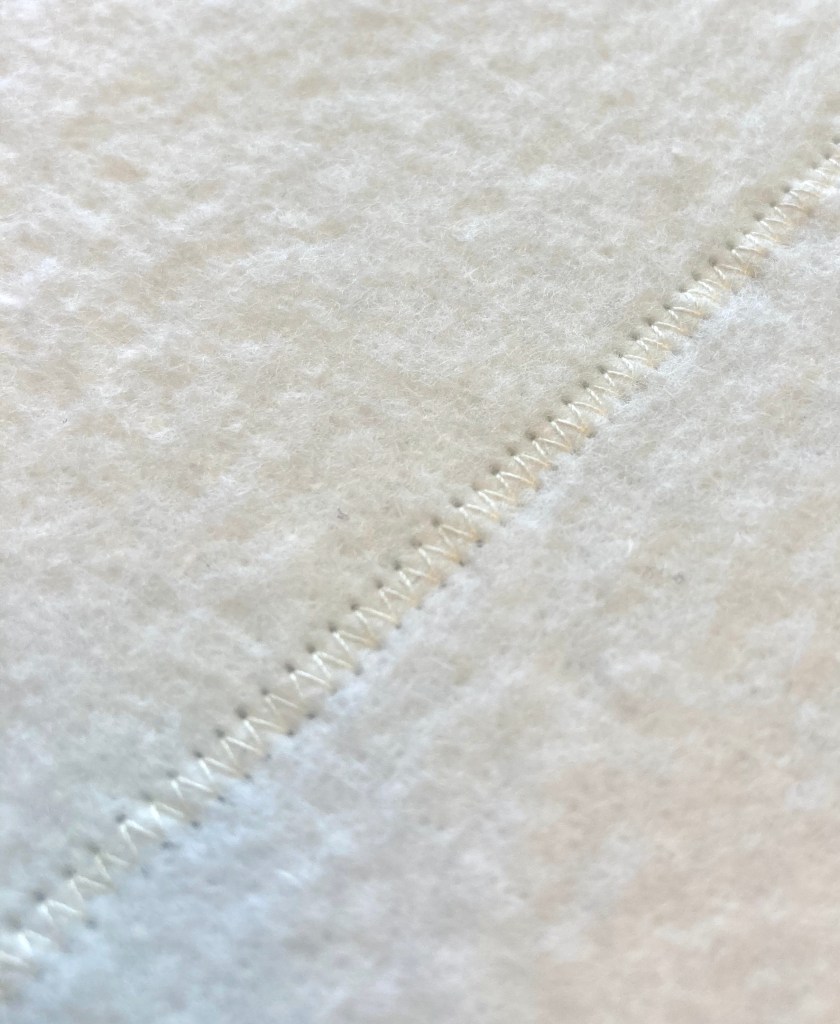
Cut fresh, straight edges using a ruler and rotary cutter OR if the factory cut edges are straight, they are fine to use.
Make sure the same sides of the batting are up.
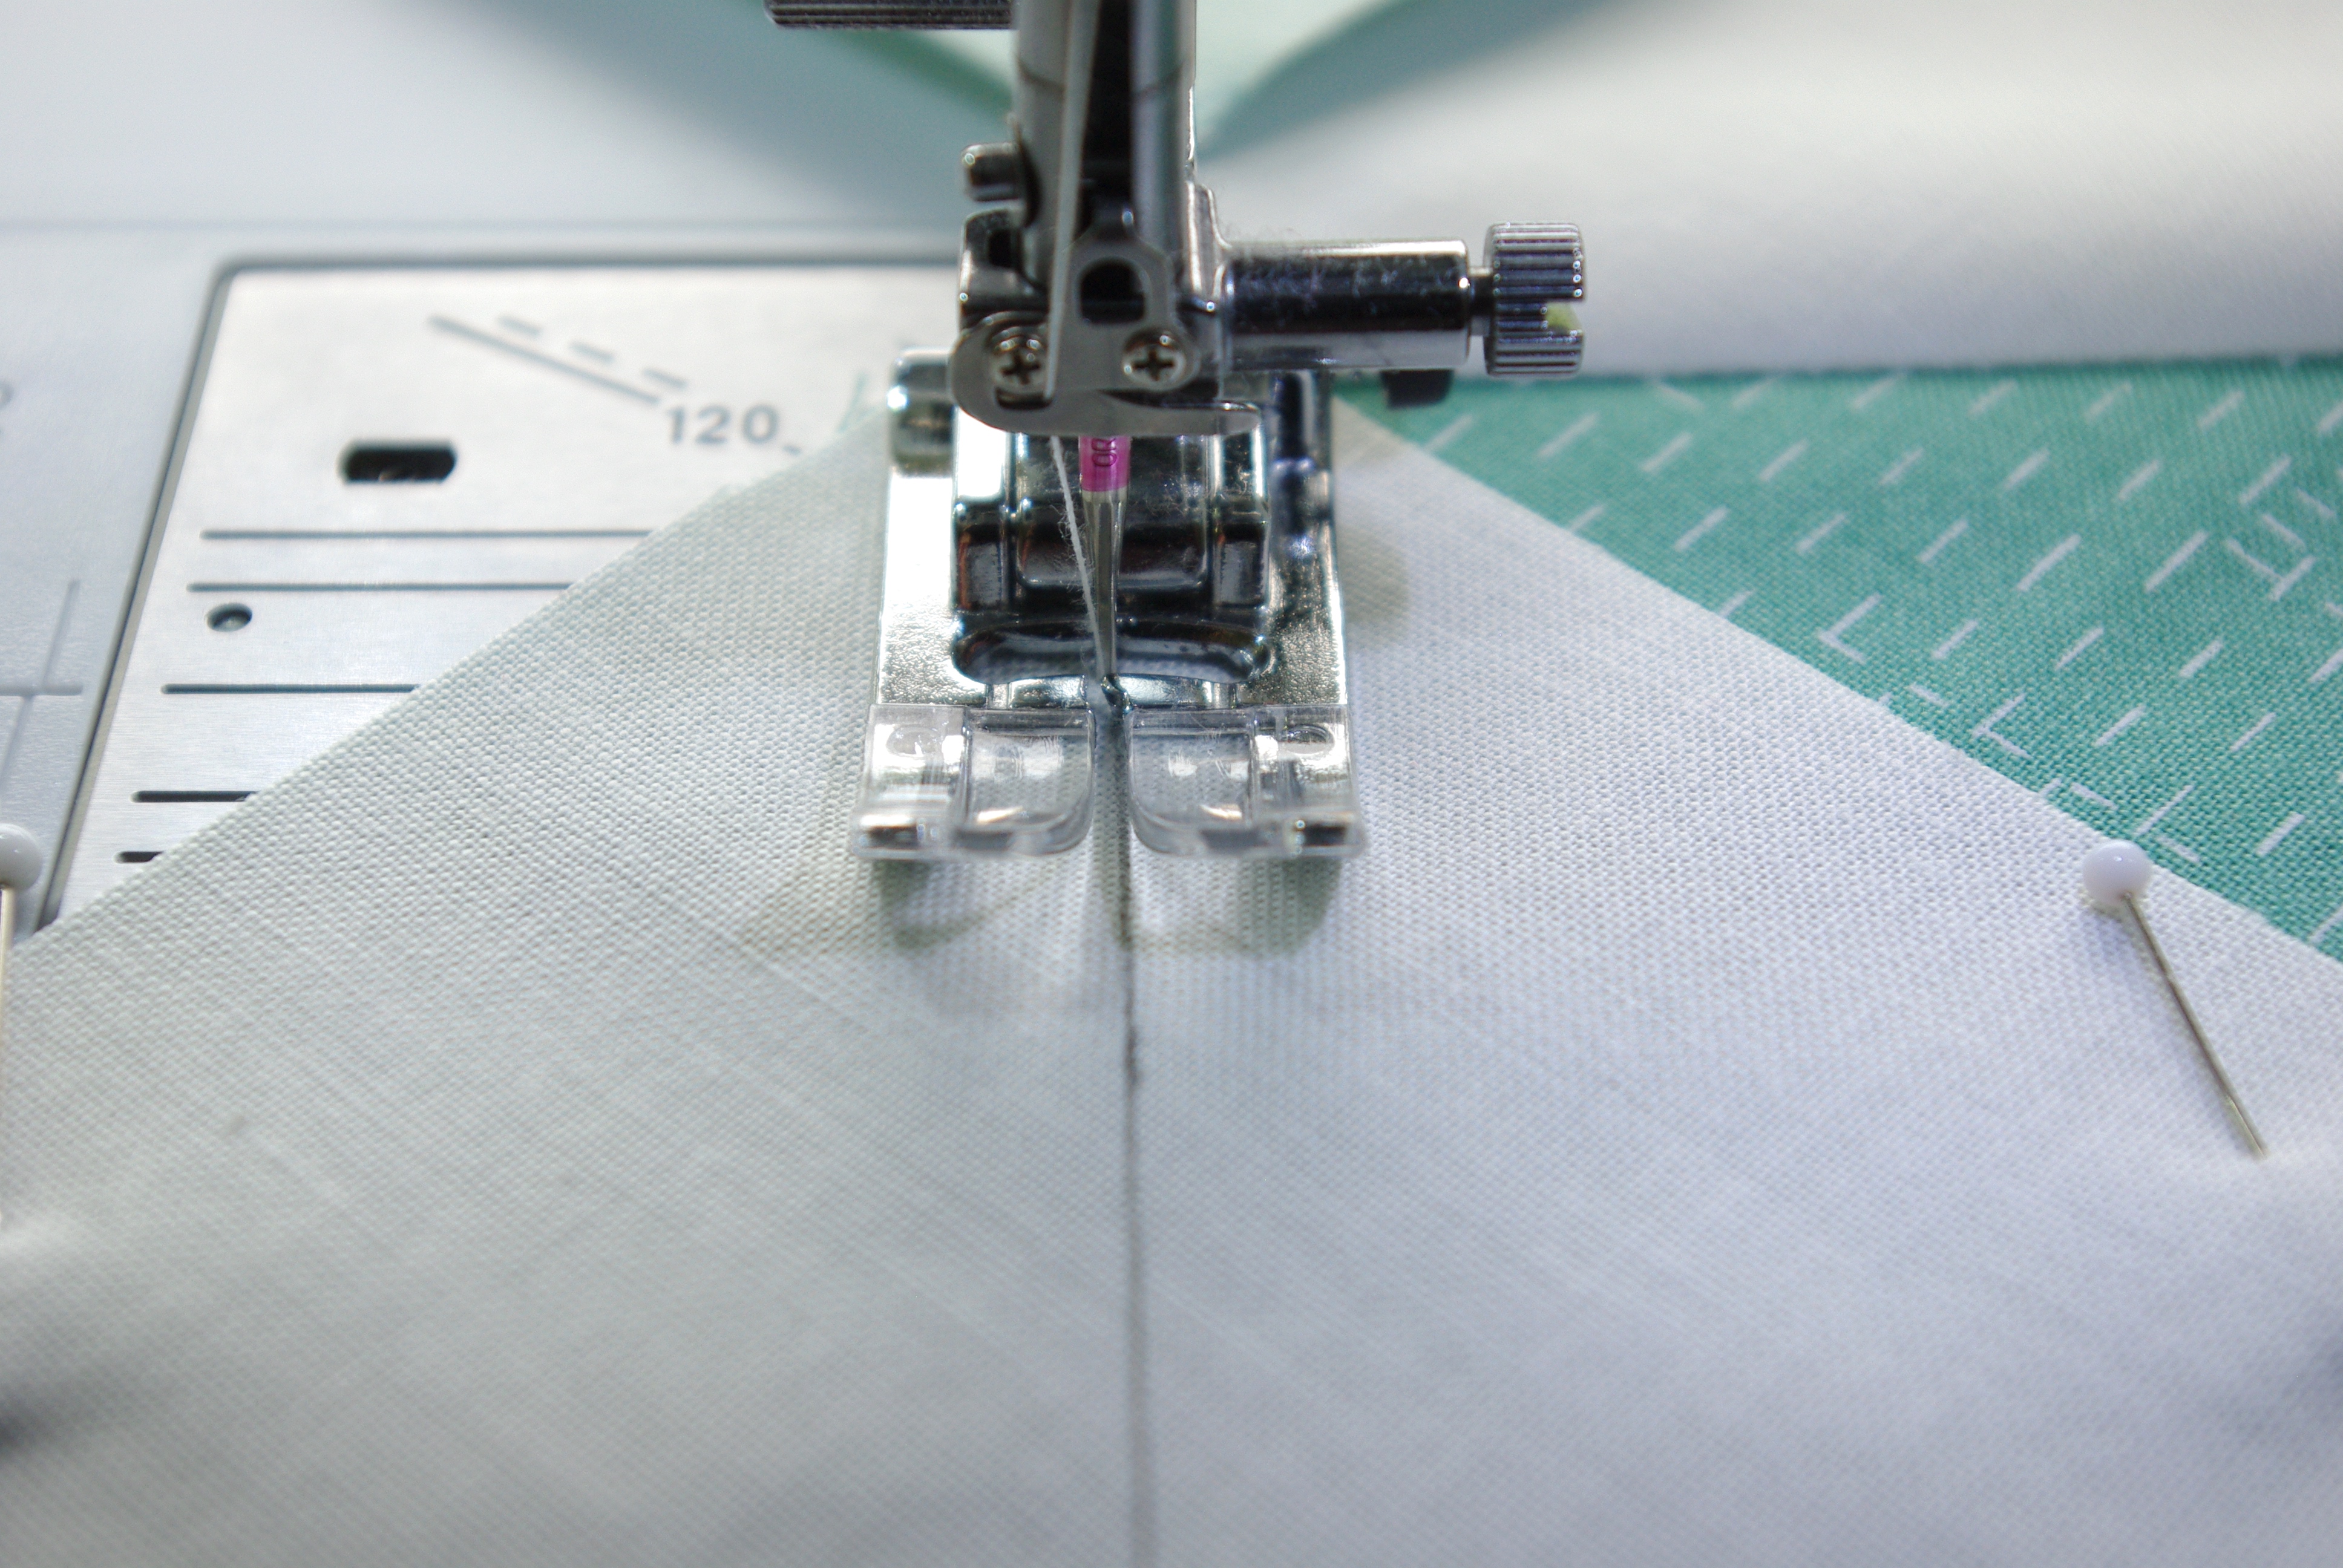
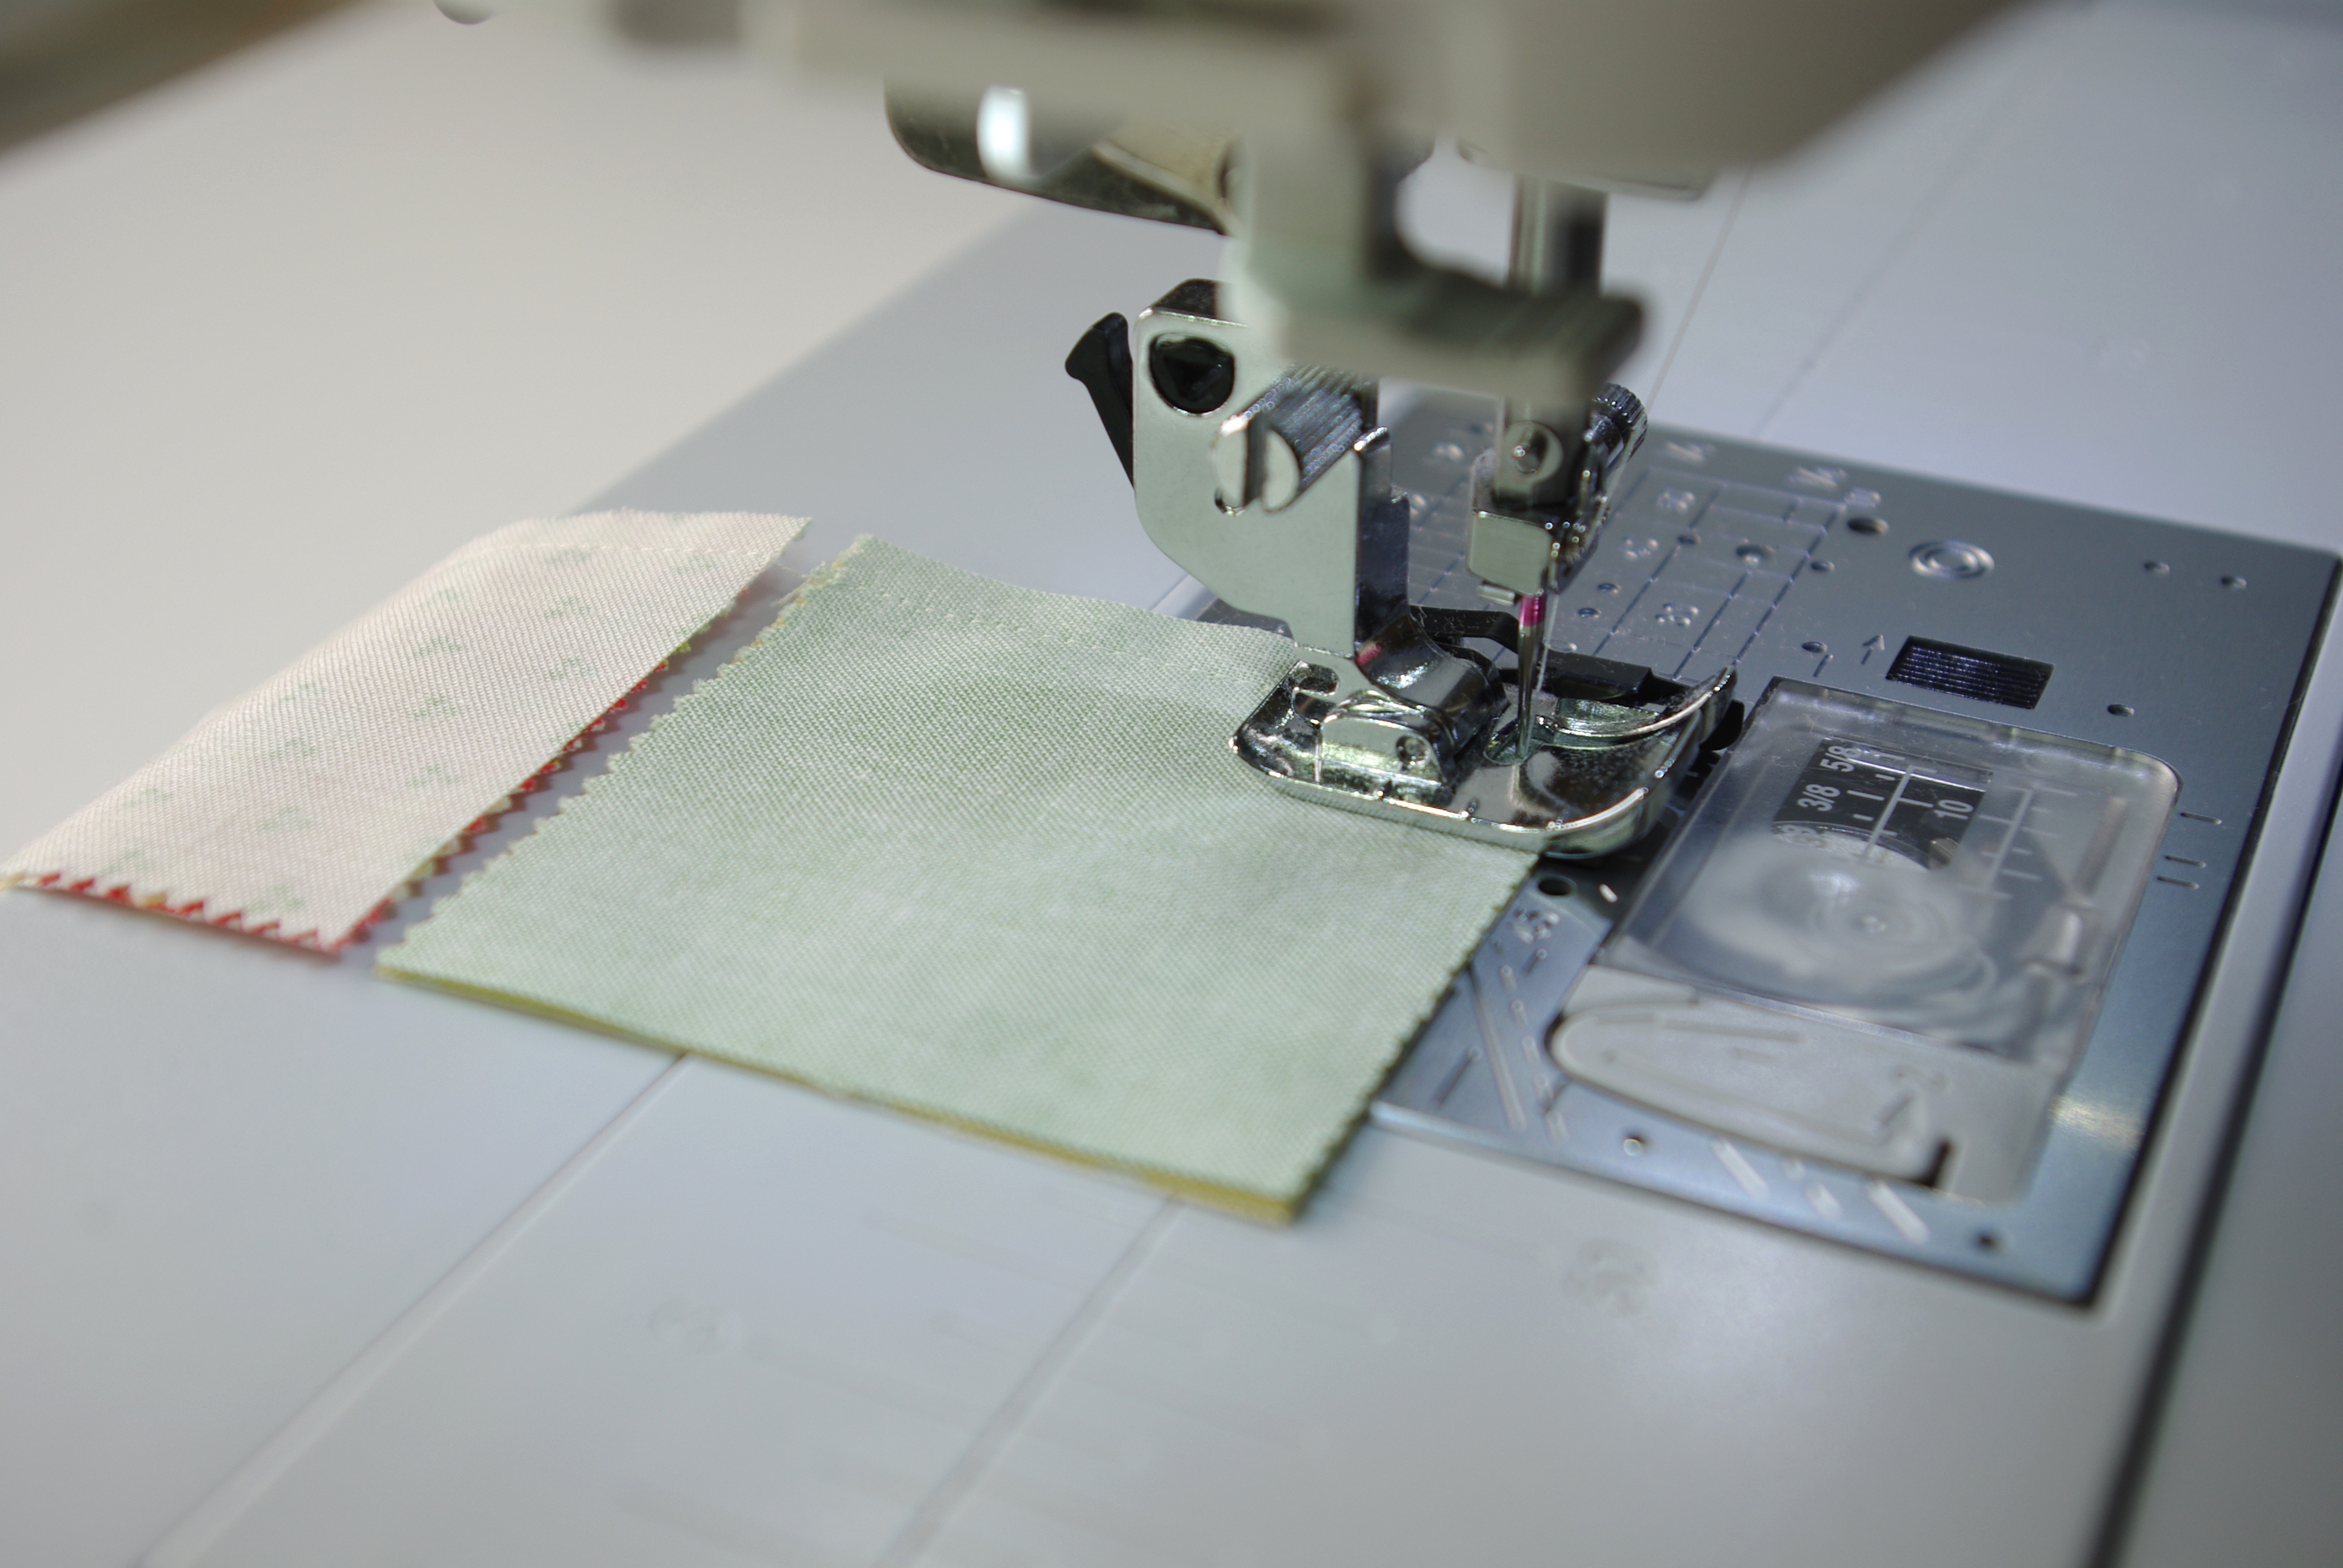
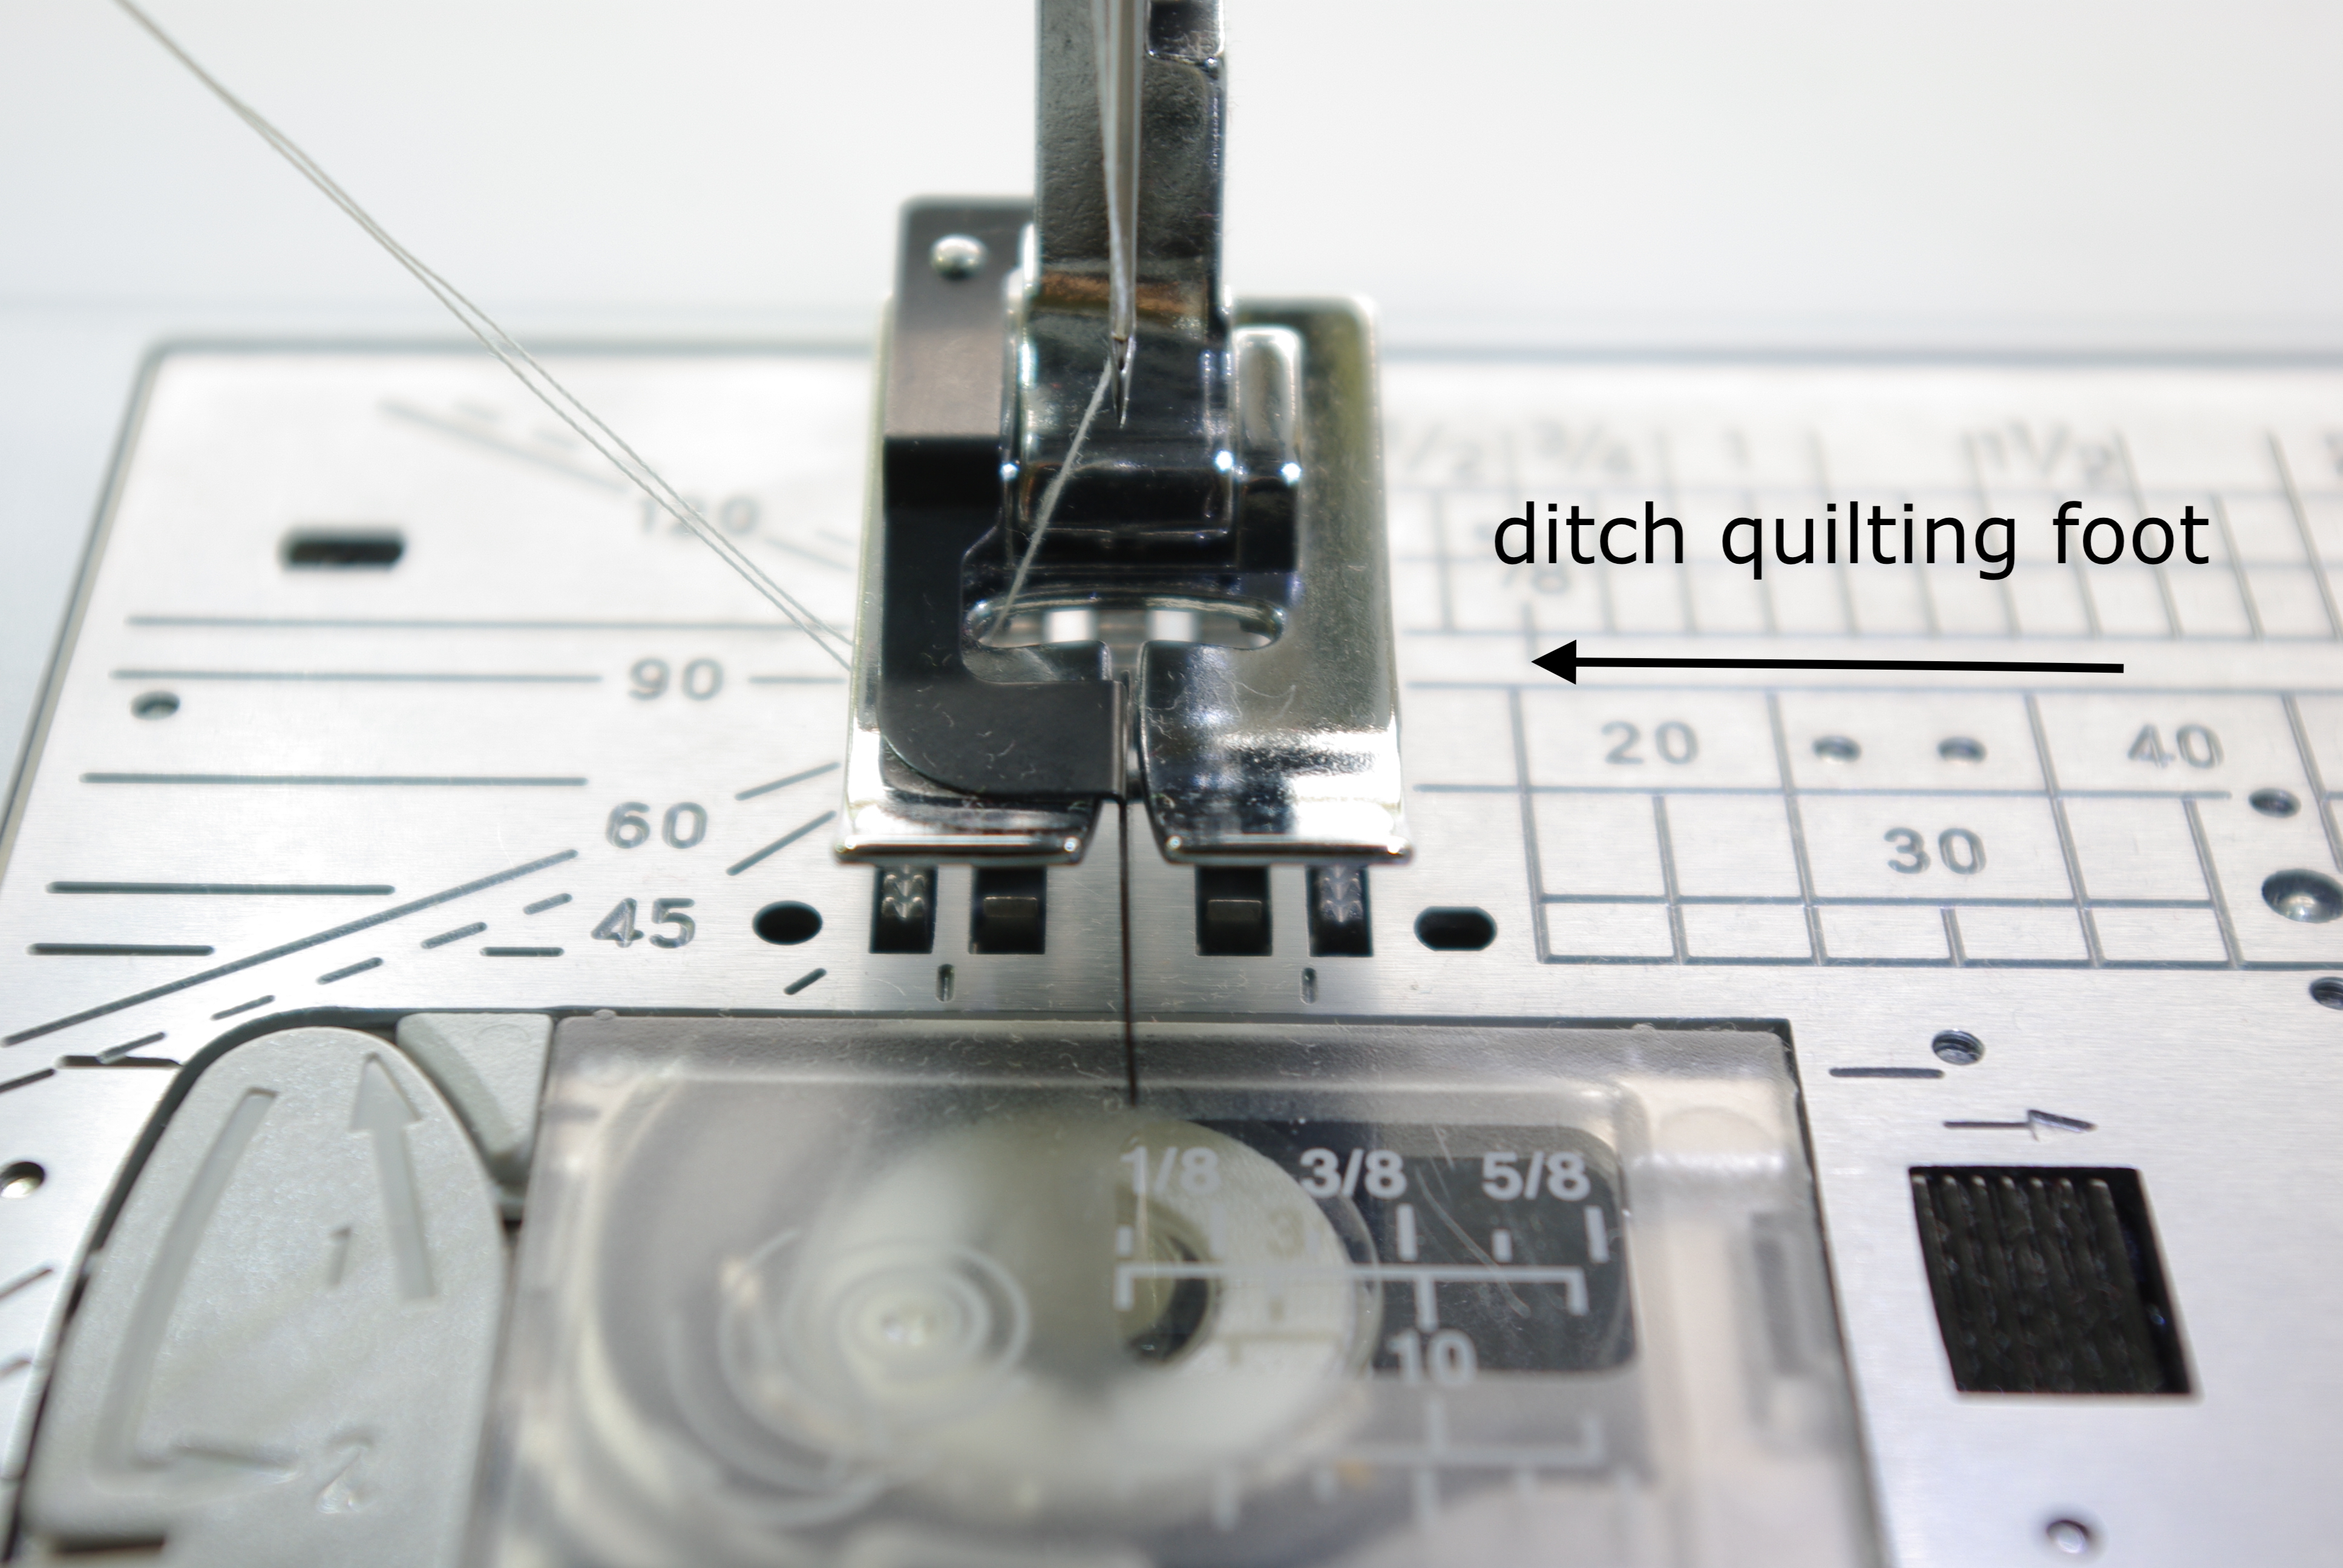
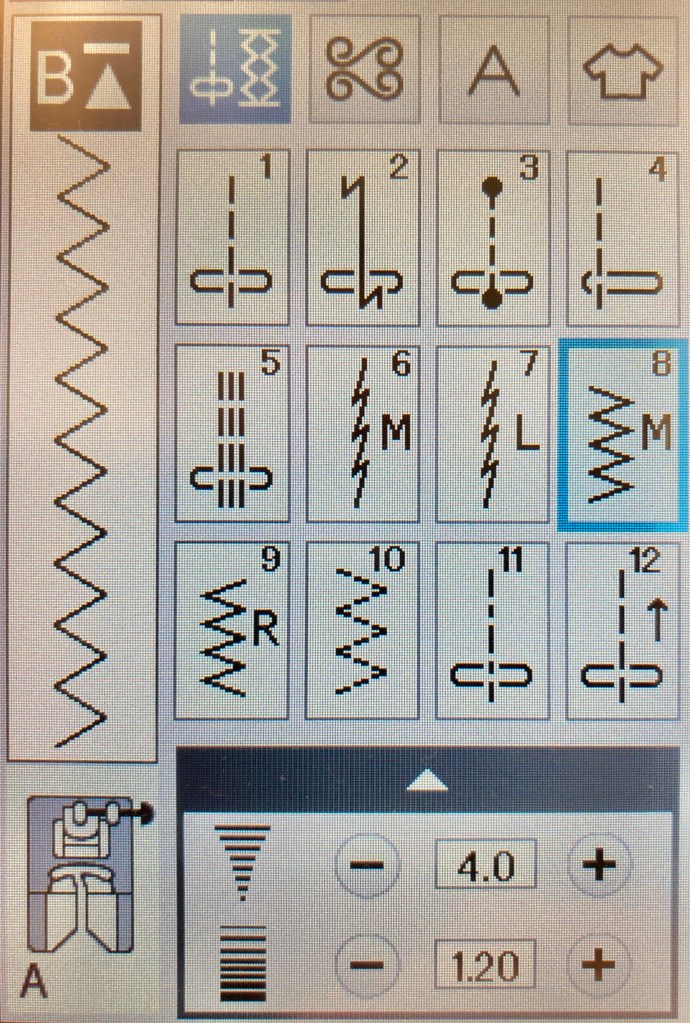
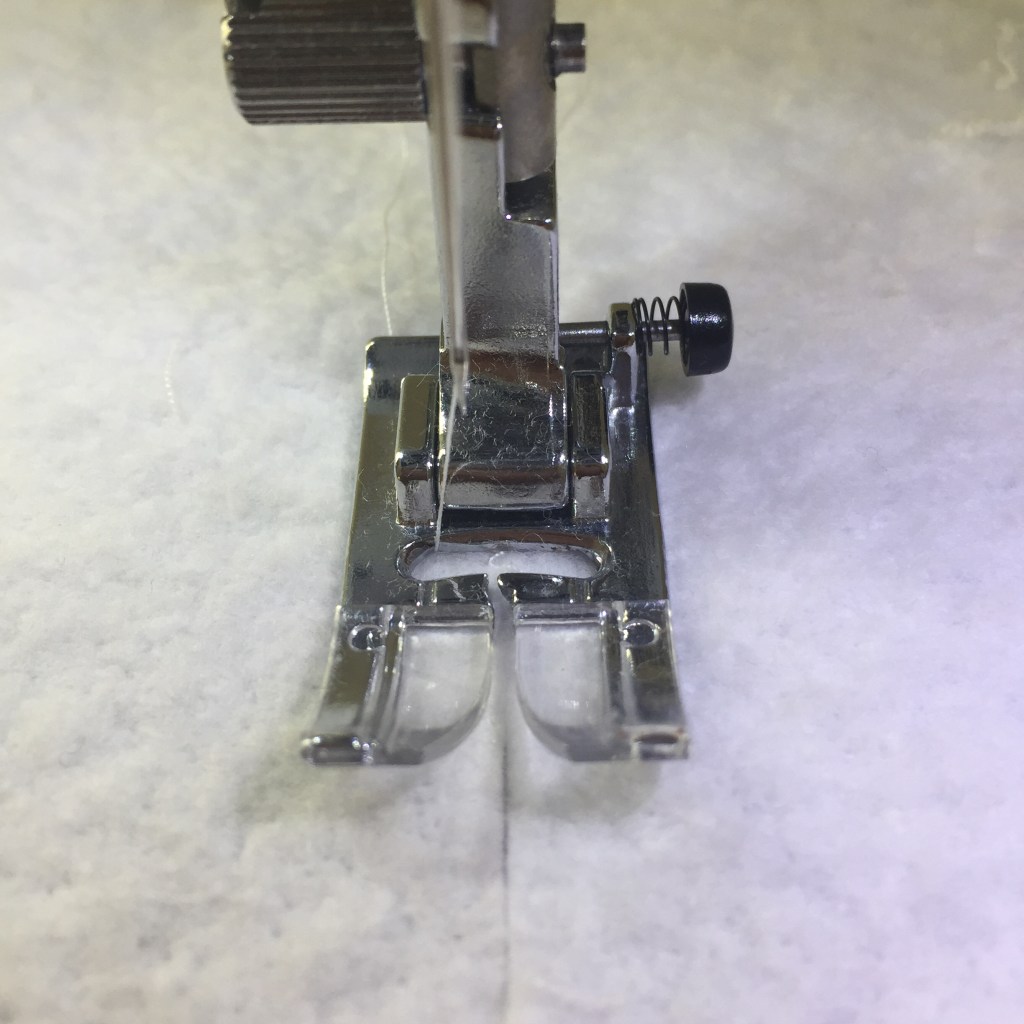
To insure seams stay secure, use a zigzag stitch. I sew on a Janome Skyline S7 and this is the setting I used. Whatever you can set close to this should work fine.
Choose the proper foot for your machine.
Try a sample first to ensure your stitch length is set appropriately.
Once you get started:
Sew slowly making sure both sides of the batting pieces are caught by the zigzag stitch. Going fast will make batting bunch.
Use quilting gloves for a better grip (batting can be slippery).
Finished pieced quilt batting
Once finished and before use:
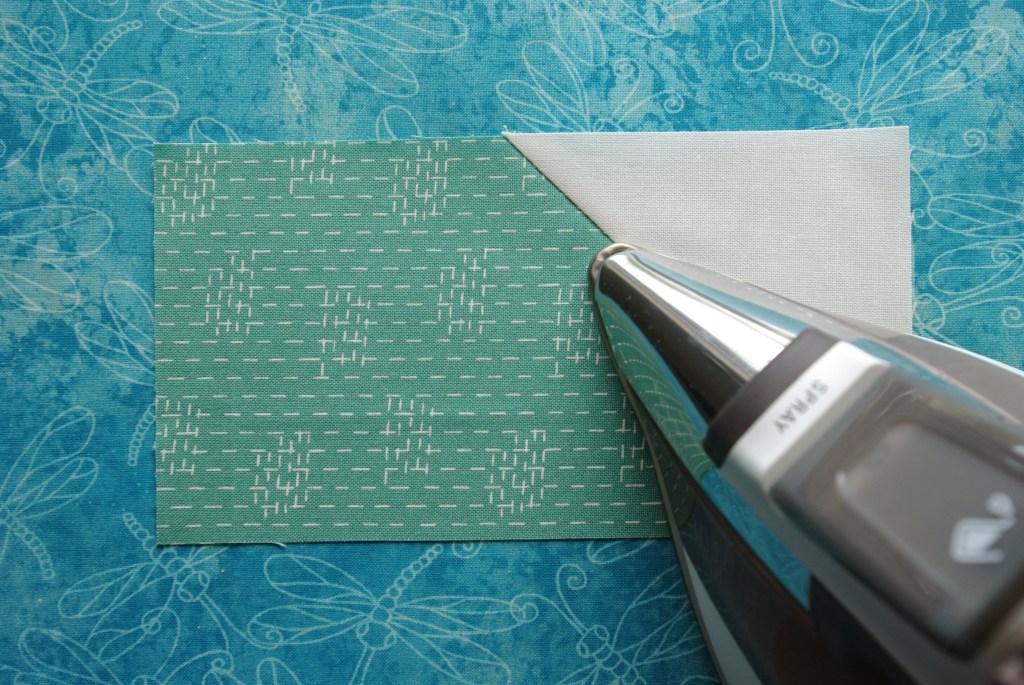
If necessary, you can press the seams to help them lie flat, but make sure the entire area of batting where you intend to iron is covered by fabric or you’ll get residue on your iron that’s difficult to remove, trust me. 😉
I spritzed water over my stitching to help relax the seams which worked really well. If you do use water, check that everything is dry before sandwiching and quilting.
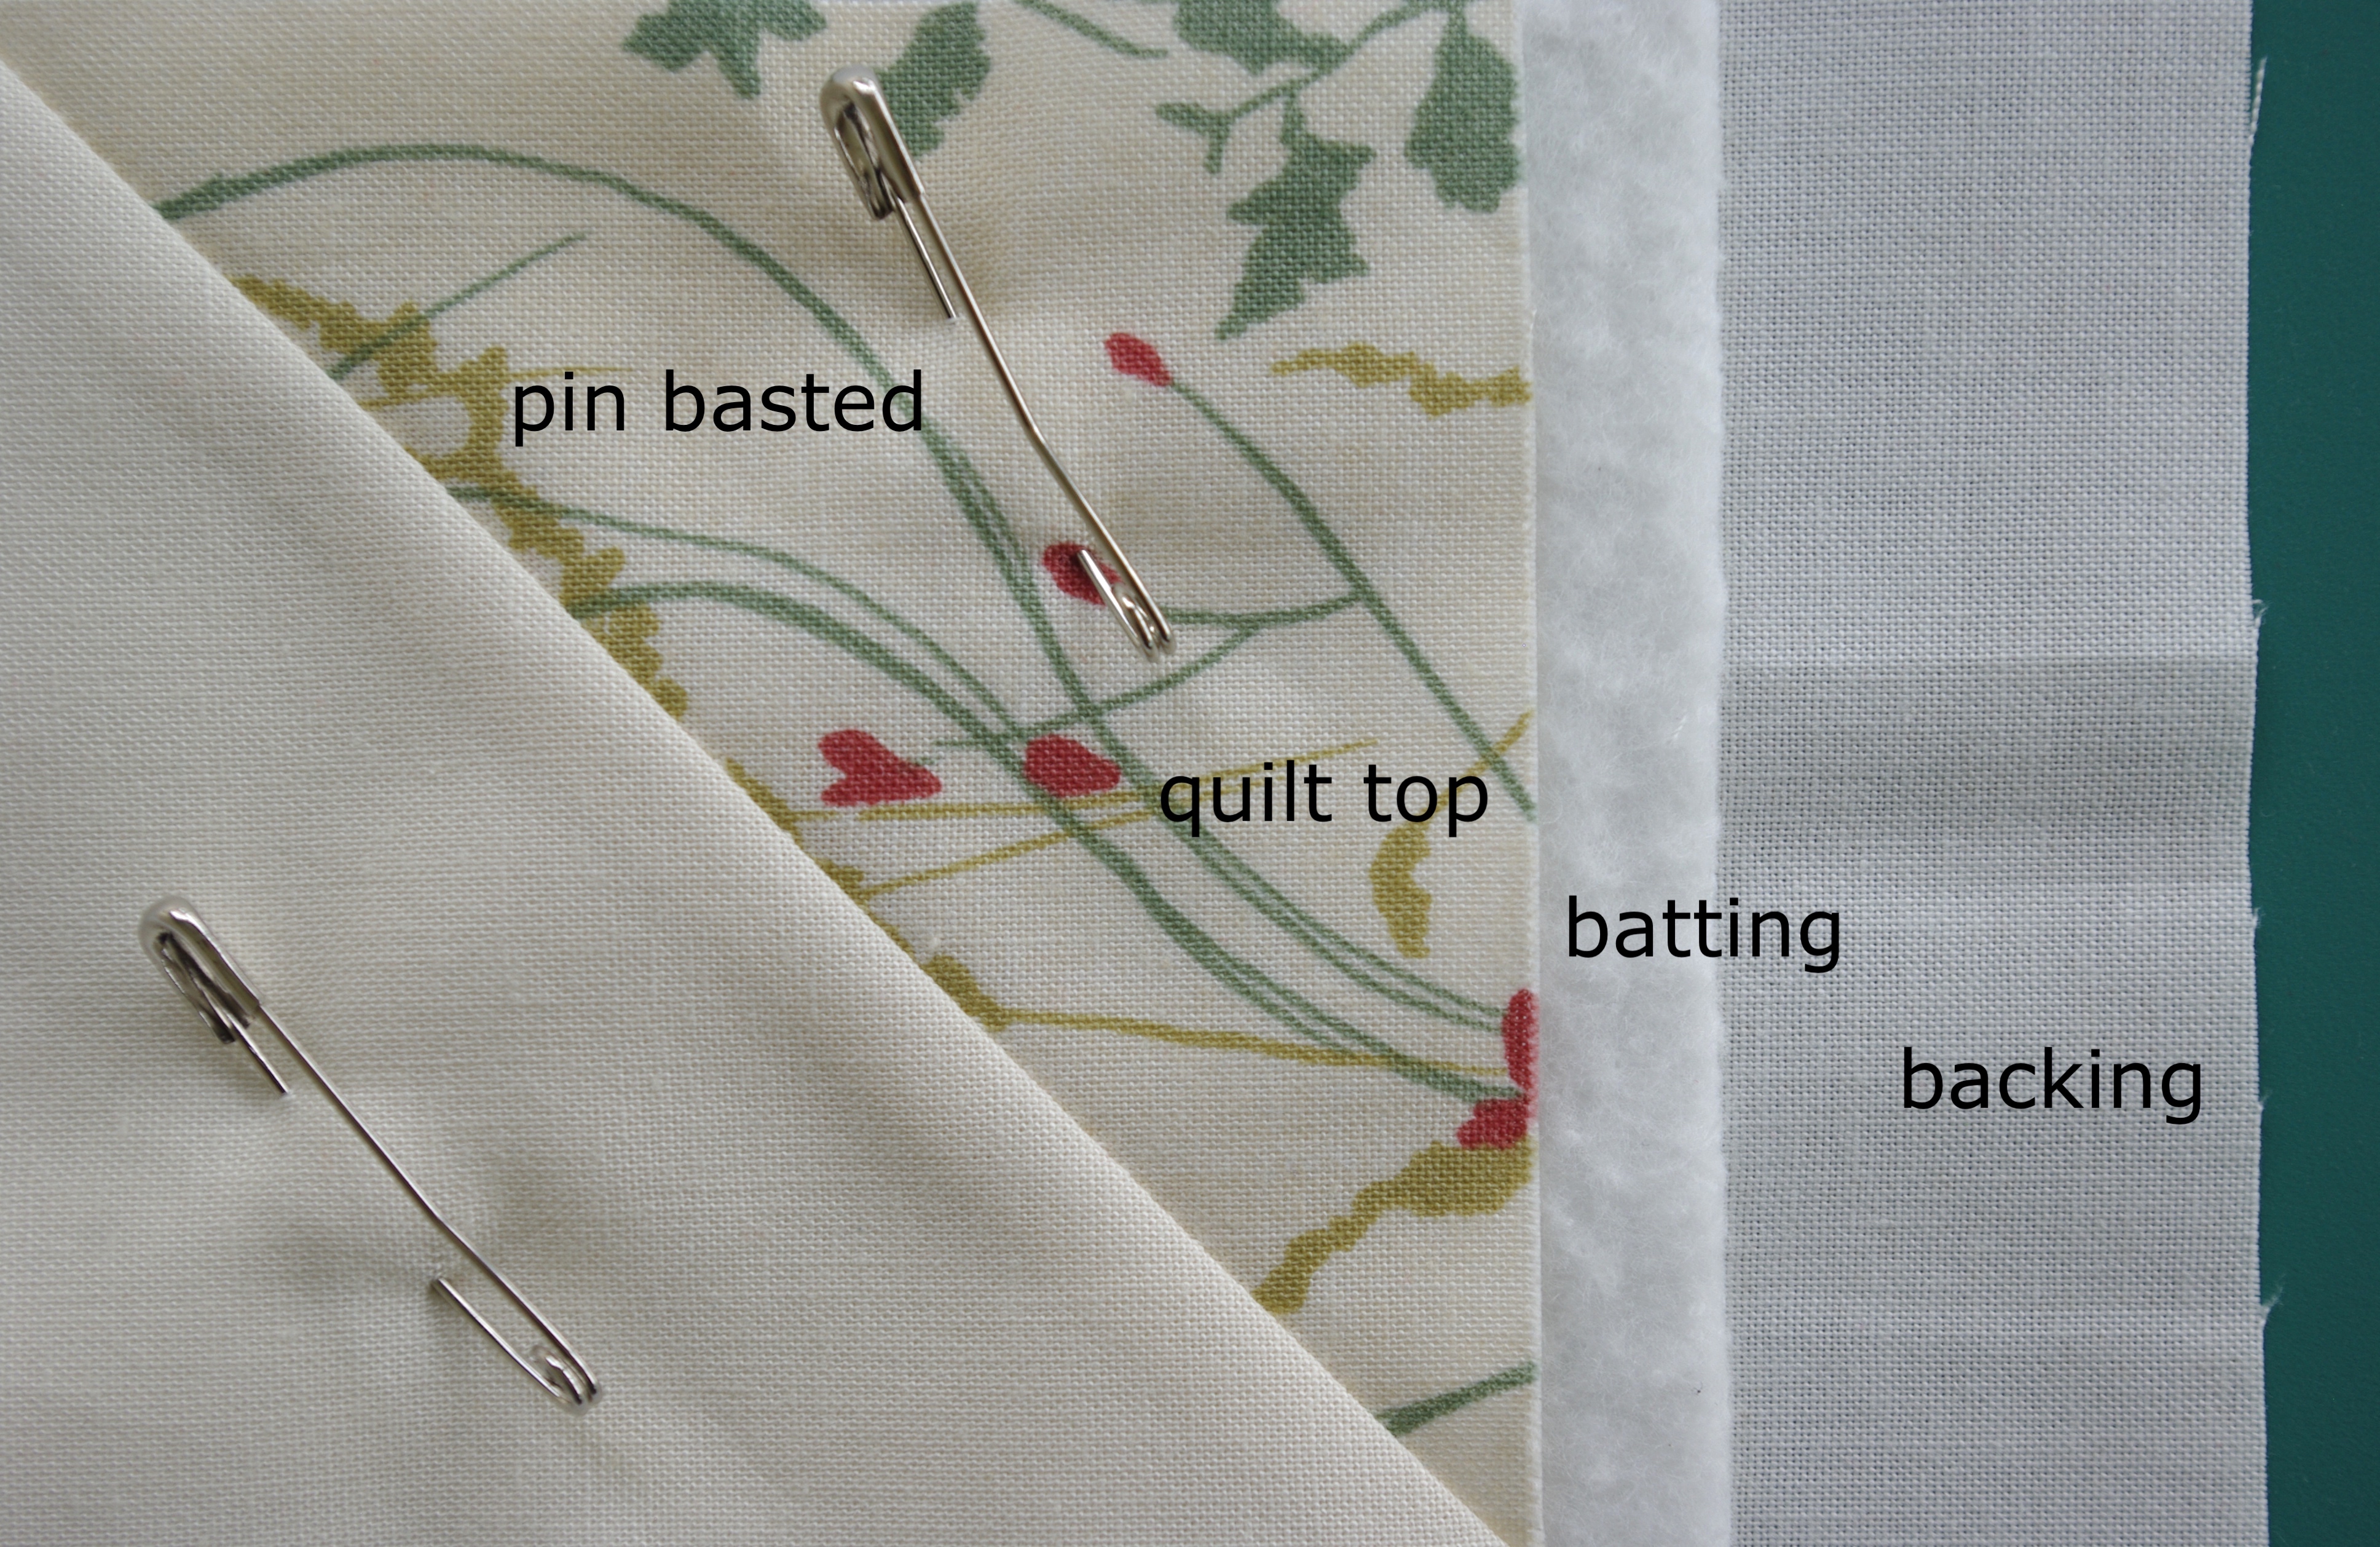
Here’s a photo of an area beneath the quilt top where there’s a pieced batting seam…you’d never know!
Last week I decided to make a charm pack friendly quilt but I wanted to use fat quarters from my stash. Since I didn’t know how many 5″ squares could be cut from a fat quarter (or any other size squares for that matter), I went online and did a bit of research.
After finding the information needed, I decided to make a quick reference chart for future use. I figured if I was wondering such things, other quilters would be too.
My Fat Quarter Cutting Chart is a free PDF download. I recommend saving it to your computer or printing out a copy as it’s a great tool to have on hand.
And how many 5″ squares do you get from a fat quarter? The answer is 12!
You’ve finished your quilt and it’s time to add the binding. If you’re new to quilting or just want to try a different way to machine bind, I’ve got you covered. This tutorial will take you through the whole process, step-by-step.
Since I tend to make several quilts a year, I’m left with the decision whether to bind them by hand or by machine. Typically, I base my decision on how the quilt is going to get used. For example, if I’m making a baby quilt and I know it’s going to get laundered a lot, I’ll machine bind it. If I’m making a quilt that’s not going to get used much, such as a holiday quilt, I’ll sew my binding on by hand. I do enjoy taking the time for hand sewing and I love a hand-stitched look.
But, if hand sewing’s not for you or you simply don’t have the time, this tutorial will show you what you need to know. I should mention that this is only one way to machine bind; there are other methods available.
The first step is to attach the binding to the front of the quilt once it’s trimmed. To begin, place the binding on the quilt top aligning the raw edges. Mark where you will begin sewing, leaving an 8-10″ tail.
I usually start at the center of the bottom edge. It doesn’t really matter what edge you begin with, but make sure you start near the middle to allow yourself enough room to work when finishing off the binding. TIP: Don’t start in a corner. 🙂
Since a 1/4″ seam allowance is required, I like to use my 1/4″ foot because of its consistency and accuracy. If you use a 1/4″ foot, make sure to set your needle to the correct seam allowance before starting. Other options are to use your favorite foot and follow a guide; it’s up to you.
Once you’re set up, begin sewing by taking a few stitches then backstitch to secure the binding in place.
Continue sewing until you reach approximately 1/4″ from the side’s end. Stop. Leaving your needle down, lift your foot and pivot the quilt corner so you can sew on an angle toward the point. Sew to the point, stop and cut the thread.
Next, fold a tuck in the binding, lining up the top edge flush with the quilt edge, also aligning the side.
Begin sewing at the tucked end and continue along the entire side. Stop 1/4″ away from the side’s end, as above, repeating the same process each time you get to a corner.
By doing this, you’ll have nicely mitered edges when your binding is finished. 🙂
When all three sides are complete and you are nearing the beginning tail, stop sewing about 8-10″ from the end. Cut the threads and take your quilt out of your machine. Place the beginning/ending area of the binding on a flat surface.
Stretch out the beginning tail, overlapping the end tail on top. This is where you’ll finish off the binding by joining the beginning and end.
It’s time to do some measuring. From the end of the beginning tail, measure 2 ½” onto the end tail. Mark a line. The rule of thumb is to measure the overlap as wide as your binding. For example, my binding is 2 ½” wide so I marked at 2 ½” on the end binding strip. If you made your binding 2 ¼” wide, then mark at 2 ¼”. It will look like this…
Cut on the marked line.
The next step is to sew the two ends together using the same method as making binding. First, flatten out both ends. Place the left hand end over the right hand end, forming a cross. Leave about 1/8″ overhang at each end.
On the top binding strip, draw a diagonal line from the TOP RIGHT corner to the LOWER LEFT corner, as shown below. Pin. Sew on the line.
Next, trim 1/4″ away from line and press the seam open (finger pressing works fine).
Flatten out the binding and it should fit perfectly!
To finish, start sewing where you left off and continue until you meet the beginning stitches. Congratulations, your binding is now attached!
To keep everything neat, trim the threads around the entire quilt. Once they’re trimmed, fold the binding over to the back and clip in place.
The last step is to sew down the binding…but before doing so I always run a single-thread basting stitch, removing the clips as I go.
Sure, it’s an extra step but I find it’s much easier to have the binding secured in place rather than trying to sew it down while removing clips. You can choose to skip this step, but it does give a nice, even finish that’s well worth the extra time. 🙂 TIP: Use inexpensive thread as it’s going to get discarded.
Once the binding is basted, it’s time to sew it down by machine. I use my ditch quilting foot, also known as a Stitch-in-the-Ditch foot, because I get accurate results and it works great!
Before sewing, you’ll have to decide on thread color first. This can be tricky; if the binding is a different color than the border, you have to chose thread to match either the border or the binding. Since the stitches will be seen on the front, I don’t want them the same color as the binding and vise versa. So, as unconventional as it may seem, I’ll use two different thread colors. Odd, right? But it does solve the problem! I’ll use one thread to match the border and the other (my bobbin) to match the binding. Once the thread’s decided, it’s time to sew.
Starting at the bottom (where you initially began), line up your guide with the binding seam or the ditch. The needle will be about a needle’s width away allowing the stitches to catch the binding on the back nice and close to the edge.
Sew all the way around until you come back to the beginning. And you’re done! Don’t forget to remove your basting stitches.
front of quilt binding
back of quilt binding
It looks great, doesn’t it? Now that all the work is done it’s time to enjoy your quilt!
There’s no doubt flying geese are essential to quilting and they’re fun to experiment with. They give quilts an interesting perspective and can be addicting to make once you get started.
If you’re new to quilting or having trouble with your flying geese blocks, here’s an easy tutorial on how to sew an accurate flying geese unit that won’t need squaring up.
To get started, cut fabric to the required sizes. You’ll need a rectangular piece for the background and two squares for the sides. The flying geese I made in this tutorial are based on the measurements below.
Once your fabric is cut, draw a diagonal line on the wrong side of both side squares. Place a marked square on the right hand side of the rectangle, as illustrated, lining up the outside edges. Pin together.
NOTE: You can choose to sew the first square on either the left or right hand side, there will be no difference in the outcome.
The next step is sewing the pinned pieces together. But before sewing, be sure to follow this important tip…instead of sewing directly on the drawn line, sew just along side of it.
And here’s why. By having sewn along side of the drawn line, it frees up about a thread’s width of space so when you press the fabric to the corner, the new piece will line up accurately. That small width might seem minor, but it can make all the difference in your finished unit.
Here’s how to set your foot and needle before sewing…
And this is what it looks like sewn just to the right of the line…
A rule of thumb to follow is to sew to the right of the drawn line for the right hand side of the flying geese unit and sew to the left of the line on the left hand side of the unit.
Once you’ve finished sewing, cut ¼” away from the sewn line. Press the square to the corner.
Your results will be a nicely aligned corner. 🙂
To finish your flying geese, repeat the same steps for the opposite side. Place the fabric with the drawn line as shown. Pin.
Sew just along side of the line.
Cut away the corner and press.
And done! A finished flying geese with no trimming required. 🙂
Simple, right?
I made my blocks for a Swoon quilt I have in the works. If you’re making several for a project, they can be chain pieced, one side at a time. It’s a great time-saver.
Now that you’ve added the traditional flying geese block to your quilting repertoire it’s time to experiment and have some fun!
It’s been a while since I’ve posted anything for my Quilting 101 series so I figured it was time for a revisit.
Recently I created an easy-to-read downloadable PDF Conversion Chart for converting your fabric from inches to yards, yards to meters—whatever way you need! It’s definitely a time saver.
I find this chart especially useful for fabric you already have on hand. Sure, you can always order a specific amount but when you need to know if you have enough for a pattern, this is the perfect resource. And it allows you to skip the mental math!
I really enjoy posting for my Quilting 101 series and I like passing along information to beginner quilters as I know how much I appreciated it when I started. I’m always looking for topics, too. If you have anything you’d like info on, let me know and I’ll do my best to make an informative post.
When I started to quilt, some of the quilting language had me really confused. Everyday words referring to animals, winter and food with a quilting-related meaning….huh? It just didn’t make sense. If your experience is one of the same, this post will help clarify some of the terminology used that has other meanings.
I chose my top ten favorites, or I should say, my top ten most confusing quilting terms. 🙂
1. Dog ears – Dog ears are those small pieces of fabric that appear in quilt block corners and edges when two triangular pieces are sewn together—results of a diagonal seam. Always trim dog ears before finishing a quilt block.
2. Feed dogs – The feed dogs are the metal teeth located in the slots in a sewing machine’s needle plate. Feed dogs are comprised of metal bars, crosscut with diagonal teeth that move back and forth; they grip fabric and pull it through the machine and away from the needle.
3. Flying geese – Flying geese is a traditional quilt block pattern created by sewing a triangle at each end of a rectangular piece of fabric, forming a peak in the middle. Finished flying geese blocks resemble geese flying in formation, hence the name.
4. Nesting seams – Seams that line up precisely at an intersection of a block or quilt are known as nesting seams. To achieve nesting, press seams in opposite directions to reduce the bulk created by the seam allowance.
5. Snowball – The snowball technique is used when a quilter chooses to give a square a rounded effect (like a snowball). To achieve this result, the quilter draws a diagonal line on a background fabric square (white or light colored), sews on the line, cuts away the corner and presses back the triangle. This process can also be done in reverse, using a central white square and a color triangle in the corner.
Preparation to snowball a corner
Snowballed corner
6. Quilt sandwich or sandwiching – Sandwiching is assembling the quilt top, batting and backing, then securing the layers together by basting with either quilting pins or glue–readying it for quilting. The batting and quilt backing are always cut a few inches larger than the quilt top to allow for fabric shifting while quilting.
7. Chain piecing – Chain piecing is sewing together squares in one continuous length of thread instead of sewing piece by piece. This method saves time and is popular among quilters. Once multiple squares have been sewn in a strand, the thread is easily cut to separate individual pieces.
chain piecing
8. Sashing – Sashing is a strip of fabric sewn between blocks on a quilt top. It gives a windowpane effect and shows off blocks individually. Most often lighter-colored fabric is used for sashing to make the other colors pop. As a variation, sashing can be used to contrast quilt block colors.
9. Stitch in the ditch – Stitching in the ditch is a technique where the quilting stitches on the quilt top are minimized by quilting ‘in’ the seams that were created when the quilt blocks were pieced together. Using a specialized foot helps makes this process neater with more accurate results.
10. Fussy cut – A fussy cut is used when a quilter wants to showcase a specific section or element of a fabric pattern, e.g. a flower, an animal, etc. A fussy cut should always include a seam allowance.
I hope this blog post helped clarify some quilting terminology confusion.
I plan to continue my Quilting 101 series with my next post delving into the variety of precut fabric.